Jay’s Baked Ribs Recipe

I’m a Texas girl at heart. I love meat, and I love BBQs. That’s how you can win me over. Easy!

Now that I’m in the Bay Area, I reminisce those days I ate at Rudy’s, and Salt Lick, and Franklin’s. I definitely took it for granted when I lived in Austin because BBQ was so easy to come by. It’s just not the same here.

But when I crave those things, I usually make something at home to satisfy. For instance, this week, I’m having a dinner party for friends, and I know the perfect thing to cook. Ribs! Who doesn’t love lip-smacking, juicy, fall off the bone, BBQ ribs?

Close up of ribs

At Costco, you can purchase 3 racks of ribs for about $25 dollars. Perfect for a dinner part of 6-8 people! With a few sides, like a salad, cornbread, potatoes, and corn, that’s the perfect Southern meal.

Here’s my easy peasy rib recipe. I’m not lying when I say simple.

Jay’s Baked Rib Recipe (3 ingredients only)

Ingredients:

  • Dry pork rub (Find one at the grocery store. It need not be expensive)
  • Pork ribs
  • Your favorite BBQ sauce

Directions:

1. Preheat your oven to 300° F.
2. Peel off the membrane that covers the boney side of the ribs. The hardest part is finding an edge to start peeling, but once you do that, it should come off fairly easily. Look at corners for a piece to grip and peel. Otherwise, I like to cut the membrane with a knife between two bones and start to peel from the middle.
3. Now apply the rub on the front and back of the ribs. Be generous with the rub and coat evenly.
4. Lay the ribs on foil, meaty side down, and shiny foil out. Add another layer of foil on top and bottom and crimp the edges together.
5. Place the ribs onto a baking sheet and bake for 2-2.5 hours.
6. Remove from the oven, and put oven on broiler on high.
7. Cut ribs into serving sizes and brush on the BBQ sauce on every side of the ribs. Be super generous!
8. Place the ribs into the broiler, meaty side up and broil for 5 minutes, or until the ribs are charred to your liking.
9. Enjoy! And lick those fingers clean!

Membrane

Broiled

Done

Seriously so delicious! It really falls right off the bone.

Another option for this recipe is to grill the ribs instead of broiling. Gives it that yummy grilled taste. To keep things simple, because after smelling cooking ribs for 2.5 hours, I just use the broiler so it can get into my mouth quicker!

Craving ribs now? What are some of your favorite BBQ places to eat? Any recommendations for BBQ in the Bay Area?

I want my baby back, baby back…
Jay

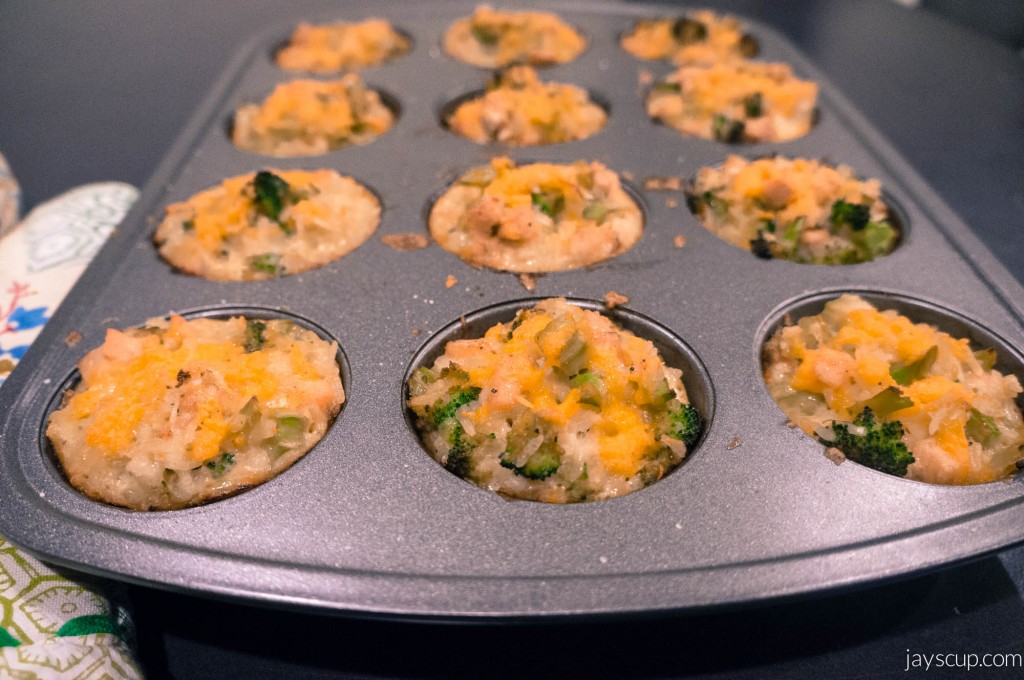
Baked Broccoli Chicken Rice Cups

I love baking!

Not just sweets, but savory foods too. I absolutely love making things in muffin pans. So easy to take on the go and to give away as treats too. It’s my new favorite thing to do!

I recently made some baked broccoli & chicken rice cups (with lots and lots of cheese) that I must share with you! Scrumptious little things!

Baked

It’s really the perfect recipe because I always have leftover rice in the fridge. I seem to always make too much of a starch since it expands. I make too much pasta. I mash too many potatoes. I cook too much rice. I could feed a family of 10! In my case, MG and I have leftovers for a week. Oops! Does that happen to you too? What’s a good trick/tip to measuring the right amount?

Anyway, back to these little cups! It’s a really simple recipe (5-steps), and I promise you’ll eat more than one!

Ingredients:

  • 2 cups of cooked white rice
  • 1 medium broccoli crown
  • 1 chicken breast, cooked and diced
  • 1/2 cup chicken stock
  • 1/4 cup ranch salad dressing
  • 2 eggs, beaten lightly
  • 3/4 cup grated cheese (I chose cheddar, but feel free to use your favorite kind)
  • 1 teaspoon of garlic salt
  • Salt and pepper, to taste

Directions:

1. Preheat the oven to 350° F.
2. Cut the broccoli crown into smaller than bite-size pieces, then cook the broccoli either by steaming or boiling. I like to do a quick boil (3-5 minutes tops). Drain the broccoli and set aside.
3. Mix together all the ingredients, but only half the cheese.
4.  Fill each of the muffin pans with the mixture, and sprinkle the remaining cheese on top.
5. Put the pan into the oven for 25-30 minutes, until the tops are golden brown and crisp.

Once the cups are ready, scoop each out and serve! Eat away!

MixMixing it all together

RawReady to go in the oven! 

Close up
Cooked and ready to be eaten

Final
Perfect cups! ^^^

Is this something you can do? What are some other recipes that you’ve come across/made in a muffin pan?

Happy eating,
Jay