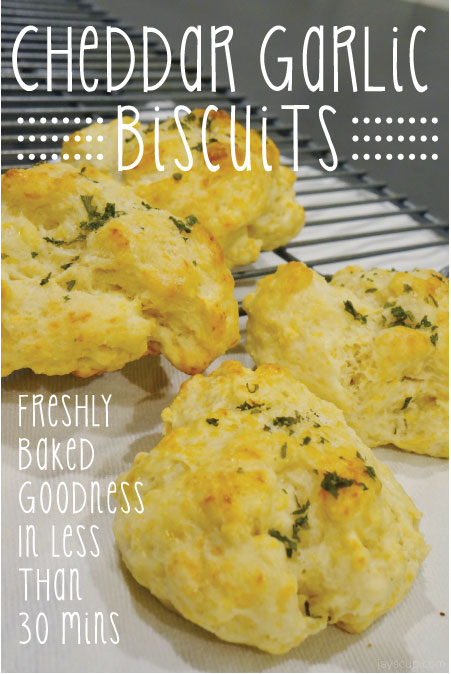
Cheddar Garlic Biscuits

Today in the Bay Area, it finally feels like Fall. Gloomy weather, a little bit of rain, and colder temperatures. It’s one of those days where it’s hard to get out of bed.

But one thing that does help is heating up the oven to warm up the house and making some freshly baked goods. I purchased buttermilk to make cake last week, but since then, I’ve just had buttermilk sitting in the fridge. I hate when things go to waste, so I decided to make some delicious buttermilk biscuits! To make it even yummier, I added garlic flavoring and freshly grated cheddar.

Biscuits Cover

I’ve been told they taste like the ones from Red Lobster (I have to admit, I’ve only been there once, a long time ago, so I don’t actually know!). But I know people love the biscuits there, so I take it as a compliment! I’ve even been asked from a few people for the recipe so here it is!

Ingredients:
12 biscuits

  • 2 cups all-purpose flour
  • 2 teaspoons baking powder
  • 1/2 teaspoon garlic salt
  • 6 tablespoons of cold, unsalted butter, cubed
  • 6 ounces of freshly grated sharp cheddar cheese
  • 3/4 cup of buttermilk, cold (can be substituted with whole milk)
  • 3 tablespoons of melted butter (for brushing on)
  • Dried parsley (for sprinkling)

Directions:

  1. Preheat the oven to 450°F. Line the baking sheet with parchment paper.
  2. In a bowl, mix together flour, baking powder, garlic salt. Using your hands, mix the cubed butter the flour mixture until flour is able to form crumbs. Mix in the cheese. Add the buttermilk. Combine thoroughly.
  3. Drop the dough into 1/4 cup portions and bake for 16-18 minutes, until golden brown.
  4. Take the biscuits out of the oven, brush on the melted butter, and sprinkle the parsley. Serve these little delights warm.

Final

These treats take less than 30 minutes to whip up. Your home will smell deliciously of biscuits! Your belly will be filled with warm garlicky goodness! Promise you won’t be able to eat just one. Flakey. Crisp on the outside. Fluffy in on the inside.

If you’re lucky enough to have leftovers, put them in the fridge and heat them up for 10 seconds in the microwave. It’s just as tasty!

What do you think? Is this something you can make?

Noms away!
Jay
—–
Recipe adapted from Handle the Heat

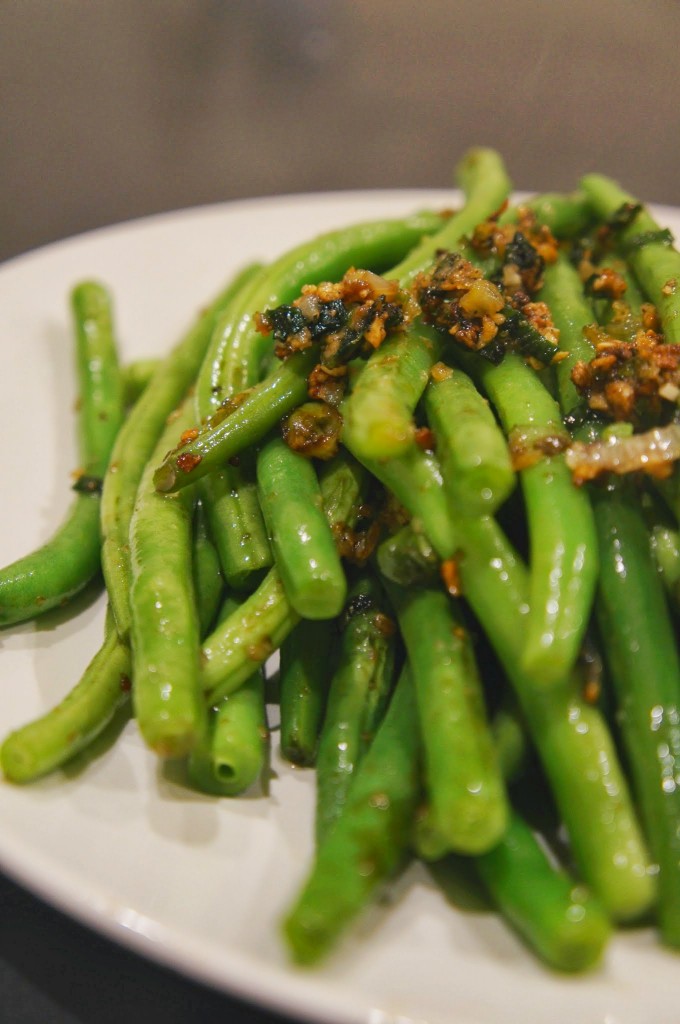
My Favorite Asian Green Beans

If you haven’t noticed yet, I’m big on cooking at home. Now only does it save money, it’s also always a healthier option. When you cook, it’s less oil, less butter, and less fat since you’re in control on the ingredients.

I almost always have a side of veggies with every dinner meal. Because I grew up in a Chinese household, there’s always been a variety of foods on the table to be eaten family style. Usually our house had one meat dish and two different plates of vegetables, and of course rice, for a family of four. So I love variety when it comes to dinner. When I cook for two, I always have one meat dish and one veggie dish (we try to go without rice too). This week I’ll share with you a meal that I cook for MG and myself (chicken and veggies). We’ll start out with the veggie dish first – green beans!

Green beans

Green beans are my favorite vegetable. I love the crunch of the bean and the squeak between your teeth when eating. I basically always make this recipe when I have green beans – it’s my go-to! It’s Asian because of the soy sauce and oyster sauce, and the sauces make the beans extremely tasty. Another big plus, it’s a 3 step dish!

Ingredients:

  • 16 oz package of green beans
  • 5 cloves of garlic, minced
  • 1 green scallion, chopped
  • Soy sauce
  • Oyster sauce
  • Sesame oil
  • Olive oil for cooking
  • Salt and pepper for taste

Directions:

1. This is my tip: steam or boil the green beans first so they cook faster! I like to boil because it only takes 5-7 minutes. Then drain and set aside.
2. Add a teaspoon of olive oil to a pan on medium-high heat, and cook the garlic and scallions until crisp and golden, but not burnt. Now add the drained green beans to the pan – I love the sizzle in this process!
3. Sprinkle salt and pepper, add a teaspoon of soy sauce, a teaspoon of sesame oil, and a tablespoon of oyster sauce. Mix it into the beans until beans are thoroughly coated. Serve right away!

Ginger and scallions

Sprinkle seasoning

Oyster sauce
Get this at any Asian market – it’s also delicious just eating it with rice!

Beans
Those crunch garlic/scallion clumps are deee-li-ciousss ^^^

All done
Yeah, we basically licked up all the sauce!

What’s your favorite vegetable? Do you have any veggie recipes to share? I’m always on the lookout for new vegetable recipes!

Stay tuned on Friday for my chicken recipe to pair with the green beans!
Jay

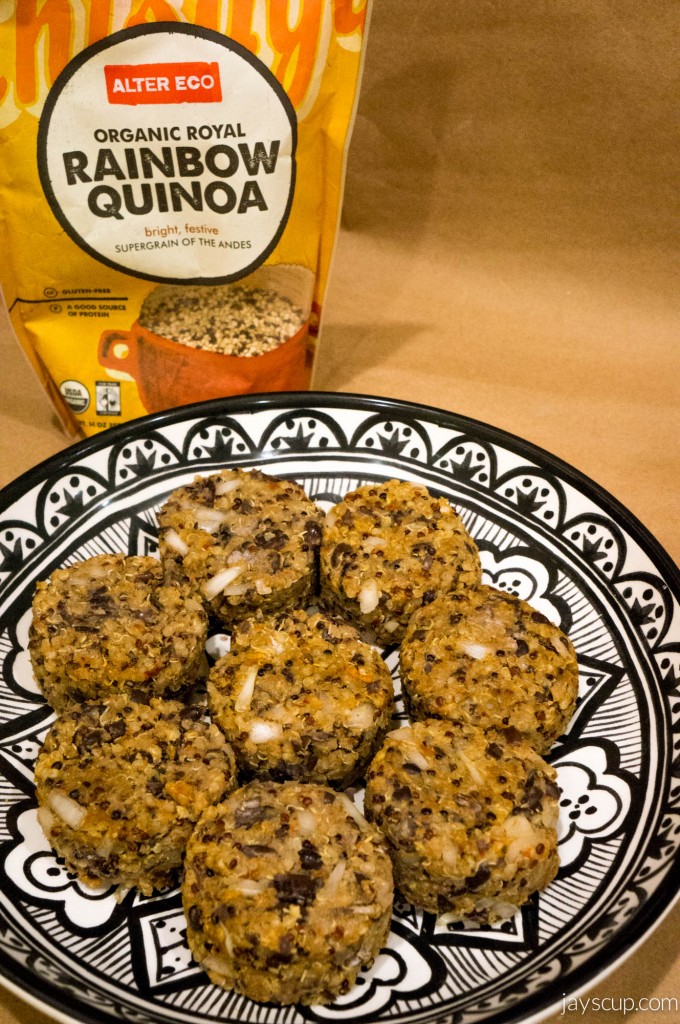
A Different Kind of Slider & Fries

MG and I are still going strong on our healthy eating (healthier living post), granted it’s only been a week. We are loving the foods that we consume, and the best part is that we don’t hate ourselves after a meal. Speaking of meals, I have created a variation of your typical slider and fries, Quinoa Sliders and Eggplant Fries with a Side of Garlic Aioli. It sounds a bit crazy, I know. But it’s scrumptious! Here’s the recipe for the quinoa patties:

Quinoa patties
Quinoa from my Trade as One subscription!

Ingredients:

  • 1/4 cup of quinoa
  • 1/2 cup of chicken broth
  • 1 can of black beans (rinse, drained, and mashed with a fork)
  • 1/2 cup of bread crumbs
  • Half and onion, chopped
  • 1 clove of garlic (minced)
  • 1 1/2 teaspoons of cumin
  • 1/2 teaspoon of salt
  • 1 teaspoon of hot sauce
  • 1 egg (beaten)
  • Olive oil for cooking

Quinoa patties cooking

Directions:
1. Boil the quinoa and chicken broth in a pot. Reduce heat to medium-low, cover the pot, and simmer until the broth has been absorbed and the quinoa is as tender (about 15 minutes). If you want the quinoa to be more tender, add some more broth and continue to cook until broth is absorbed.
2. Mix the cooked quinoa, mashed black beans, egg, bread crumbs, onion, garlic, salt, hot sauce, and cumin together. I like to use my hands!
3. Form patties by scooping up the mixture in a 1/4 measuring cup.
4. Heat up the olive oil in a large skillet, and place the patties onto the pan. Squish the patties with your fingers just a bit to thin them out.
5. Cook the patties thoroughly (about 2.5 minutes on each side).

Quinoa sliders!

With the quinoa patties, I made sliders by using sweet Hawaiian Bread. The sliders are low-carb because I’m using half of the bread roll. Spread mayo, ketchup, and mustard on the bun, add some spinach then the patty, and finally sprinkle some cheese on top. Mmmm Mmmm Mmmm!

Of course with sliders, you have to have fries! I came across a recipe for eggplant fries, and I had an eggplant laying around. How perfect is that? I tweaked the original recipe a bit because I only had dried herbs. These things are so good, I want to make them for snacking!

Eggplant Fries

Ingredients for eggplant fries:

  • Medium-sized eggplant
  • 3/4 cup all-purpose flour
  • 1 teaspoon garlic powder
  • 1/2 teaspoon dried oregano
  • 1 teaspoon dried rosemary
  • 1 teaspoon dried parsley
  • Salt and pepper
  • Oil for frying

Garlic aioli (1/2 cup): Mix all ingredients below and chill for 30 minutes before serving.

  • 2 cloves garlic, minced
  • 1/4 cup and 2 tablespoons mayonnaise
  • 1 tablespoon lemon juice
  • 1/4 teaspoon salt
  • 1/4 teaspoon black pepper

Instructions for eggplant fries:
1. Peel eggplant and slice it into sticks. Salt the eggplant sticks generously and let them sit for about 30 minutes. This osmosis process helps take out the bitterness of eggplants. Afterwards, rinse the eggplant with cold water and dry them with a paper towel.
2. Combine the flour and all the seasonings.
3. Then cover each eggplant stick with the flour mixture.
4. Heat oil over medium heat in a deep pot, and fry the eggplant in small batches until golden (about 2 minutes).
5. Remove the sticks from the oil, and place them onto a paper towel. Sprinkle with some pepper, and serve hot with garlic aioli.

If you make this for a dinner party, I bet you they will be surprised that it’s so healthy! I know my guests were!

Enjoy your meal,
Jay
—–
Original eggplant fries recipe
Original aioli recipe