DIY: The Ultimate Wire Holder

On this episode of hoarders…

Do you have a wire hoarder as a significant other as well? After I got married, I moved into my husband’s place. As I started to unpack my crafts, I found bins and bins of wires. Wires galore! TV cables, electronic wires, headphones, chargers, lions, tigers, and bears! I knew I married a techie; I didn’t know I married a wire wholesaler.

Wire hoarder
Organizing the large cables

Wires/ChargersMore cables!

If you have a significant other like mine, then I have the perfect Valentine’s gift idea for you. It’s an easy weekend project. If you’re the wire hoarder, then treat yourself to this organizer.

DIY Project – The Ultimate Wire Holder

Displayed

What you’ll need:

  • About 77 poster tubes 2″ in diameter and 6″ in length or 30″ in length so you can cut your desired length yourself
  • Hot glue
  • Crate (ask someone at the local farmer’s market for a crate)

Line up tubes 7 in a row (or until the row reaches the end of the crate). Line the second row in between the first. See the diagram below:

wire-holder-instructions

Second step, glue the tubes together. I glued the tubes inside the crate as I worked so that I know exactly how many rows I can make. My crate was able to hold 11 rows, 7 in a row.

Once the glue is dry, start organizing your small cables, chargers, headphones, etc.

Cut
I actually bought kraft tubes in 30″ length and we sawed each of the tubes into 6″ inch lengths. This is a lot of work! Next time around, I am simply going to purchase the 6″ tubes.

Stacked
Lined up and glued in the crate

Done
Organized and displayed on MG’s table top

Organized
Reminds me of honeycombs (just a little?)

Organized

MG and I put shoelaces, extra car keys, iPod cases, headlamps, Krazy Glue, basically anything that can fit into the tubes. Or you can put your paws in…

Chubs
“My Box… Muahaha!!!”

Isn’t this a perfect gift for a crazed wire collector? How do you organize your cables and chargers? What are some other ways you’ve seen people organize?

What are you getting for your loved one for Valentine’s Day?
Jay
—–
Buy kraft tubes at Uline here

From Wallpaper to Paint

I’m super proud to unveil one of my most recent projects on the blog today!

BEFORE:

Before

AFTER:

Final

Since I’ve been home in Sugar Land, I decided to update the bathroom in my parent’s house. I set out thinking this DIY would be a week long task. But because I’d like to have Glass Doors to make it more appealing.

After doing research about interior painters in Cincinnati, it seemed removing wallpaper and hiring a professional painter would be a breeze – Score the wallpaper and make holes throughout the paper, penetrate the paper with anti-adhesive solution, peel, and then primer and paint. Seems easy right? One thing you can do is, you can contact this house painter to get help.

WRONG. That’s only true for plastered walls.

Apparently, houses built in the 90s glued wallpaper directly onto drywall. Builders did not expect homeowners to switch out wallpaper (ill thought out). For those of you who are reading and don’t know about drywall, drywall is plaster between thick sheets of paper. Trying to “unglue” wallpaper from paper is an extremely difficult task. I set out to do a nearly impossible assignment. All the trash residue from such a makeover can be disposed with the help of services like rubbish collection dublin.

Because the wallpaper is glued on drywall, our project became this: peel wallpaper and be careful to not damage the drywall to badly, spackle the drywall damage then dry, sand down the walls to make it even, primer and another day to dry, texturize the walls then dry, sand to even out the texture, primer again and dry, and finally paint and allow for it to dry. 8 total steps but with 5 days of drying in between jobs. This project became a 2 week task with multiple trips to Home Depot.

Removing
Here’s Katie (my sister) and Baldwin peeling off wallpaper

Removing
See the dark spots on the wall? That’s damaged drywall

Removed
See the difference between drywall and plaster?

Removed
The drywall is so badly damaged… ouch

But Ming-Gih saves the day with spackle. It’s smoothed onto your walls and evens it out if there are dents or damage.This stuff goes on pink and drys white so you know where you’ve spackled – it’s called DryDex.

Plaster
Lots of damage ^^^

After the spackle drys, the dust storm hits. Wear a mask and I promise you’ll still get white boogers.

Sanding

Sanded
I’d be a cute grandma right?

Then we have to primer!

Prime
Had a little helper this time around ^^^

And then texturize

Texture

Then sand and primer again (but no need for pictures since you get the idea). We took guidance from the local business Elite Finishing

Finally, paint and install the new toilet! You can visit the page here to find more interesting insights into home renovation and door installation.

Color
This is Behr’s Pastel Jade. My sister claims she dreams in this color

PaintAlmost there ^^^

Done
Toilet in and working!

BEFORE image of the bathroom:

Before

AFTER image of the bathroom:

Final

Curtain
Gorgeous shower curtain with peacock rings (all by Threshold from Target)

Unit
This storage unit was from a garage sale for $10, and the elephant was an awesome steal for $5 at Target.

How perfect is this color palette?

Color Palette

What do you think of the update? What kind of projects are you working on?

Love,
Jay

DIY: Jeweled Frames

I’ve come across some super cute jeweled frames, especially from Z Gallerie. Look how pretty these are!

Jeweled Frames

Too bad they range from $18-40. Wah. wah. wah. That’s more than what I’m willing to spend.

This only means one thing! It’s time for a DIY! For under $5, you can make jeweled frames.

frame 1

Materials:  frame, paint, E-6000 craft glue, and mosaic tiles

Simply paint the frame and let it dry overnight. Then align the tiles, and glue each piece to the frame.

Similar mosaic tiles here.

Frame 2

Materials:  frame, E-6000 craft glue, beads, and spray paint.

For this frame, I purchased silver beads. I first aligned the beads and glued them onto the frame. Next I removed the glass, picture, and picture mat, then sprayed paint the entire frame with the beads white. Let it dry overnight.

Similar beads here.

Frame 3Here’s a different design for our bookshelf.

I like the juxtaposition of the tiles and beads. Each one has a personality, and every piece doesn’t match in size, shape, and alignment. Put your favorite photo of you and your friend and it will make for a great Christmas gift!

Is this a project you can do? What would you use these frames for? I actually used these frames to display my engagement pictures at my wedding.

DIY away!
Jay

Also check out my revamped frames from JCP for the house!
—–
1  //  2  //  3  //  4

DIY Wine Bags & Giveaway!

Congratulations to Connie for winning this giveaway! Please check your email for shipping information. Thanks to those who participated. It’s an easy DIY, so you can still own these wine bags!

—–

I love making gifts for people. I enjoy spending time getting creative and thrifty! Since Christmas is coming up, I’ve been busy coming up with ideas for presents. Repurposing things for gifts is my hobby. That’s a hobby right?

For instance, I love using paper grocery bags for gift wrap. I like using string or baking twine for bows. It’s also time to bust out those cassette tape pom poms!

Since my wedding, I’ve had a bunch of burlap laying around. While I was drifting off to sleep, I came up with the idea of making wine bags with the burlap (I tend to come up with the best ideas while I’m about to fall asleep. I have a journal to jot down my thoughts since I’ll wake up and totally forget). These make fantastic gift bags, and it’s great if you’re hosting a wine tasting party!

Tis the season of giving, so here’s another giveaway! Just comment on this post for a chance to win.

Bags

Materials:

  • 60 inch width by 30 inch length sheet of burlap
    • As long as you have 10 inch width by 30 inch length for each bag, you’re good to go
  • Scissors
  • Iron
  • Sewing machine
    • For the no sew approach, you’ll need double sided tape
  • Ribbon

Burlap
You need burlap, minus the cat! For some reason kitties love burlap

Here’s the tutorial:

DIY Wine Bags

CRAFTER’S TIP:

  • Burlap can be hard to manage. What I typically do to ensure I’m cutting straight is take one strand of burlap and pull the entire string through. It will create a straight line to serve as a cutting guide (numbers 2 & 3 in the tutorial above).
  • For the new sew approach, use double sided tape to tape down the edges after ironing.

For the mystery tasting party, each wine was put in the burlap bags so that all labels and types were hidden. Guests were asked to taste each and rate aroma, body, taste, and finish. After adding up the scorecard, you find out which wine you like most. It’s so fun when you find out that sometimes the cheapest wine is actually your favorite!

I created a scorecard for the wine tasting party. Feel free to use this template! Download it here.

Pens
Scorecards and pens, with glasses ready to go

Cheese
Cheese is necessary on any and every occasion

Bottles
Wine bags are numbered and hidden

PartyEnjoying at this point!

Tasting

For a chance to win three wine bags, comment on this post!

Cheers!
Jay
—–
Only one entry per email. Email must be valid. Shipping address must be in the United States. This giveaway ends at 11:30pm PST on 12/10/13. Winner will drawn and announced on Wednesday, 12/11/13 at 12:00am PST via blog and email provided.

DIY Dainty Tube Necklace (Giveaway)

UPDATE: Congratulations to Danielle at bybegnaud.blogspot.com! You’re the winner of this drawing!

Thanks to everyone who participated. You can still flaunt this gorgeous necklace with the DIY instructions below. Stay tuned for more giveaways!

—-

Another dainty necklace DIY and giveaway!

I am loving these pretty little things. There’s so much love that I just want to give things away! Perhaps I’m already in holiday cheer. Comment on this post for a chance to WIN.

Tube Necklace

What you’ll need (and where to buy at the end of the post):

Here’s the step by step tutorial:

DIY Tube Necklace

What do you think about this piece? Is this something you can do?

Necklace

So feminine and flirty! Plus, you could wear this with any outfit!

I’m also loving the layered look. I layered this tube necklace with the necklace from last week’s post (dainty beaded DIY here).

Layered

It’s almost the holidays. Start DIY-ing and getting those presents ready to give out to friends and family. These would be great gifts with a nice personal touch.

Don’t forget to comment on this blog post for a chance to WIN a necklace.

Loving dainty and pretty things,
Jay

Only one entry per email. Email must be valid. Shipping address must be in the United States. This necklace giveaway ends at 11:30pm PST on 11/19/13. Winner will drawn and announced on Wednesday, 11/20/13 at 12:00am PST via blog and email provided.
—–
Gold filled curved noodle tube bead
Wire Cutter & Pliers on Amazon (similar set to mine)
Gold chain from Amazon
Eye pin, lobster claw clasp, and jump rings from Michael’s

DIY Dainty Beaded Necklace (Giveaway)

Contest has ended. See winners here.

—–

I am in love with dainty necklaces right now! Don’t get me wrong, I do love a chunky statement necklace, but delicate jewelry can match so many different outfits, on casual days or with a fancy attire. It’s so girly and so fun!

Dainty Necklace

Here’s a tutorial on how to DIY a dainty beaded necklace. You can also WIN one of these necklaces by commenting on the post below! Simply tell me what you would wear this necklace with. Boys, win a necklace for your lady friend by telling me what you would like to see her wear this with (betcha you’ll win some serious brownie points!).

What you’ll need (where to buy at the end of the post):

Here’s the easy tutorial:

DIY Dainty Beaded Necklace

What do you think about dainty jewelry pieces? Is this something you can recreate?

Beaded Dainty Necklace

Don’t forget to comment on this blog post for a chance to WIN a necklace. What outfit would you wear this dainty necklace with?

Get to DIY-ing,
Jay

Only one entry per email. Email must be valid. Shipping address must be in the United States. This necklace giveaway ends at 11:30pm PST on 11/12/13. Winner will drawn and announced on Wednesday, 11/13/13 at 12:00am PST via blog and email provided.
—–
Small gold plated round beads
Wire Cutter & Pliers on Amazon (similar set to mine)
Gold chain from Amazon
Eye pin, lobster claw clasp, and jump rings from Michael’s

Annual Pumpkin Carving Party

I love the Fall/Winter season. For one thing, the weather gets colder so warm and comfy sweaters and boots. Secondly, the holidays – Halloween, Thanksgiving, Christmas, and New Years.

It’s Halloween this Thursday! Halloween has always been one of those holidays where my parents decorate the house so the Fall/Winter fun kicks off on 10/31. Now that I’m married, MG and I get to start our own annual traditions. The pumpkin carving party started last year, and I really hope to continue this event year after year. We go to the pumpkin patch in the morning with friends, pick out our pumpkins, head home to rest a bit and snack on treats, then start the carving!

This year I decked out the decorations for the carving party. Our closest friends joined us, and we had a great time!

Holly, David, and I went to the patch together to pick out our pumpkins at Pastorino Farm and Lemos Farm in Half Moon Bay. MG wasn’t able to go since he had a bachelor’s party this year. It was the perfect day – some wind and lots of sun! We got there early too to avoid traffic. It’s always a joy to watch little toddlers running around while parents are trying to get pictures of them in the patch. Guess that will be me one day!

Here are some fun pictures from my iPhone. Sadly my camera died right before we got to the patch (newbie mistake)!Pumpkin Patch

Special thanks to David for the next three pictures! Glad someone’s camera was working!

Pumpkin Patch

Pumpkin patch

Holly and me
Do you go to the pumpkin patch every year? What do you like to look at?

Look at our carved pumpkins!

Carved PumpkinsWhich one do you like best? What did you carve this year?

Carvers

Carved PumpkinsSo pretty when lit up! I sprinkled some cinnamon on the lids before lighting the candle. My house smells awesome!

Messy
W
e collected all the ooey-gooey-ness and cleaned off the seeds and made….

Roasted Pumpkin Seeds!

Roasted Pumpkin Seeds
Wash and dry your seeds. Add two tablespoons of melted butter, sprinkle garlic seasoning, pepper, and salt. Then roast them for 45 minutes at 300°, turning the seeds over every 15 minutes for an even roast. So crunchy and delicious!

To make things more fun, I adorned the house with some low cost, easy to do decorations!

Webs
Done over and over again, but definitely adds to the setting!

Mice
I found some cute mice wall decals at Target for $5 a pack (10-15 mice decals)

Zombie blockade
I’m really proud of this zombie blockade! I found a cardboard box and cut it into strips, then used a Sharpie and drew wood grain. I cut out hand silhouettes from poster and spray painted them black for the zombie hands. Looks really cool over a window or a fire place! What do you think?

Stairs - Zombie
I cut out and spray painted some extra hands and taped them against the banister so that it looks like zombies are reaching out to you as you walk up the stairs. It actually took 2 days to adjust to this because looking from the bottom of the staircase, it’s a bit terrifying.

Zombies
Here’s an up-close shot

As I was spray painting the hands against a cardboard, the outlines turned out to be a pretty cool backdrop.

Zom HandsI placed this against a wall for some extra effect

Lastly, Halloween themed food is one of my favorite parts of this holiday!

Chex Snacks
Chocolate covered Chex with Candy Corn and Reece’s Pieces. This is such an easy to make snack! Melt semi-sweet chocolate chips in the microwave, add a teaspoon of vanilla extract and mix into Chex evenly. Then add 3/4th cup of powdered sugar and evenly coat (I like to shake them in a Ziploc).

Eyeballs
Blood shot eyeball deviled eggs. Use a toothpick and red dye to draw veins, use green coloring in the mashed up yolk, and olives for the pupils.

Spiders
Spider deviled eggs with olives

Cupcakes
Owl and brain cupcakes! The owl’s eyes are Oreos with Reece’s Pieces. Aren’t they so cute?

Brain CupcakeBrain cupcakes! Red velvet cake with strawberry filling/guts. Yum

Do you celebrate Halloween? What is your annual Halloween tradition? Anything you want to try from this post?

Happy Halloween!
Jay

Revamped Storage Unit

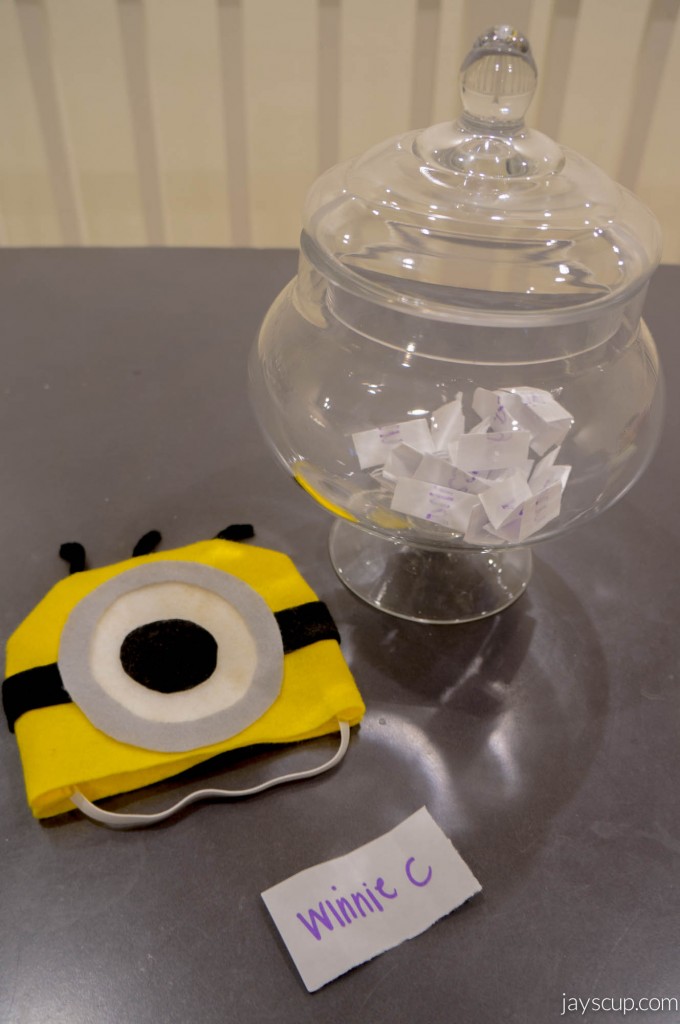
Before we get into the revamp, I want to announce the winner of the Minion Hat costume giveaway. Congratulations Winnie Cheung! Cheetor will make a great Minion for Halloween. I will send you an email with shipment details.

Minion Giveaway - Winner

Stay tuned for more giveaways coming up soon!

——-

Now! I’m so excited to reveal my newest revamp – my updated storage unit.

Before and After

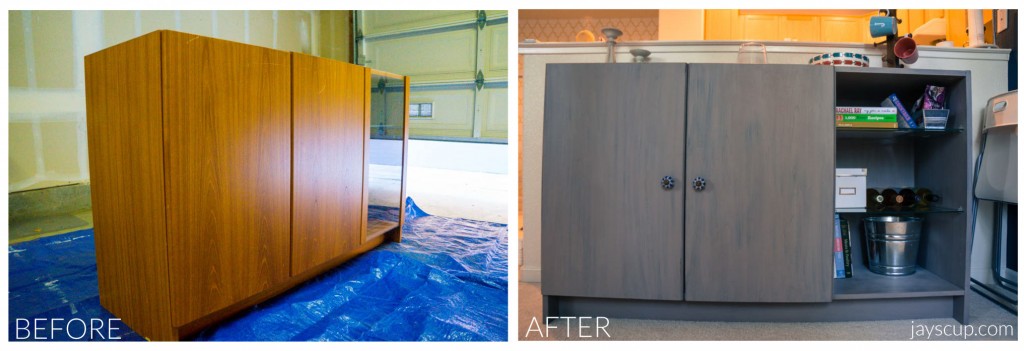
I bought this storage unit from Salvation Army when they were having a 50% off furniture sale. I was able to steal this piece for only $20.

It’s not the most intriguing piece of furniture, but I saw potential! With a bit of sanding and painting, the unit looks totally different now. Here I’ll provide detailed instructions on what I did. Maybe then you’ll be motivated to go purchase a storage unit for yourself and revamp it!

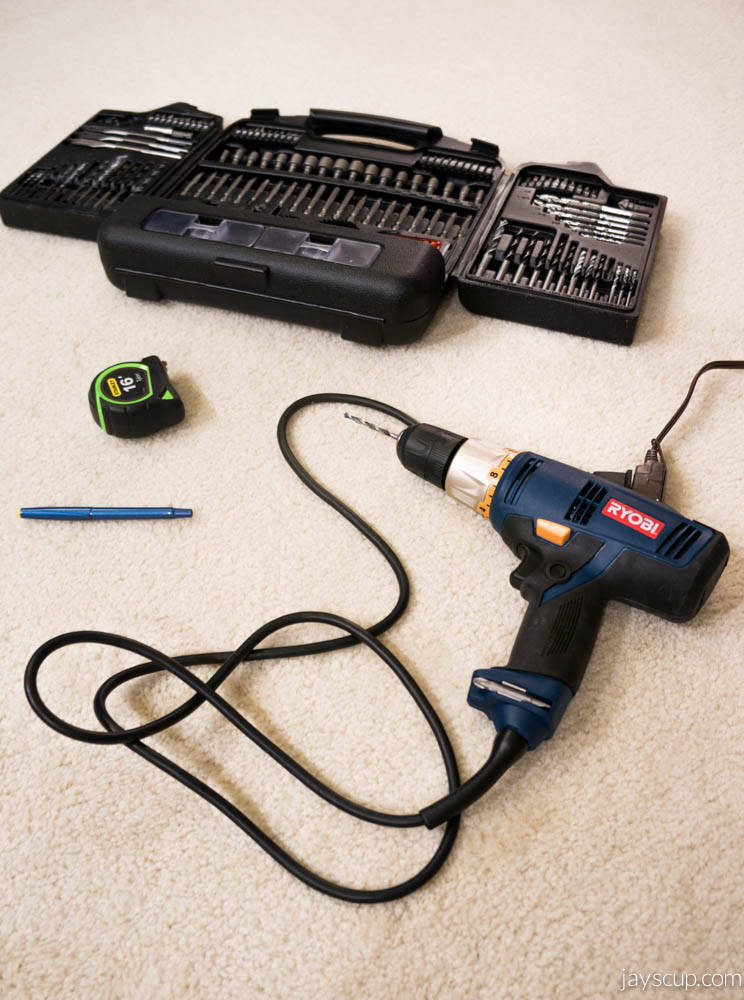
First off, bring your unit into a well-ventilated place because that spray paint is strong! I brought mine into the garage. Bring music because this is a 3-day process!

I then unscrewed the cabinet doors and took off the glass shelves. Keep the hardware in a brown bag so you don’t lose anything.
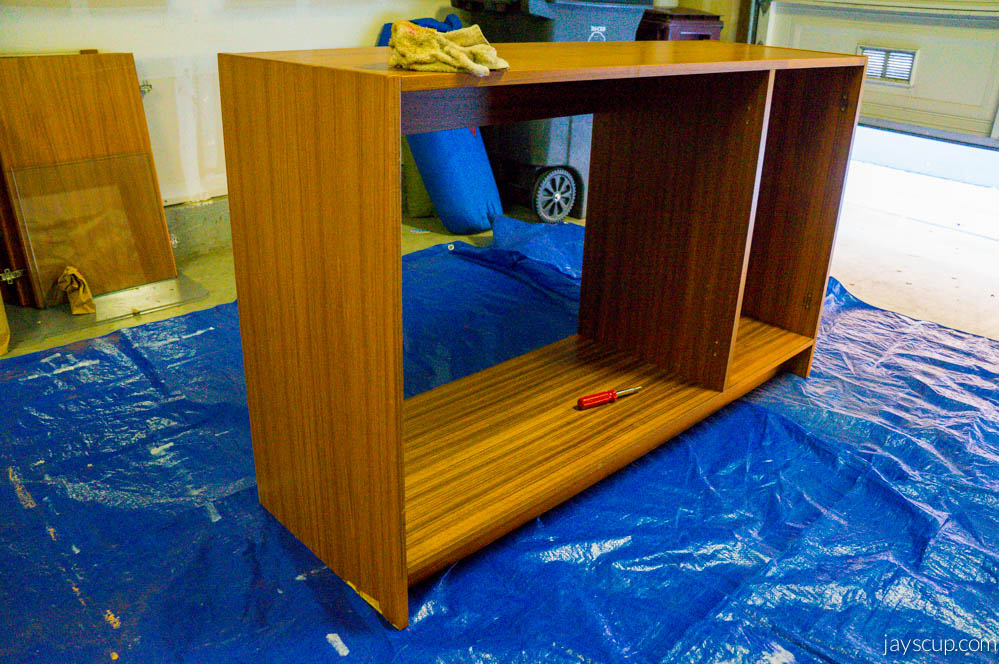
Storage Unit unscrewedIt’s so naked ^^^

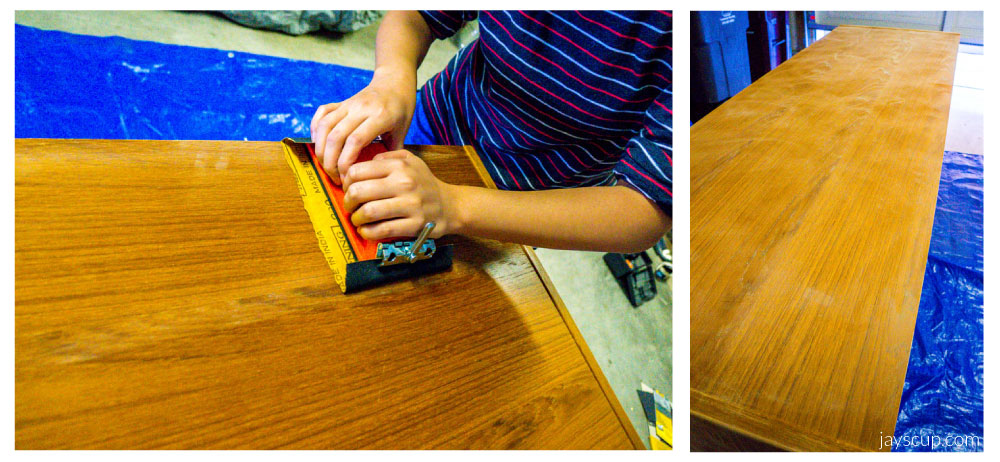
Now start sanding! This will help paint stick to the furniture. Get every inch and all crevices. The shiny layer should be gone by the time you’re done.

Sanding

Before you start painting, dust and wipe down the storage unit with a wet rag. Then take a a black spray paint or dark, dark brown and spray the edges. I did this so that there would be a more rustic look at the end. This part is optional, but I think it gives the unit more character.

Black Spray
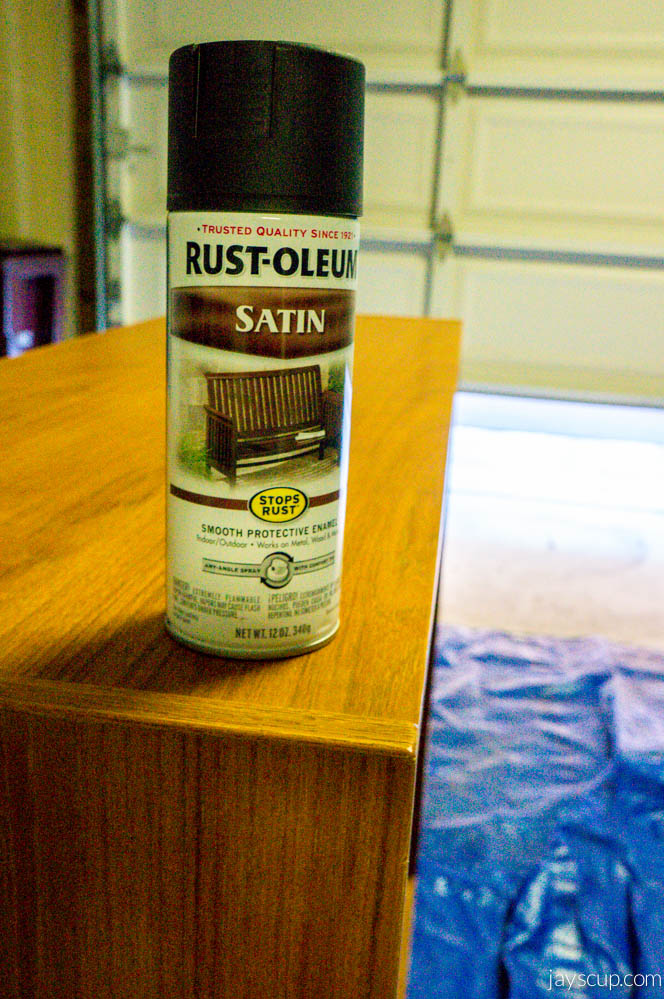
As you can see, I used Rust-Oleum in Black Satin

Sprayed
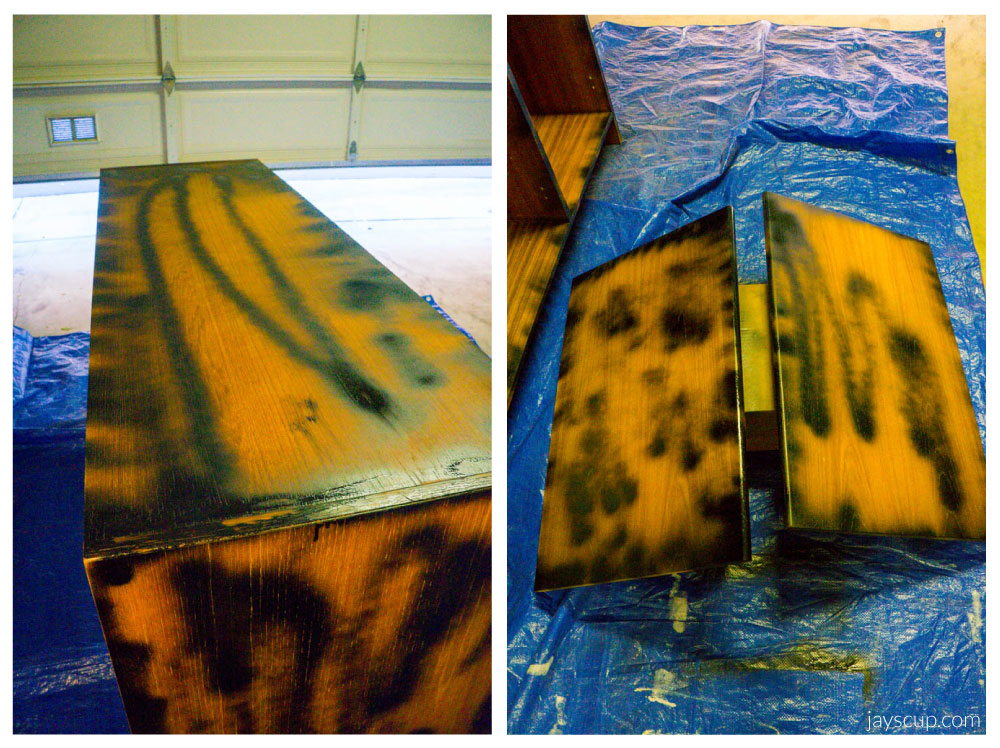
The most important thing here is to get all the edges. I sprayed some middle parts too so that some black can show through later. Go crazy and have fun! Now let the spray paint dry for 24 hours. You’ll get to actually painting the unit once the spray paint is completely dry.

Use acrylic paint for this project because latex will not stick. Acrylic!

Painting

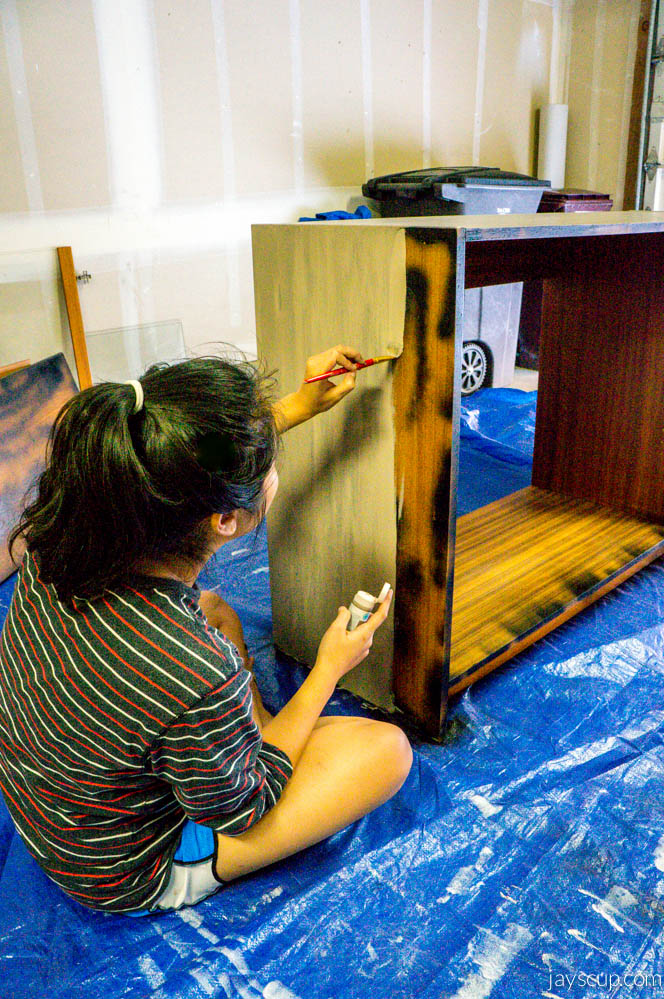
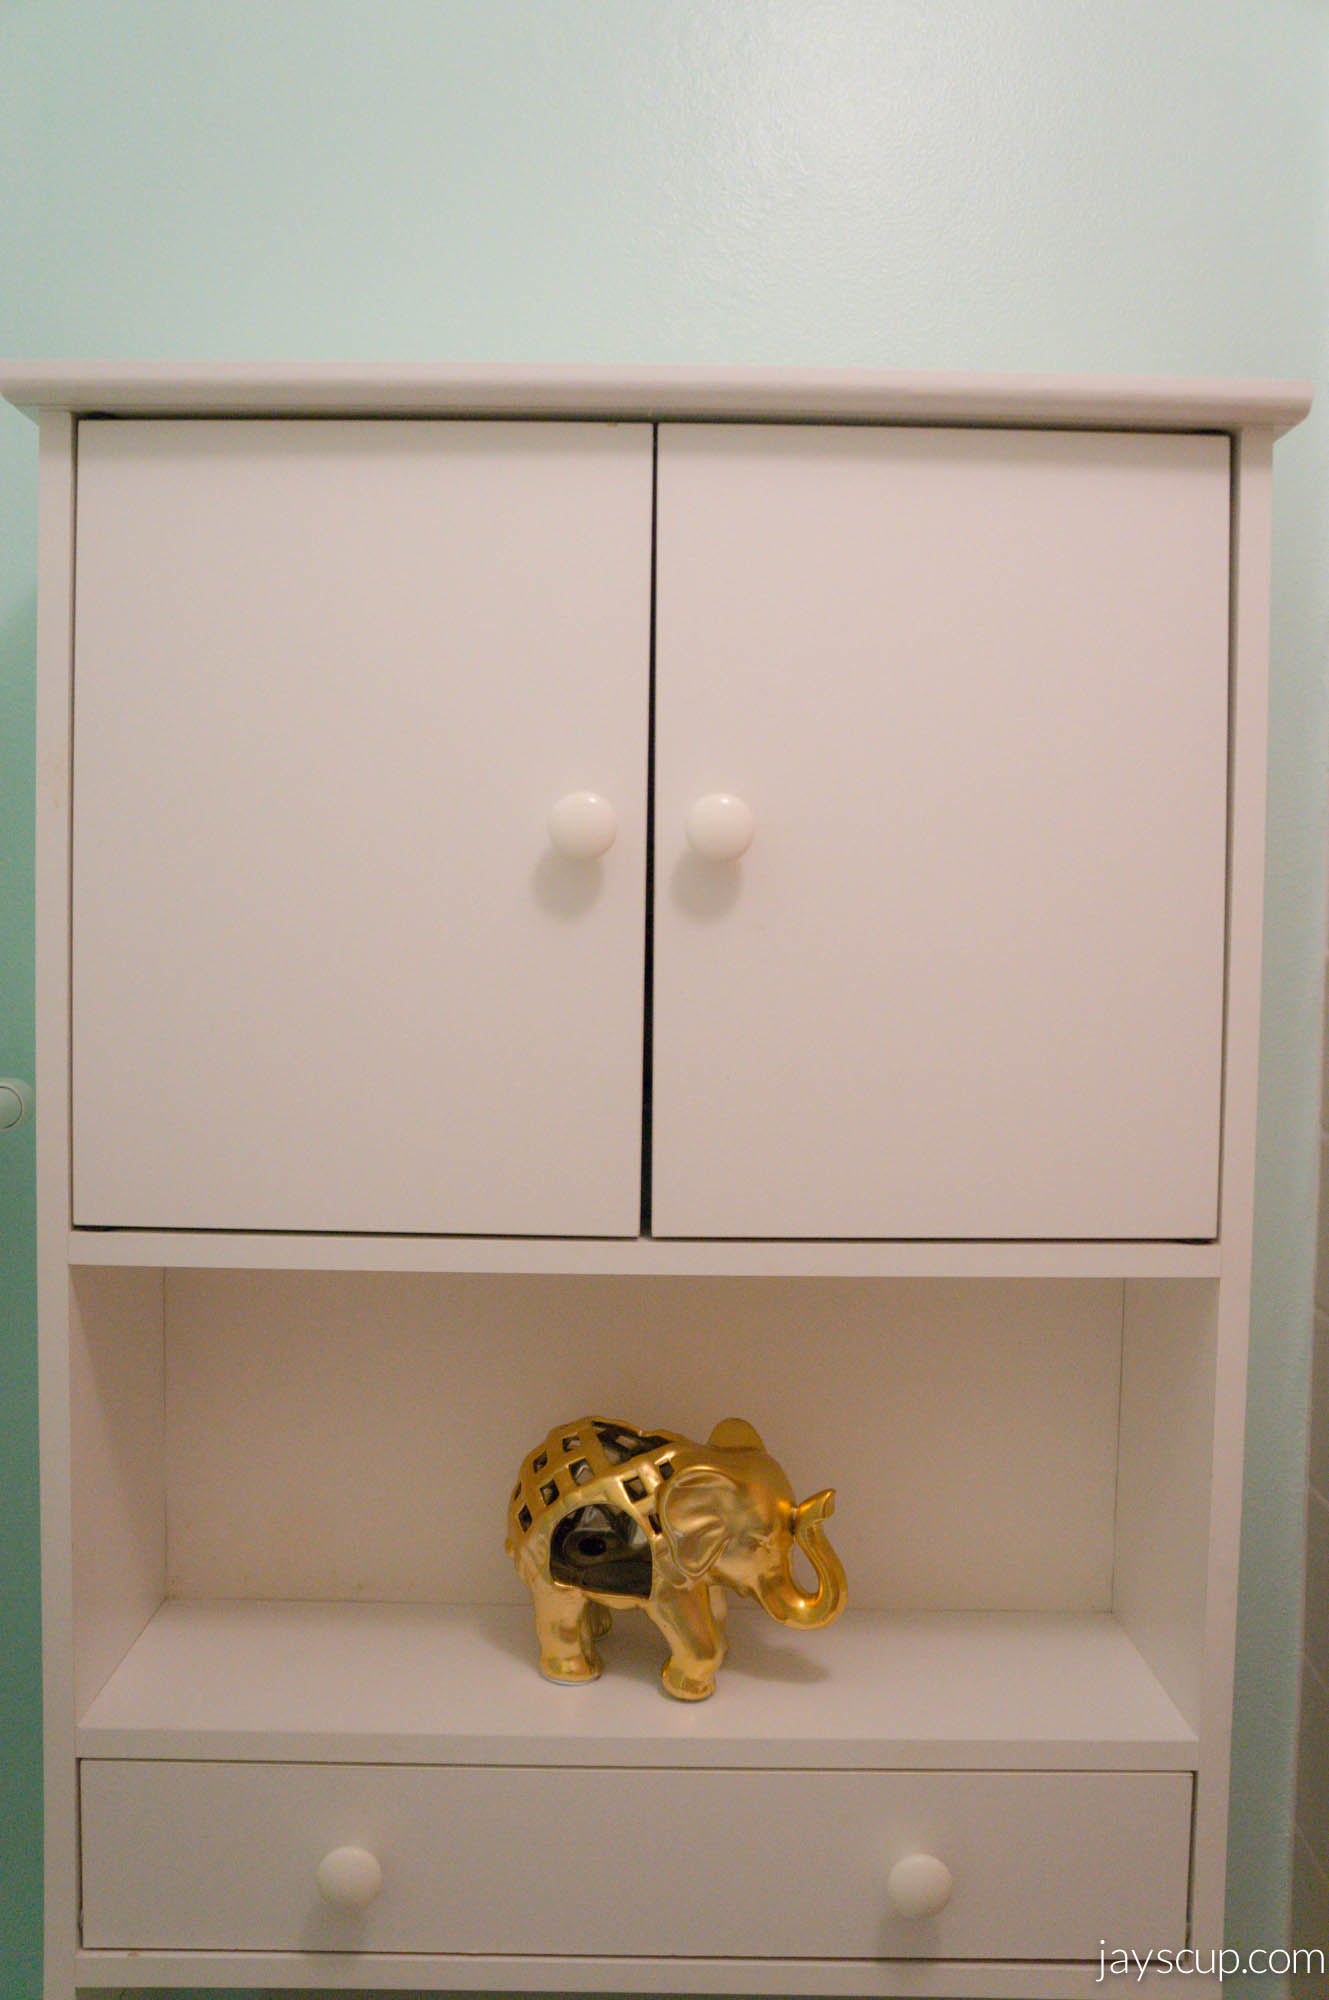
If you’ve been reading my past revamps, you already know this is my favorite color of all time – Grey Wolf Martha Stewart. I had to use 4 bottles of this to finish the storage unit. It’s the perfect warm grey, and now this unit will match my reupholstered bench, revamped bathroom storage unit, and updated frames. Yay!

Painted
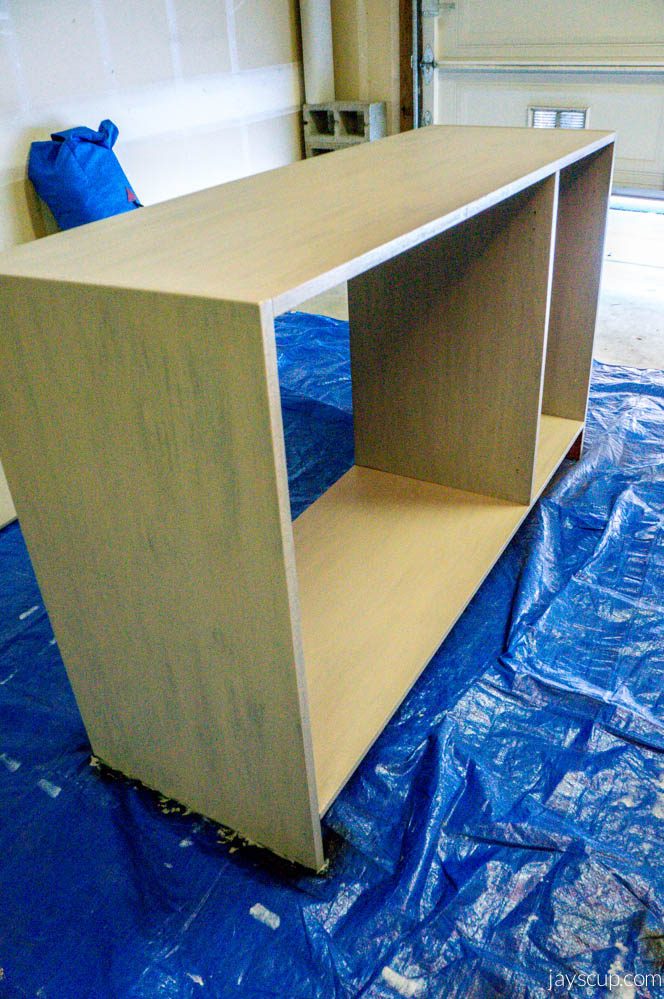
Here I’ve painted the entire unit

Grain
I love the wood grain look, so I painted in long strokes with the grain. You can see how the paint looks up close in this picture and how some of the black shows through.

I wanted my unit to look very antiqued. I took some fine grit sandpaper (220-grit), and carefully rubbed off some paint on the edges. Don’t be too rough or the black underneath will rub off too. The trick is, high grit and light pressure.

Sanding EdgesDo you like the edges like this?

Finally, once the unit feels dry to the touch, you can coat the storage unit with a finishing spray.

Coat
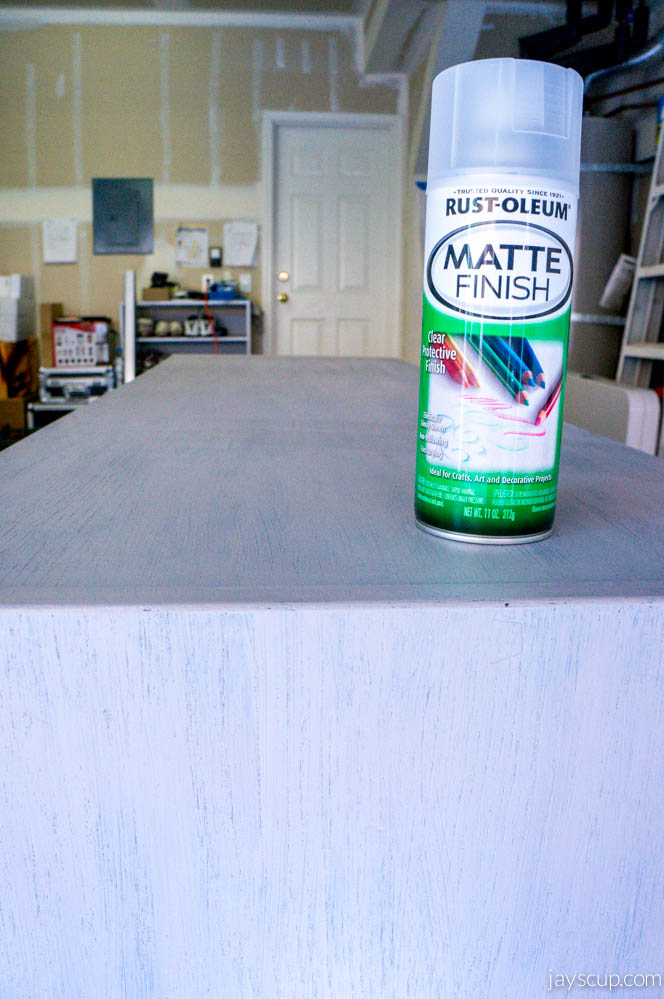
I used a matte finish from Rust-Oleum. This stuff stinks! Seriously, make sure you’re in a well ventilated area.

Time to wait for another 24 hours for the paint to dry. My patience is low, so this is the hardest part, especially since you’re so close to finishing!

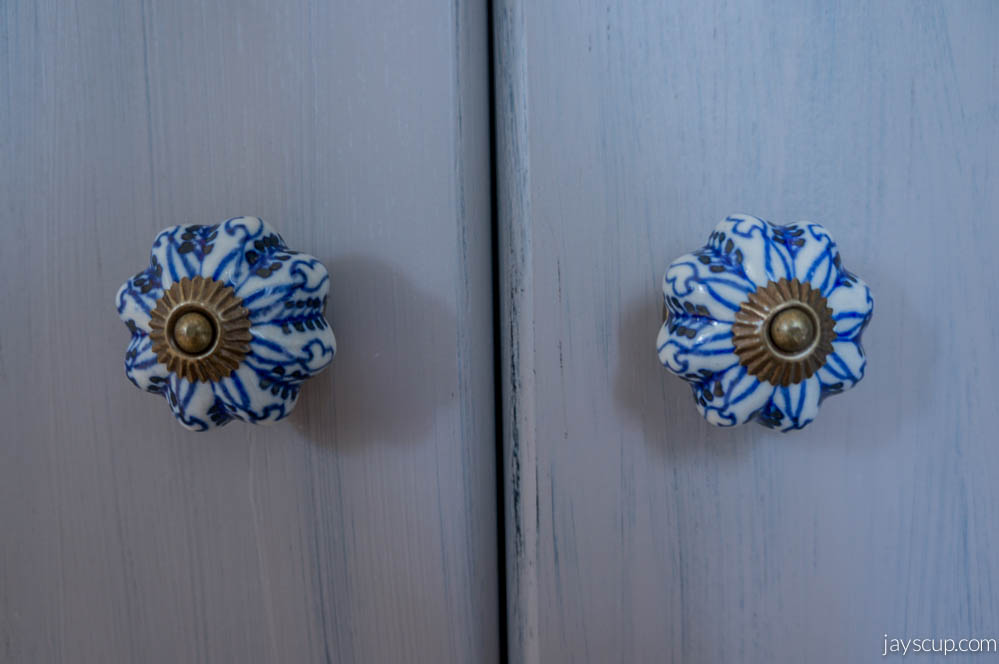
When dry, I took out my tools, measured where I would want knobs on the cabinet doors, and drilled holes for two knobs. I found gorgeous knobs at Cost Plus World Market for $3.99 each.

Trusty tools

Knobs

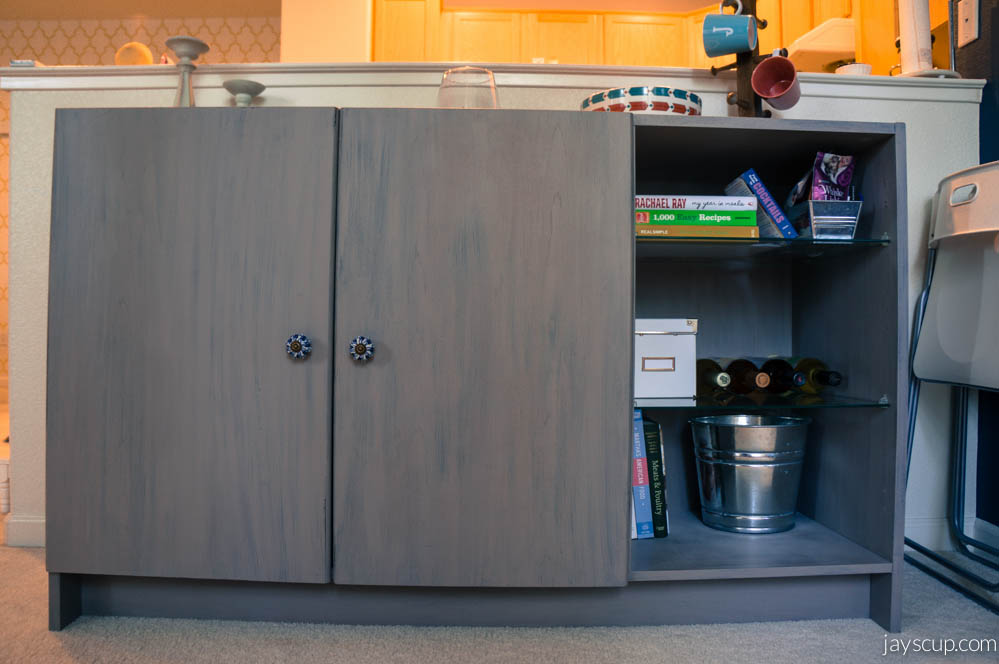
Storage always seems to be a problem when you own a place! I put this unit in my living room, near my kitchen so that I could store appliances. Once I organize everything, I’ll have so much more counter space.

Drumroll, please! Here’s my final product:

FinalWhat do you think?

Side
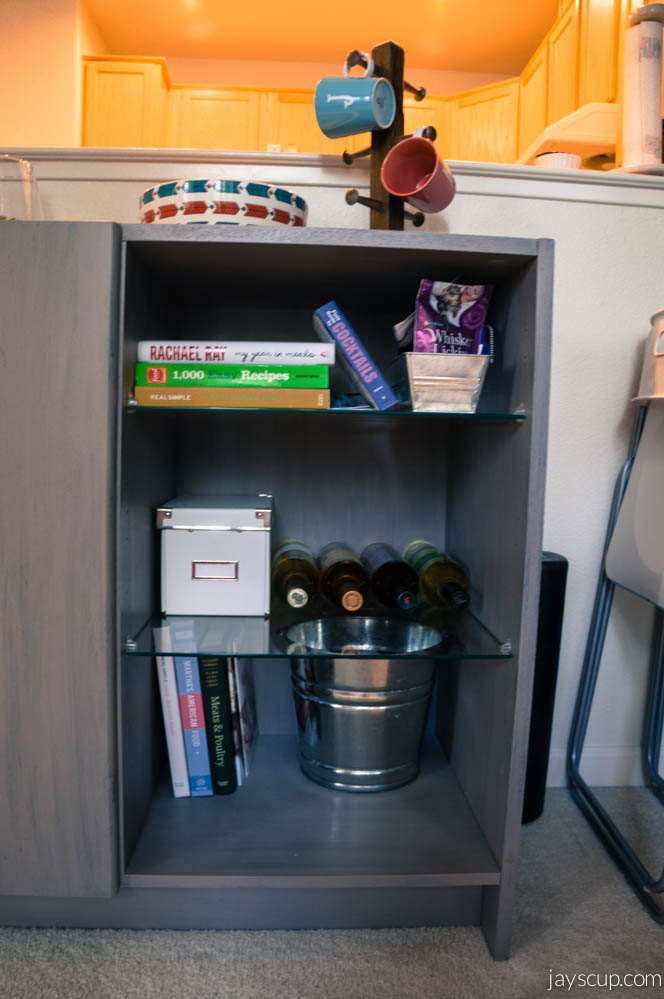
Up close of the right side of the unit – I put in some cookbooks, wine, and kitty toys

You don’t get to see the inside because there’s a bunch of random things – like my rice cooker, crock pot, and tools. Ew, that’s why it’s hidden!

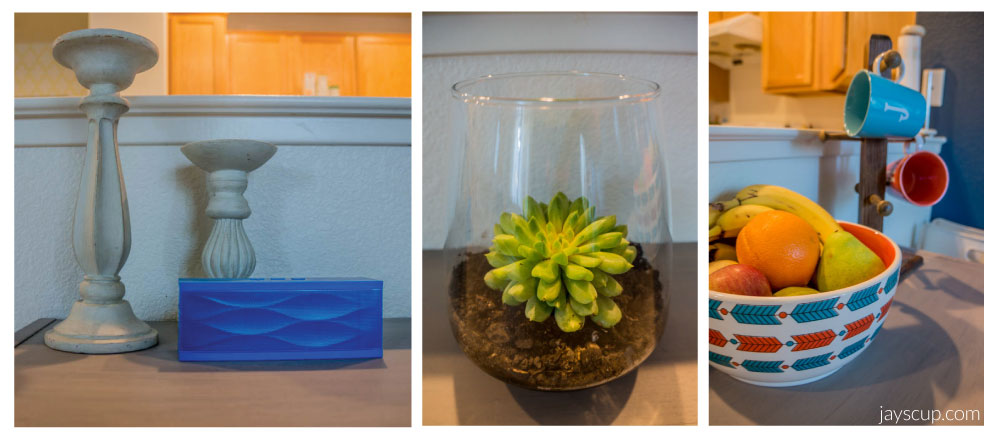
For your viewing pleasure, I’ve added a few decor items on the top – my beloved Jambox, a succulent plant displayed in a glass vase, my fruit bowl, and my cup holder that I purchased for 99 cents at the thrift store. I’m displaying my “J” cup!

Decor

Do you have a problem with storage and counter space at your house too? What do you think about this $20 unit revamp? Is this something you could do and will you be hunting for a piece of furniture to revamp now?

Deal hunter,
Jay

DIY: My Little Minion

UPDATE:  Congratulations Winnie Cheung! You’re the winner of this costume giveaway! Thanks to all those who participated in this contest. Your pet can still be a Minion with this easy DIY. Happy Halloween!

—–

Minion

It’s almost Halloween (only two weeks away)! I know you’re thinking only one thing – what costume should my pet wear? I got you covered with this DIY! Plus, enter a comment below and you can win one of these costumes for your pet!

After watching Despicable Me 2 and going around a few McDonald’s to pick up those Minion Happy Meal toys, I knew I had to make a Minion costume. Meet my little Minion, Chubs.

Little Chubbo

Chubs

What do you think? This costume takes a little bit of sewing, cutting, and some hot gluing. Super easy, and I promise you’ll get a lot of “OMG, SO CUTE” reactions.

What you’ll need:

  • Felt (yellow, black, grey, and white).
  • Sewing machine (you can definitely hand-sew if you don’t have a machine)
  • Scissors
  • Hot glue gun and glue sticks
  • Black pipe cleaners
  • Elastic
  • Velcro

Let’s start out with the yellow felt. My cat is a small animal (10lbs), so I measured his head and cut a piece of yellow felt 9×7 inches. Then sew the edges together on both sides (follow the pattern below). I used a sewing machine, but this is easy to do by hand too.

Yellow Felt

Next cut black pipe cleaners into 2 inch pieces. Stick them through the top of the hat (you may need to snip a little hole at the top for the pipe cleaners to go through). I then bent the end of the pipe cleaners inside the hat, and hot glued them into place.

Minion Hot Glue

Now it’s time to sew the elastic onto one side of the hat. Then sew the velcro onto the loose end of the elastic, and sew the velcro onto the other side of the hat. Make sure your band is flat when it is velcro-ed together.

Elastic

Velcro

Finally, we can move on to the details. Let’s cut the other pieces of felt. Again, my hat is for a 10lb animal so my circle diameters are as follows:

  • Black – 1.5 inches in diameter
  • Grey – 3.75 inches in diameter
  • White – 3.25 inches in diameter
  • Black band – 6.5 inches in length

To make things easier, here’s a template for the circles. You can print the pattern so that it can serve as a guide.

I simply hot glued all the pieces together. First the eyeball, then the pupil, then the black bands, and lastly the grey glass.

Details

Done

Put it on your little minion, and take lots of pictures!

Minion Boy

Chubs' Hat

Is this something you can easily recreate? Are you thinking about making your little pet child a minion now?

As I mentioned earlier, enter a comment for this blog post, and you could win one of these small hats for your little pet. You’ll get it before Halloween! Enter now!

Only one entry per email. Email must be valid. Shipping address must be in the United States. This costume giveaway ends at 11:30pm PST on 10/22/13. Winner will drawn and announced on Wednesday, 10/23/13 at 12:00am PST via blog and email provided.

Banana,
Jay
—–
Minion image copyright

A New Look For My Wall Rack

If you’ve been reading along, you know I’m a bargain hunter. Hunting for goodies at thrift stores, Cost Plus World Market, and Marshall’s for home decor is my hobby! Okay, maybe not but I really enjoy doing it.

One knows that you can never have enough wall racks in your bedroom. I have two but it’s weird how my clothes still like to leave a path on the floor of where I walk. Does that happen to you too? Strange right?

Recently I came across a wall coat rack at Marshall’s for $10 in the clearance area. It was on sale because someone had put some nail polish paint on the corner and a knob was missing. I couldn’t pass up such a good deal and had to have it!

Marshall's Find

All I saw was potential!

Marshall's rack

I love the grain of the boards and the marbling of the knobs. I didn’t reuse the knobs for this project, but I’m going to save them for something else. Nowadays there are so many decorative knobs. The Anthropology knobs are swoon-worthy, but for $8 a knob, that’s almost the price of my wall rack! Nope… cannot. Fortunately I went to Cost Plus World Market and came across adorable knobs for $1.99 a piece. Done!

Knobs I love the colors of these knobs and how they are different. The blue helps bring them all together.

First off, I sanded down the rack so that new paint could stick and so that the nail polish paint was gone. I put a fresh coat of paint on the wall rack, a light and sheer white to make it a lighter color. The sheerness also allows the grain detail to show through. Then I took off the old knobs and screwed in the new colorful ones. This is the final product:

Done!

It’s hanging in our bedroom, and it’s the first thing you see when you walk in. I just need to be careful to not put my delicates on the rack so that guests don’t see!

What do you think of the revamped wall rack? Is this something you can do? How many coat racks do you have in your bedroom, and do you need more too?

Happy deal hunting,
Jay
—–
White Frost Acrylic Paint by FolkArt