Circle Garland DIY

I truly believe that decoration can change the entire look and feel of an environment. After I painted the walls in my home, it became a more comfortable environment. Typically people stick with white, but I painted a dark navy that almost looks black during the day. I love it! To add some fun aspect, I stenciled the opposing wall with a yellow lattice pattern. I’ve also put up curtains which makes any room feel more grand. I’m starting to really love this home decor thing. I’ve been asked to help decorate a dentist office recently. I immediately accepted the offer and will be starting on designing this week. And of course, I’ll be taking you along the journey via my blog. We’ll see where this takes me! I’m so excited for the opportunity!

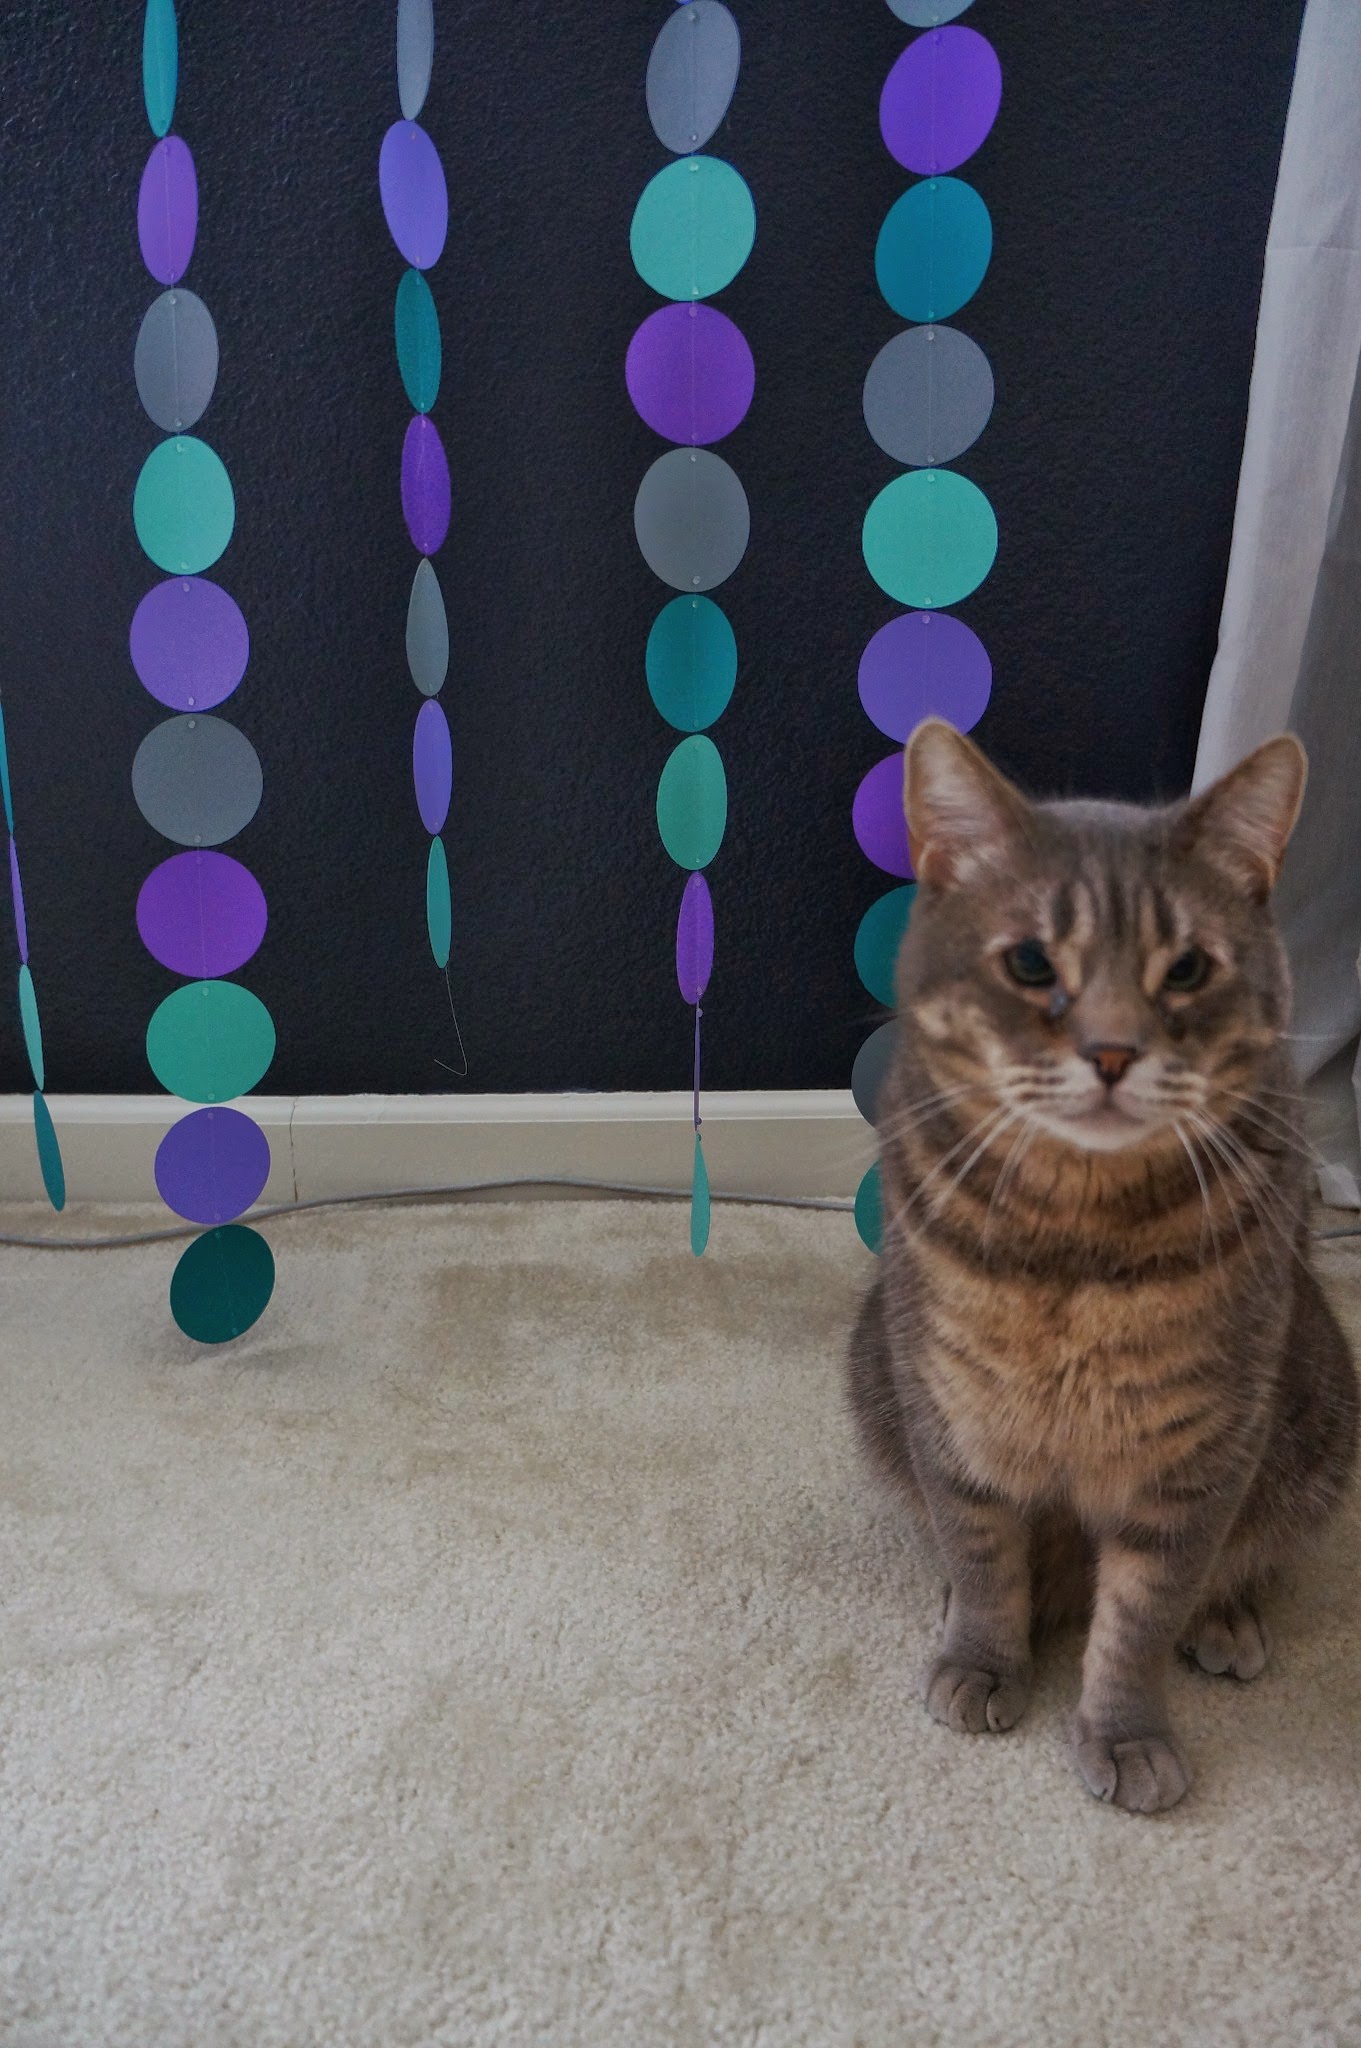
Perhaps you saw the decor at the bridal shower from my weekend post (previous post here)! I helped with that! Today’s post will be a DIY on how to make those circular garlands. Perfect for parties! It’s great to use as a backdrop for pictures as well!

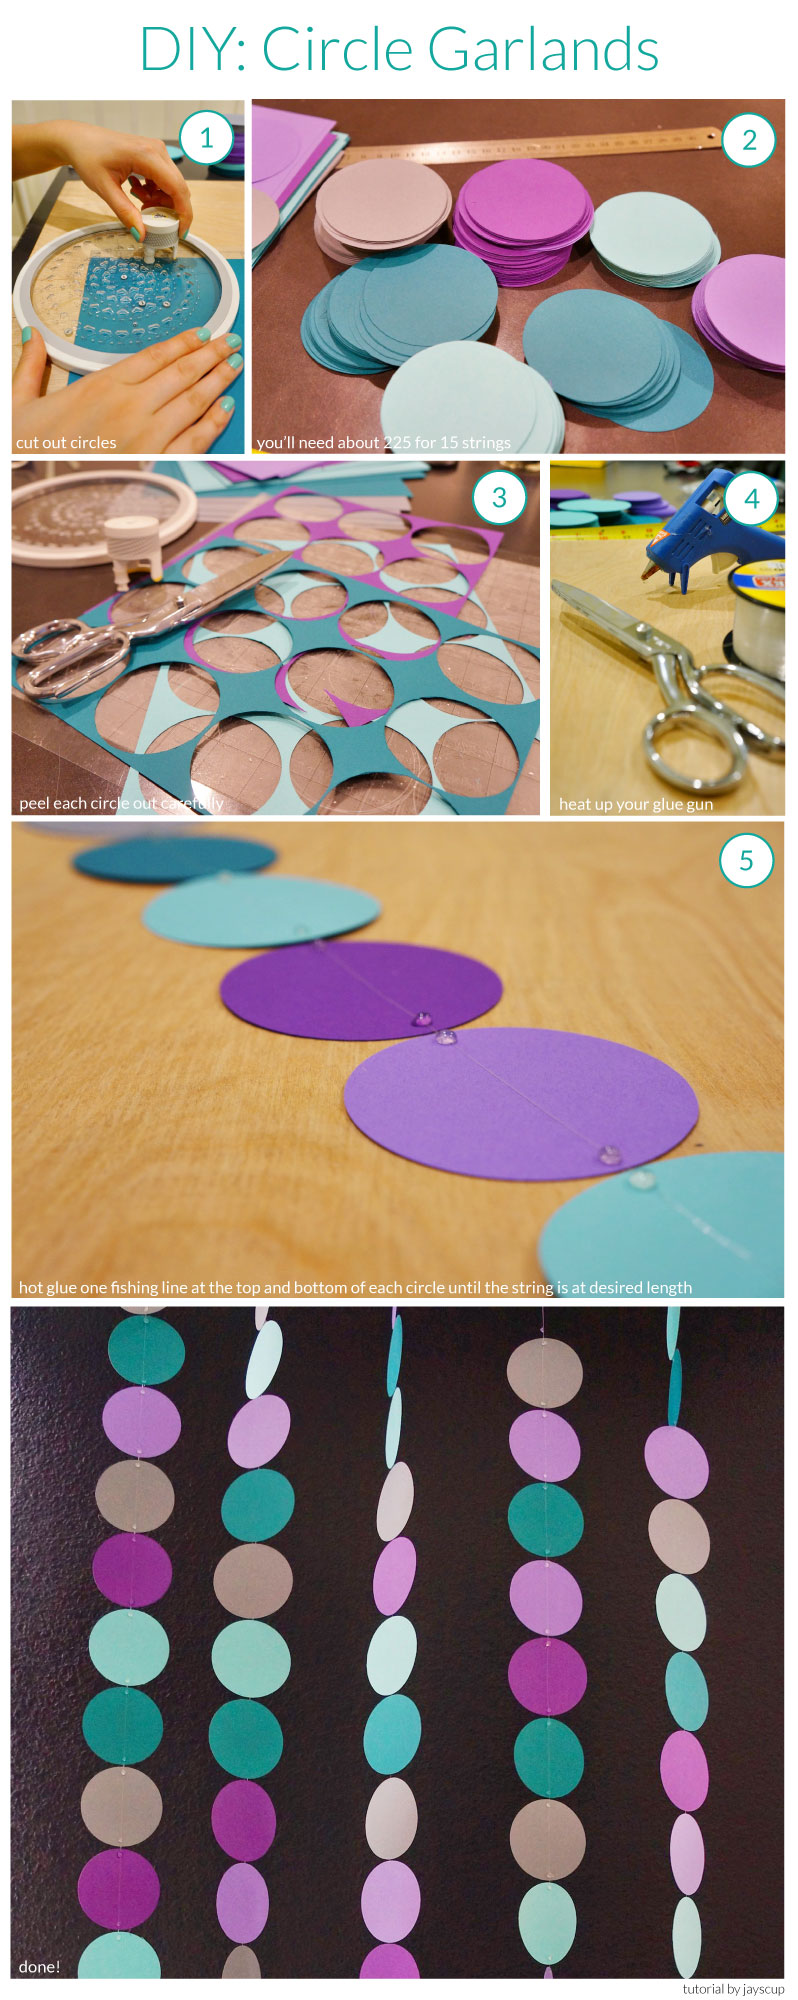
These are so easy to make but it does take time. It took me about 3 hours a day for 5 days to make 15 garlands. Worth it when you get some great photos!
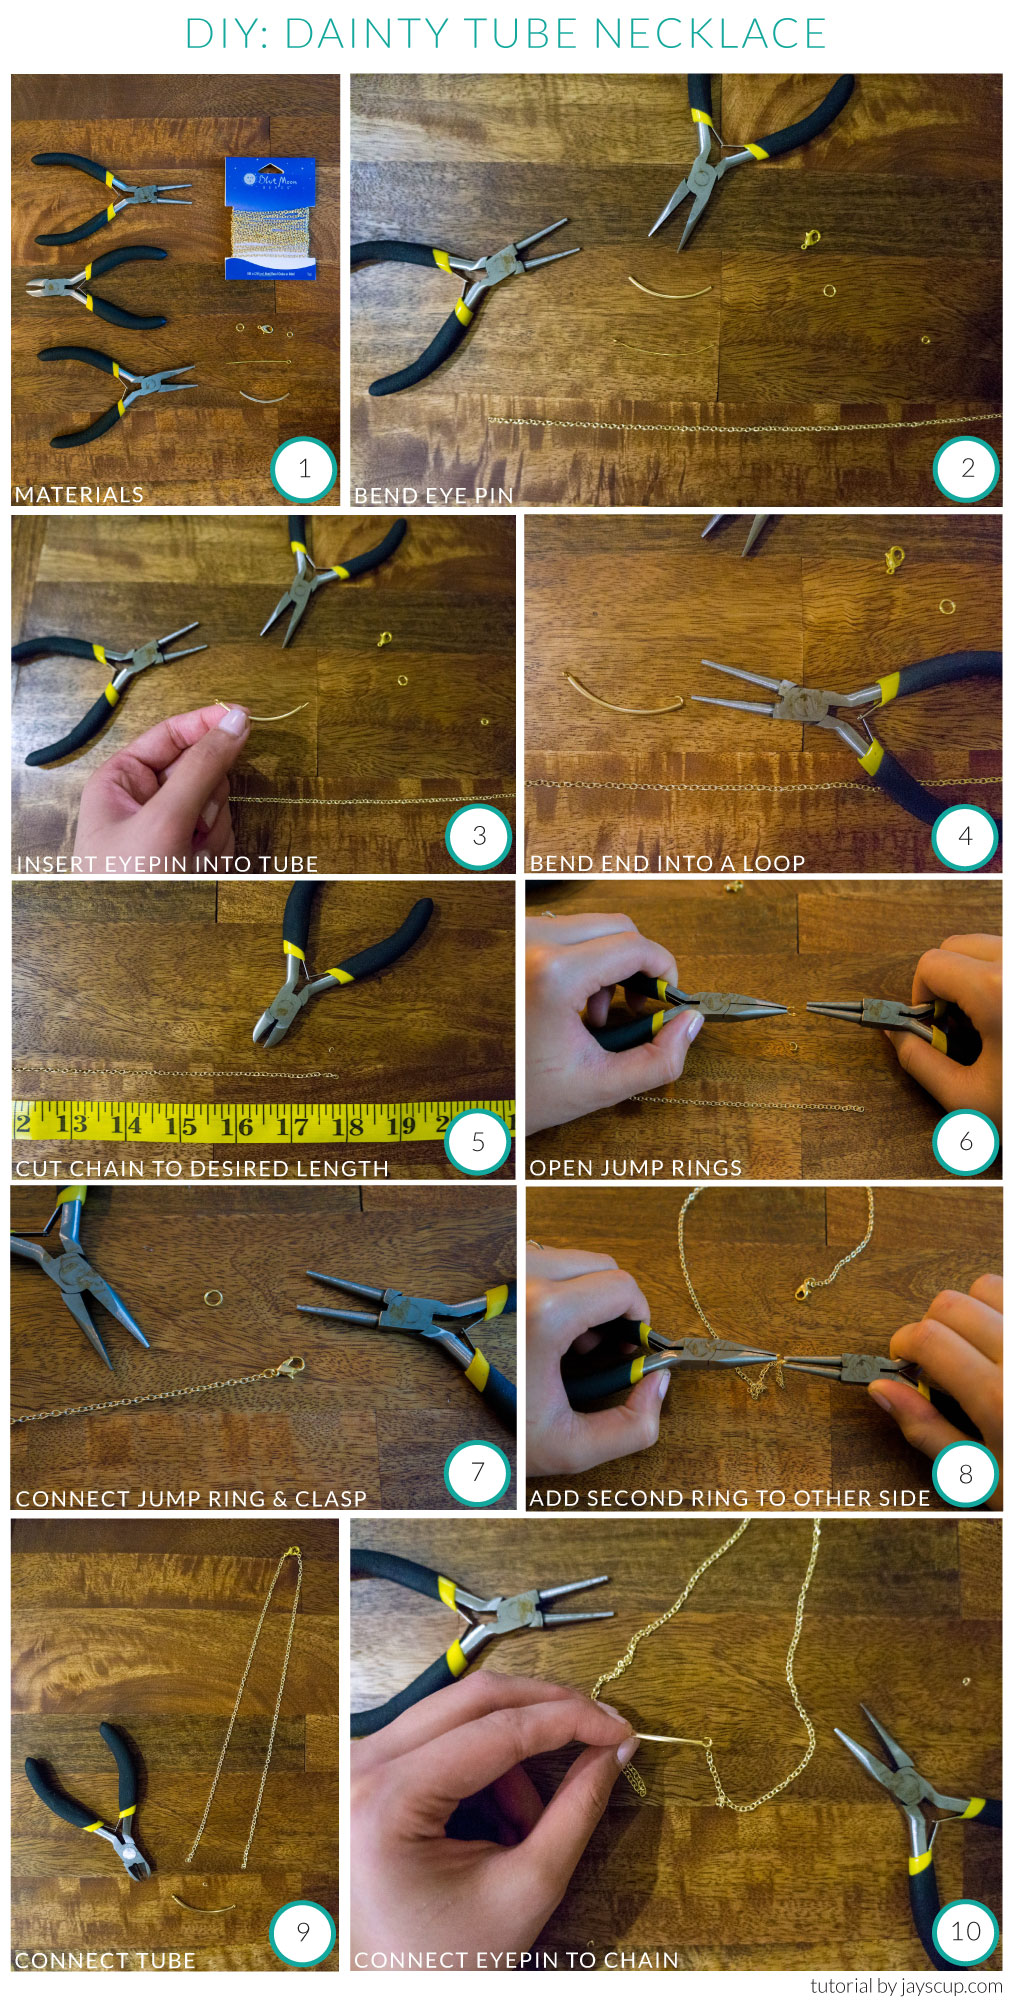
Chubalee

What you’ll need:

  • Paper to cut circles (I made about 225 circles for 15 strings of circles)
  • Circle cutter (similar one hereOR circle punch (affordable one here)
  • Cutting mat (I used a piece of plywood)
  • Fishing line
  • Hot glue gun with extra glue sticks

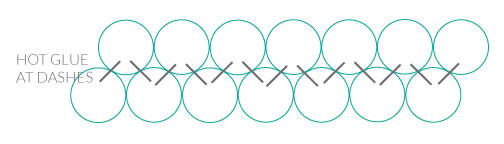
Directions: Cut out circles, line them up in a straight line, and hot glue the circles onto your fishing line. When cutting the circles, make sure you have something underneath so you don’t scratch up your surface (oh my poor dining table…).

Another option to put these together is sewing the circles into a straight line (perhaps you’ve seen this option on Etsy). I think the hot glue is easier but that’s up to you!

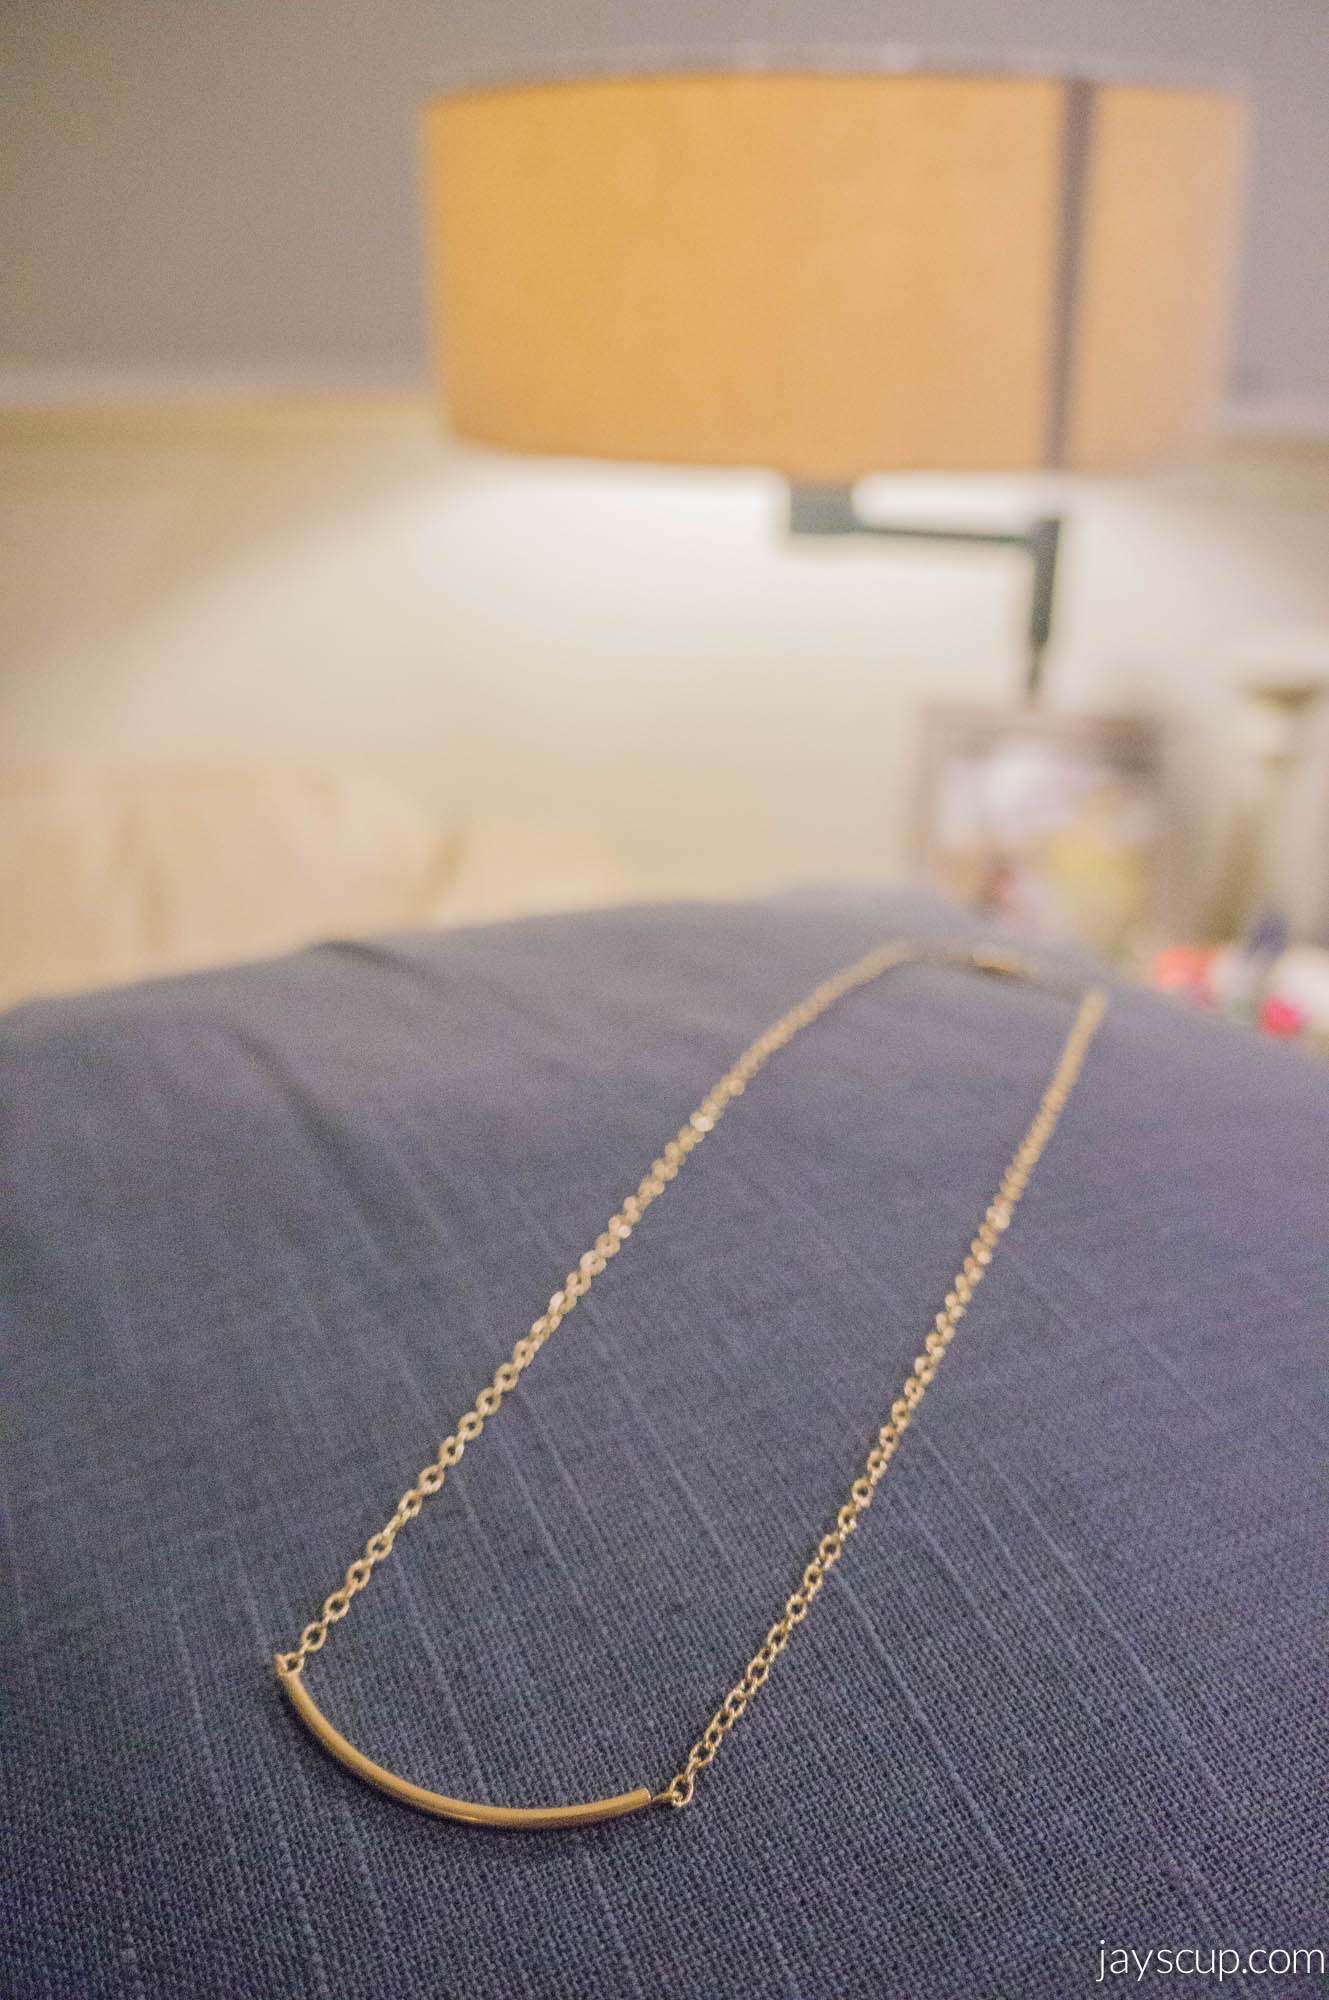
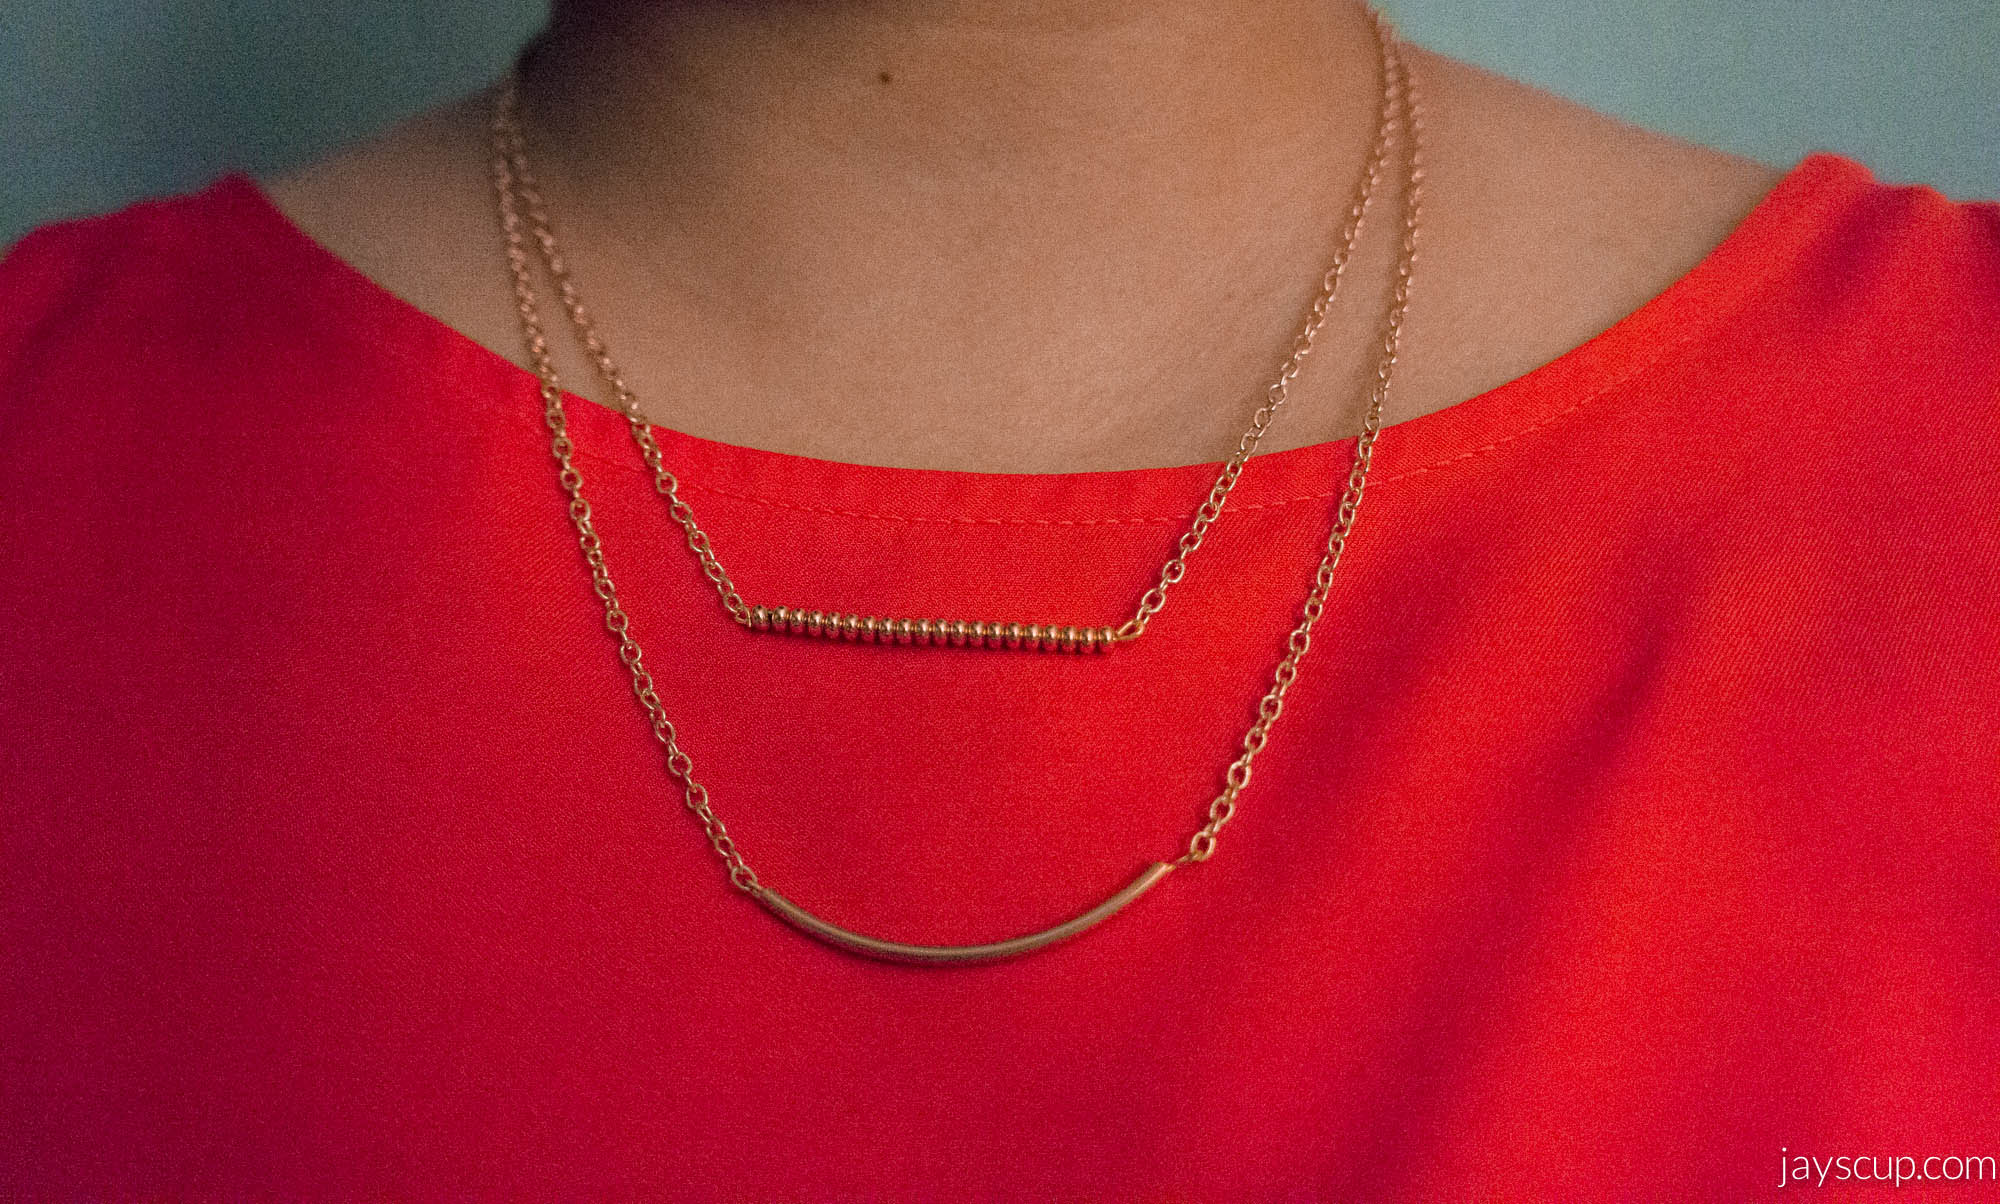
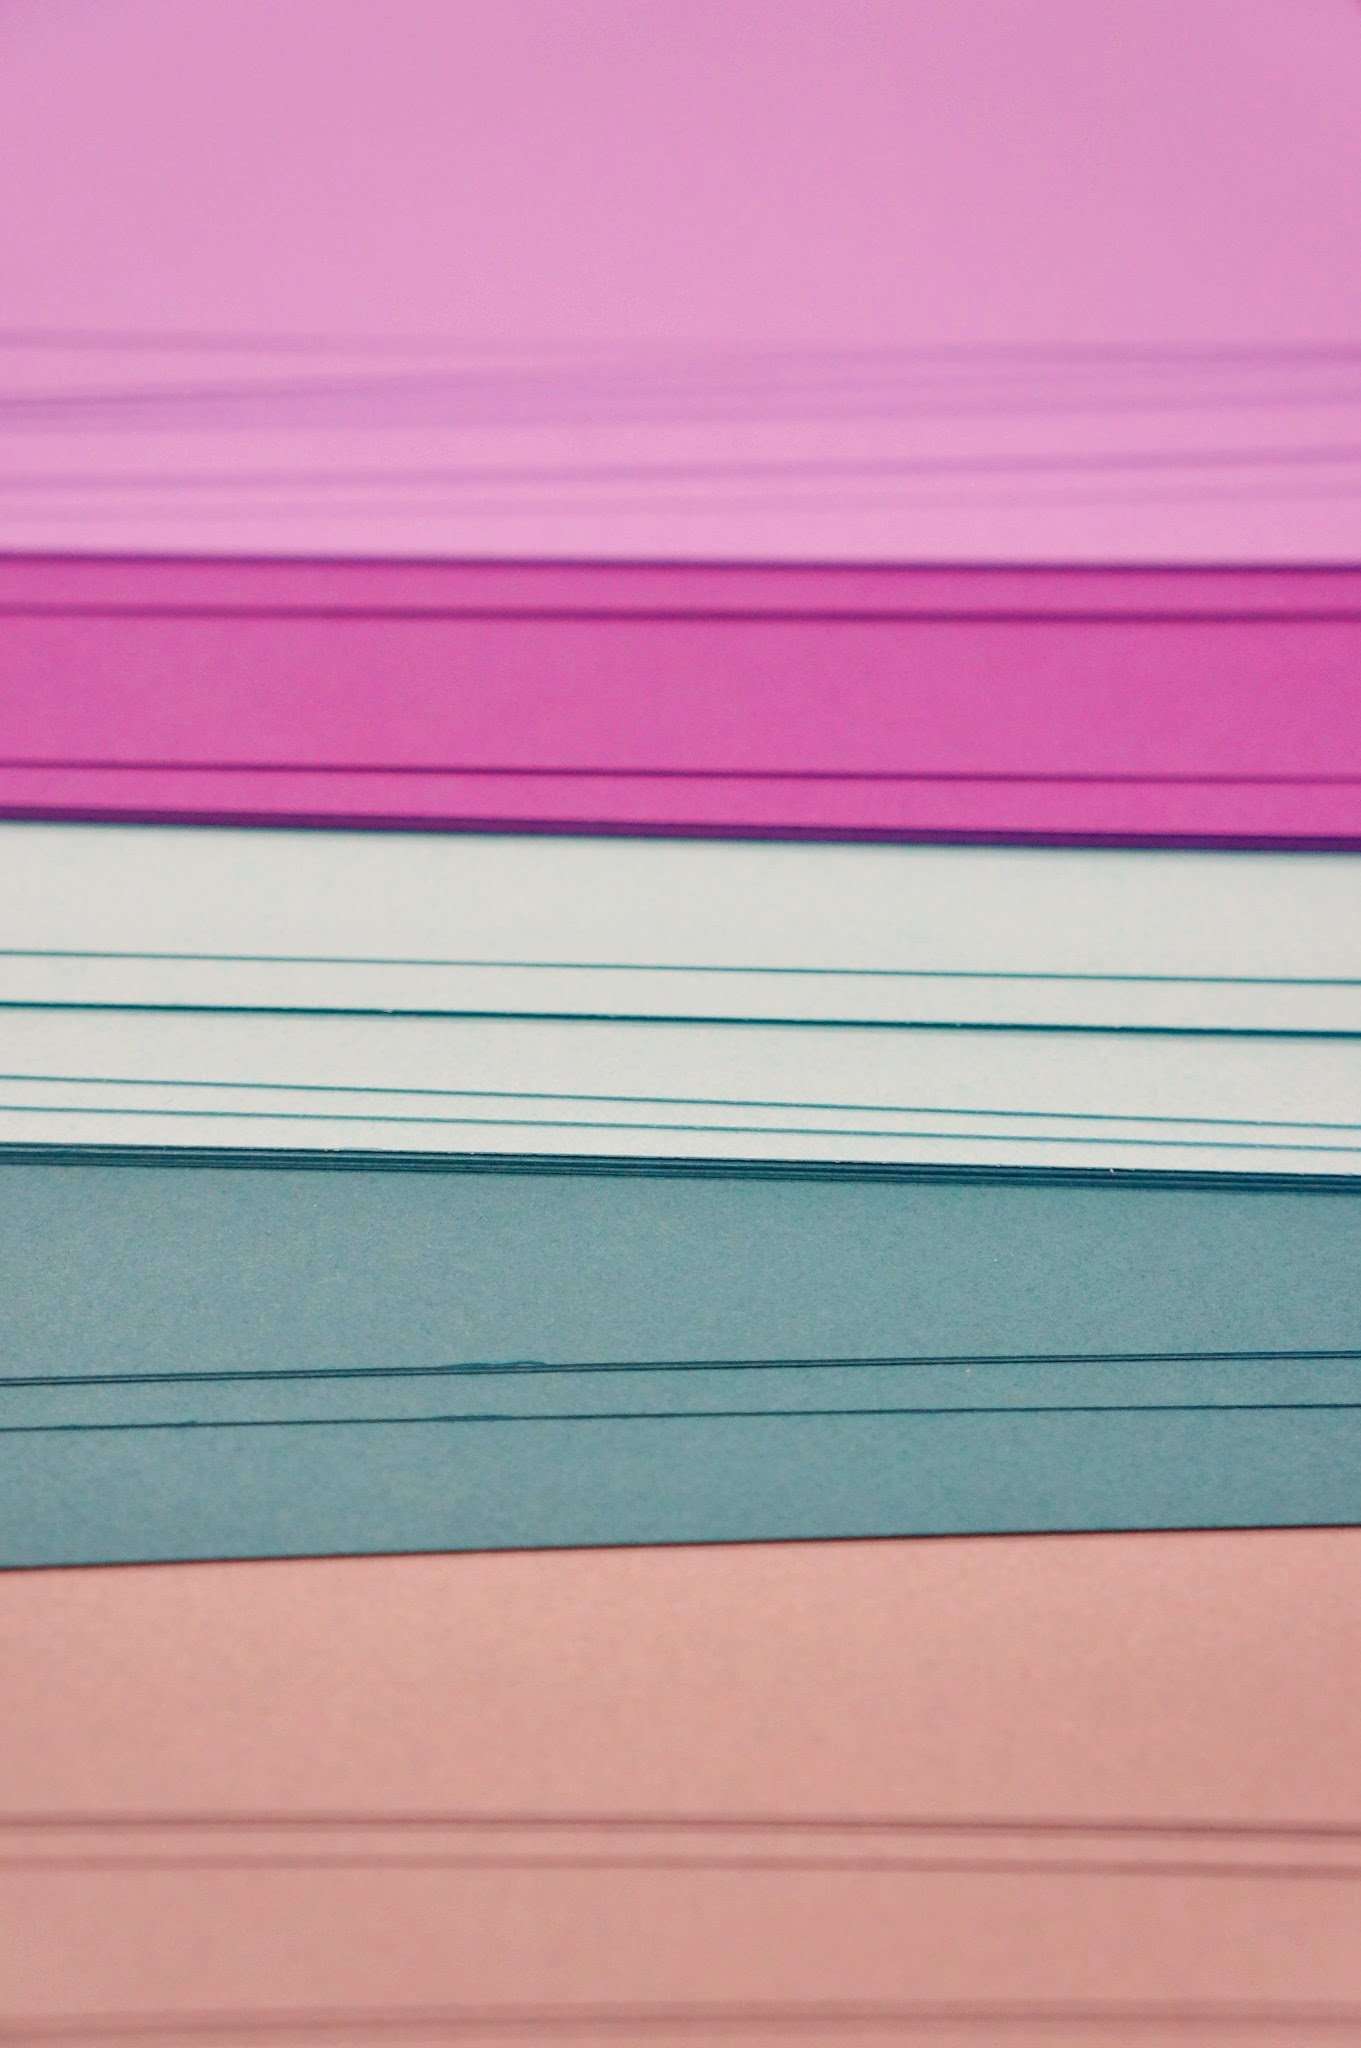
Aren’t these colors so pretty?

Colors

Here’s the photo tutorial:

DIY-tutorial

If you have a Silhouette, use it! It’s a cutting machine for avid scrapbookers or crafters. The best thing about this machine is that you can design your own shapes and fonts to be cut, whereas with the Cricut cutter you’re limited to their cartridges. It’s a pricey machine at $270. I would suggest only purchasing if you’ll use it often. Otherwise the Martha Stewart cutter at $12 is a great option. Still interested? You can purchase the Silhouette here.

I was able to cut 12 circles per every standard sheet of paper easily on the Silhouette. It saved me a buttload of time!

Silhouette

I really love these garlands, so festive!

Done

Have you ever purchased these garlands? Where did you get them and what did you use them for? Is this something you can make for your next party?

With love,
Jay

DIY Dresser Revamp

I’m super, duper, fricken ecstatic to share my newest project with you.

I revamped an old dresser that I bought from a friend for $10. With a fresh coat of paint and some new hardware, this piece of furniture looks brand, spankin new!

If you’re planning to revamp or buy a dresser as well, it’s advisable to first be knowledgeable by reading articles like Consumer Reports tested 13 dresser models for tip-over risks.

Before/After

This project is simple but it takes time for each layer of paint to dry. The entire project took 3 days. I’m almost positive that you have an old piece of furniture sitting around your house that needs a little bit of loving. If not, maybe you’re looking for a new bookshelf or a dresser. Go to the thrift store, find one to your liking, and revamp it. I love bargain hunting, and the thrift store for furniture is where the treasure’s at! I also like to think that refurbishing something old is like recycling, so I’m being green too right? It’s really a win/win situation. Honestly, most, if not all, furniture pieces have potential to be something beautiful. I’m also well-equipped with the best power drills online to help me in these kind of projects.

What you’ll need to repaint furniture:

  • A drop cloth or tarp (cause it can get messy)
  • An old rag (cleanup)
  • Painter’s tape (I love Frog tape, it works really well)
  • Sandpaper (fine grit, I used 220)
  • Water-based primer
  • Latex paint (I used Behr from Home Depot)
  • Water-based polyurethane varnish
  • A paint tray
  • 2 small, dense foam rollers
  • A small brush for the varnish

Basic instructions:

1. Undo all hardware. I also took apart the dresser so that none of the screws get painted (this part is optional but recommended).
2. Sand – get that shiny layer off. Sand it real well so that the primer sticks.
3. With a roller, primer all pieces (roll carefully so that there are no paint drips). Let dry (timing depends on your paint, read the label), and sand it down again if there are drops of paint or bumps. Then roll primer one more time. Let dry. Sand again to ensure all pieces are smooth.
4. Now it’s time to paint. With the other roller, paint the dresser with your desired color. Let dry and sand again to smooth out bumps. Paint the dresser one more time and let dry.
5. If you’re doing a design, it’s time to paint it on now. I used frog tape to outline where I would paint. I also painted all the edges of the drawer gold too. Let this part dry as well. If you want a darker color, paint it another time.
6. Take the brush and paint on the varnish (a roller will cause bubbles). It’s recommended to varnish 2-3 times. Since the top of my dresser will be used a lot, I varnished 3 times but the drawers I only painted twice. Let dry overnight.
7. Put the furniture piece together. Change out the hardware if you desire.

Some tips from my experience:
1. Roll and paint on carefully so that you do not have to sand in between layers. It’ll save you time in the end.
2. Bring plastic wrap to wrap up your rollers and brushes so that your tools do not dry up. If you’re not using it, wrap it!
3. If you’re using white, use an off-the-shelf white to save some money. I used Ultra Pure White by Behr.
4. If you’re doing a design with painter’s tape, do not allow the paint to completely dry before ripping off the tape. Simply wait 5-10 minutes, and rip tape off at an angle. Paint will chip if it becomes dry.

Got it
This is how I got the dresser – I call it blegh green

Hardware
I took apart all the hardware and taped the screws to each piece. That’s helpful!

Sand
Sand it down!!!

HandsThat turned me into Elphaba ^^^

Primer
Use a roller for the primer – smooth, long strokes

Paint
Paint with a roller too – long strokes again and careful not to drip paint

Drying
Be patient with drying. Make sure it’s dry – better safe than sorry!

Design
This is my design. To guide the lines, the width of the white is the same as the tape

Gold
I found this gold on sale at Home Depot for $5.25 (find it here)

Peeling
This is delayed gratification at its finest. Best feeling in the world is tearing off painter’s tape.

Design
Ta-Da!!!

Dresser Back
Reassembling the dresser – it also needed a back. Home Depot will custom cut wood for you. All I had to do was nail the back onto the dresser

And now this beauty is in my room, ready for my clothes!

Complete

Final

I’m totally in love with this dresser and am proud of the end product. What do you think? Do you shop for furniture at the thrift store? How do you revamp it? And can you share some of your current DIY projects?

Obsessed with gold right now,
Jay

Reference: consider using Water Mold Fire Restoration

DIY: The Ultimate Wire Holder

On this episode of hoarders…

Do you have a wire hoarder as a significant other as well? After I got married, I moved into my husband’s place. As I started to unpack my crafts, I found bins and bins of wires. Wires galore! TV cables, electronic wires, headphones, chargers, lions, tigers, and bears! I knew I married a techie; I didn’t know I married a wire wholesaler.

Wire hoarder
Organizing the large cables

Wires/ChargersMore cables!

If you have a significant other like mine, then I have the perfect Valentine’s gift idea for you. It’s an easy weekend project. If you’re the wire hoarder, then treat yourself to this organizer.

DIY Project – The Ultimate Wire Holder

Displayed

What you’ll need:

  • About 77 poster tubes 2″ in diameter and 6″ in length or 30″ in length so you can cut your desired length yourself
  • Hot glue
  • Crate (ask someone at the local farmer’s market for a crate)

Line up tubes 7 in a row (or until the row reaches the end of the crate). Line the second row in between the first. See the diagram below:

wire-holder-instructions

Second step, glue the tubes together. I glued the tubes inside the crate as I worked so that I know exactly how many rows I can make. My crate was able to hold 11 rows, 7 in a row.

Once the glue is dry, start organizing your small cables, chargers, headphones, etc.

Cut
I actually bought kraft tubes in 30″ length and we sawed each of the tubes into 6″ inch lengths. This is a lot of work! Next time around, I am simply going to purchase the 6″ tubes.

Stacked
Lined up and glued in the crate

Done
Organized and displayed on MG’s table top

Organized
Reminds me of honeycombs (just a little?)

Organized

MG and I put shoelaces, extra car keys, iPod cases, headlamps, Krazy Glue, basically anything that can fit into the tubes. Or you can put your paws in…

Chubs
“My Box… Muahaha!!!”

Isn’t this a perfect gift for a crazed wire collector? How do you organize your cables and chargers? What are some other ways you’ve seen people organize?

What are you getting for your loved one for Valentine’s Day?
Jay
—–
Buy kraft tubes at Uline here

From Wallpaper to Paint

I’m super proud to unveil one of my most recent projects on the blog today!

BEFORE:

Before

AFTER:

Final

Since I’ve been home in Sugar Land, I decided to update the bathroom in my parent’s house. I set out thinking this DIY would be a week long task. But because I’d like to have Glass Doors to make it more appealing.

After doing research about interior painters in Cincinnati, it seemed removing wallpaper and hiring a professional painter would be a breeze – Score the wallpaper and make holes throughout the paper, penetrate the paper with anti-adhesive solution, peel, and then primer and paint. Seems easy right? One thing you can do is, you can contact this house painter to get help.

WRONG. That’s only true for plastered walls.

Apparently, houses built in the 90s glued wallpaper directly onto drywall. Builders did not expect homeowners to switch out wallpaper (ill thought out). For those of you who are reading and don’t know about drywall, drywall is plaster between thick sheets of paper. Trying to “unglue” wallpaper from paper is an extremely difficult task. I set out to do a nearly impossible assignment. All the trash residue from such a makeover can be disposed with the help of services like rubbish collection dublin.

Because the wallpaper is glued on drywall, our project became this: peel wallpaper and be careful to not damage the drywall to badly, spackle the drywall damage then dry, sand down the walls to make it even, primer and another day to dry, texturize the walls then dry, sand to even out the texture, primer again and dry, and finally paint and allow for it to dry. 8 total steps but with 5 days of drying in between jobs. This project became a 2 week task with multiple trips to Home Depot.

Removing
Here’s Katie (my sister) and Baldwin peeling off wallpaper

Removing
See the dark spots on the wall? That’s damaged drywall

Removed
See the difference between drywall and plaster?

Removed
The drywall is so badly damaged… ouch

But Ming-Gih saves the day with spackle. It’s smoothed onto your walls and evens it out if there are dents or damage.This stuff goes on pink and drys white so you know where you’ve spackled – it’s called DryDex.

Plaster
Lots of damage ^^^

After the spackle drys, the dust storm hits. Wear a mask and I promise you’ll still get white boogers.

Sanding

Sanded
I’d be a cute grandma right?

Then we have to primer!

Prime
Had a little helper this time around ^^^

And then texturize

Texture

Then sand and primer again (but no need for pictures since you get the idea). We took guidance from the local business Elite Finishing

Finally, paint and install the new toilet! You can visit the page here to find more interesting insights into home renovation and door installation.

Color
This is Behr’s Pastel Jade. My sister claims she dreams in this color

PaintAlmost there ^^^

Done
Toilet in and working!

BEFORE image of the bathroom:

Before

AFTER image of the bathroom:

Final

Curtain
Gorgeous shower curtain with peacock rings (all by Threshold from Target)

Unit
This storage unit was from a garage sale for $10, and the elephant was an awesome steal for $5 at Target.

How perfect is this color palette?

Color Palette

What do you think of the update? What kind of projects are you working on?

Love,
Jay

DIY: Jeweled Frames

I’ve come across some super cute jeweled frames, especially from Z Gallerie. Look how pretty these are!

Jeweled Frames

Too bad they range from $18-40. Wah. wah. wah. That’s more than what I’m willing to spend.

This only means one thing! It’s time for a DIY! For under $5, you can make jeweled frames.

frame 1

Materials:  frame, paint, E-6000 craft glue, and mosaic tiles

Simply paint the frame and let it dry overnight. Then align the tiles, and glue each piece to the frame.

Similar mosaic tiles here.

Frame 2

Materials:  frame, E-6000 craft glue, beads, and spray paint.

For this frame, I purchased silver beads. I first aligned the beads and glued them onto the frame. Next I removed the glass, picture, and picture mat, then sprayed paint the entire frame with the beads white. Let it dry overnight.

Similar beads here.

Frame 3Here’s a different design for our bookshelf.

I like the juxtaposition of the tiles and beads. Each one has a personality, and every piece doesn’t match in size, shape, and alignment. Put your favorite photo of you and your friend and it will make for a great Christmas gift!

Is this a project you can do? What would you use these frames for? I actually used these frames to display my engagement pictures at my wedding.

DIY away!
Jay

Also check out my revamped frames from JCP for the house!
—–
1  //  2  //  3  //  4

DIY Wine Bags & Giveaway!

Congratulations to Connie for winning this giveaway! Please check your email for shipping information. Thanks to those who participated. It’s an easy DIY, so you can still own these wine bags!

—–

I love making gifts for people. I enjoy spending time getting creative and thrifty! Since Christmas is coming up, I’ve been busy coming up with ideas for presents. Repurposing things for gifts is my hobby. That’s a hobby right?

For instance, I love using paper grocery bags for gift wrap. I like using string or baking twine for bows. It’s also time to bust out those cassette tape pom poms!

Since my wedding, I’ve had a bunch of burlap laying around. While I was drifting off to sleep, I came up with the idea of making wine bags with the burlap (I tend to come up with the best ideas while I’m about to fall asleep. I have a journal to jot down my thoughts since I’ll wake up and totally forget). These make fantastic gift bags, and it’s great if you’re hosting a wine tasting party!

Tis the season of giving, so here’s another giveaway! Just comment on this post for a chance to win.

Bags

Materials:

  • 60 inch width by 30 inch length sheet of burlap
    • As long as you have 10 inch width by 30 inch length for each bag, you’re good to go
  • Scissors
  • Iron
  • Sewing machine
    • For the no sew approach, you’ll need double sided tape
  • Ribbon

Burlap
You need burlap, minus the cat! For some reason kitties love burlap

Here’s the tutorial:

DIY Wine Bags

CRAFTER’S TIP:

  • Burlap can be hard to manage. What I typically do to ensure I’m cutting straight is take one strand of burlap and pull the entire string through. It will create a straight line to serve as a cutting guide (numbers 2 & 3 in the tutorial above).
  • For the new sew approach, use double sided tape to tape down the edges after ironing.

For the mystery tasting party, each wine was put in the burlap bags so that all labels and types were hidden. Guests were asked to taste each and rate aroma, body, taste, and finish. After adding up the scorecard, you find out which wine you like most. It’s so fun when you find out that sometimes the cheapest wine is actually your favorite!

I created a scorecard for the wine tasting party. Feel free to use this template! Download it here.

Pens
Scorecards and pens, with glasses ready to go

Cheese
Cheese is necessary on any and every occasion

Bottles
Wine bags are numbered and hidden

PartyEnjoying at this point!

Tasting

For a chance to win three wine bags, comment on this post!

Cheers!
Jay
—–
Only one entry per email. Email must be valid. Shipping address must be in the United States. This giveaway ends at 11:30pm PST on 12/10/13. Winner will drawn and announced on Wednesday, 12/11/13 at 12:00am PST via blog and email provided.

DIY Dainty Tube Necklace (Giveaway)

UPDATE: Congratulations to Danielle at bybegnaud.blogspot.com! You’re the winner of this drawing!

Thanks to everyone who participated. You can still flaunt this gorgeous necklace with the DIY instructions below. Stay tuned for more giveaways!

—-

Another dainty necklace DIY and giveaway!

I am loving these pretty little things. There’s so much love that I just want to give things away! Perhaps I’m already in holiday cheer. Comment on this post for a chance to WIN.

Tube Necklace

What you’ll need (and where to buy at the end of the post):

Here’s the step by step tutorial:

DIY Tube Necklace

What do you think about this piece? Is this something you can do?

Necklace

So feminine and flirty! Plus, you could wear this with any outfit!

I’m also loving the layered look. I layered this tube necklace with the necklace from last week’s post (dainty beaded DIY here).

Layered

It’s almost the holidays. Start DIY-ing and getting those presents ready to give out to friends and family. These would be great gifts with a nice personal touch.

Don’t forget to comment on this blog post for a chance to WIN a necklace.

Loving dainty and pretty things,
Jay

Only one entry per email. Email must be valid. Shipping address must be in the United States. This necklace giveaway ends at 11:30pm PST on 11/19/13. Winner will drawn and announced on Wednesday, 11/20/13 at 12:00am PST via blog and email provided.
—–
Gold filled curved noodle tube bead
Wire Cutter & Pliers on Amazon (similar set to mine)
Gold chain from Amazon
Eye pin, lobster claw clasp, and jump rings from Michael’s

DIY Dainty Beaded Necklace (Giveaway)

Contest has ended. See winners here.

—–

I am in love with dainty necklaces right now! Don’t get me wrong, I do love a chunky statement necklace, but delicate jewelry can match so many different outfits, on casual days or with a fancy attire. It’s so girly and so fun!

Dainty Necklace

Here’s a tutorial on how to DIY a dainty beaded necklace. You can also WIN one of these necklaces by commenting on the post below! Simply tell me what you would wear this necklace with. Boys, win a necklace for your lady friend by telling me what you would like to see her wear this with (betcha you’ll win some serious brownie points!).

What you’ll need (where to buy at the end of the post):

Here’s the easy tutorial:

DIY Dainty Beaded Necklace

What do you think about dainty jewelry pieces? Is this something you can recreate?

Beaded Dainty Necklace

Don’t forget to comment on this blog post for a chance to WIN a necklace. What outfit would you wear this dainty necklace with?

Get to DIY-ing,
Jay

Only one entry per email. Email must be valid. Shipping address must be in the United States. This necklace giveaway ends at 11:30pm PST on 11/12/13. Winner will drawn and announced on Wednesday, 11/13/13 at 12:00am PST via blog and email provided.
—–
Small gold plated round beads
Wire Cutter & Pliers on Amazon (similar set to mine)
Gold chain from Amazon
Eye pin, lobster claw clasp, and jump rings from Michael’s

Revamped Storage Unit

Before we get into the revamp, I want to announce the winner of the Minion Hat costume giveaway. Congratulations Winnie Cheung! Cheetor will make a great Minion for Halloween. I will send you an email with shipment details.

Minion Giveaway - Winner

Stay tuned for more giveaways coming up soon!

——-

Now! I’m so excited to reveal my newest revamp – my updated storage unit.

Before and After

I bought this storage unit from Salvation Army when they were having a 50% off furniture sale. I was able to steal this piece for only $20.

It’s not the most intriguing piece of furniture, but I saw potential! With a bit of sanding and painting, the unit looks totally different now. Here I’ll provide detailed instructions on what I did. Maybe then you’ll be motivated to go purchase a storage unit for yourself and revamp it!

First off, bring your unit into a well-ventilated place because that spray paint is strong! I brought mine into the garage. Bring music because this is a 3-day process!

I then unscrewed the cabinet doors and took off the glass shelves. Keep the hardware in a brown bag so you don’t lose anything.

Storage Unit unscrewedIt’s so naked ^^^

Now start sanding! This will help paint stick to the furniture. Get every inch and all crevices. The shiny layer should be gone by the time you’re done.

Sanding

Before you start painting, dust and wipe down the storage unit with a wet rag. Then take a a black spray paint or dark, dark brown and spray the edges. I did this so that there would be a more rustic look at the end. This part is optional, but I think it gives the unit more character.

Black Spray
As you can see, I used Rust-Oleum in Black Satin

SprayedThe most important thing here is to get all the edges. I sprayed some middle parts too so that some black can show through later. Go crazy and have fun! Now let the spray paint dry for 24 hours. You’ll get to actually painting the unit once the spray paint is completely dry.

Use acrylic paint for this project because latex will not stick. Acrylic!

Painting

If you’ve been reading my past revamps, you already know this is my favorite color of all time – Grey Wolf Martha Stewart. I had to use 4 bottles of this to finish the storage unit. It’s the perfect warm grey, and now this unit will match my reupholstered bench, revamped bathroom storage unit, and updated frames. Yay!

Painted
Here I’ve painted the entire unit

Grain
I love the wood grain look, so I painted in long strokes with the grain. You can see how the paint looks up close in this picture and how some of the black shows through.

I wanted my unit to look very antiqued. I took some fine grit sandpaper (220-grit), and carefully rubbed off some paint on the edges. Don’t be too rough or the black underneath will rub off too. The trick is, high grit and light pressure.

Sanding EdgesDo you like the edges like this?

Finally, once the unit feels dry to the touch, you can coat the storage unit with a finishing spray.

Coat
I used a matte finish from Rust-Oleum. This stuff stinks! Seriously, make sure you’re in a well ventilated area.

Time to wait for another 24 hours for the paint to dry. My patience is low, so this is the hardest part, especially since you’re so close to finishing!

When dry, I took out my tools, measured where I would want knobs on the cabinet doors, and drilled holes for two knobs. I found gorgeous knobs at Cost Plus World Market for $3.99 each.

Trusty tools

Knobs

Storage always seems to be a problem when you own a place! I put this unit in my living room, near my kitchen so that I could store appliances. Once I organize everything, I’ll have so much more counter space.

Drumroll, please! Here’s my final product:

FinalWhat do you think?

Side
Up close of the right side of the unit – I put in some cookbooks, wine, and kitty toys

You don’t get to see the inside because there’s a bunch of random things – like my rice cooker, crock pot, and tools. Ew, that’s why it’s hidden!

For your viewing pleasure, I’ve added a few decor items on the top – my beloved Jambox, a succulent plant displayed in a glass vase, my fruit bowl, and my cup holder that I purchased for 99 cents at the thrift store. I’m displaying my “J” cup!

Decor

Do you have a problem with storage and counter space at your house too? What do you think about this $20 unit revamp? Is this something you could do and will you be hunting for a piece of furniture to revamp now?

Deal hunter,
Jay

DIY: My Little Minion

UPDATE:  Congratulations Winnie Cheung! You’re the winner of this costume giveaway! Thanks to all those who participated in this contest. Your pet can still be a Minion with this easy DIY. Happy Halloween!

—–

Minion

It’s almost Halloween (only two weeks away)! I know you’re thinking only one thing – what costume should my pet wear? I got you covered with this DIY! Plus, enter a comment below and you can win one of these costumes for your pet!

After watching Despicable Me 2 and going around a few McDonald’s to pick up those Minion Happy Meal toys, I knew I had to make a Minion costume. Meet my little Minion, Chubs.

Little Chubbo

Chubs

What do you think? This costume takes a little bit of sewing, cutting, and some hot gluing. Super easy, and I promise you’ll get a lot of “OMG, SO CUTE” reactions.

What you’ll need:

  • Felt (yellow, black, grey, and white).
  • Sewing machine (you can definitely hand-sew if you don’t have a machine)
  • Scissors
  • Hot glue gun and glue sticks
  • Black pipe cleaners
  • Elastic
  • Velcro

Let’s start out with the yellow felt. My cat is a small animal (10lbs), so I measured his head and cut a piece of yellow felt 9×7 inches. Then sew the edges together on both sides (follow the pattern below). I used a sewing machine, but this is easy to do by hand too.

Yellow Felt

Next cut black pipe cleaners into 2 inch pieces. Stick them through the top of the hat (you may need to snip a little hole at the top for the pipe cleaners to go through). I then bent the end of the pipe cleaners inside the hat, and hot glued them into place.

Minion Hot Glue

Now it’s time to sew the elastic onto one side of the hat. Then sew the velcro onto the loose end of the elastic, and sew the velcro onto the other side of the hat. Make sure your band is flat when it is velcro-ed together.

Elastic

Velcro

Finally, we can move on to the details. Let’s cut the other pieces of felt. Again, my hat is for a 10lb animal so my circle diameters are as follows:

  • Black – 1.5 inches in diameter
  • Grey – 3.75 inches in diameter
  • White – 3.25 inches in diameter
  • Black band – 6.5 inches in length

To make things easier, here’s a template for the circles. You can print the pattern so that it can serve as a guide.

I simply hot glued all the pieces together. First the eyeball, then the pupil, then the black bands, and lastly the grey glass.

Details

Done

Put it on your little minion, and take lots of pictures!

Minion Boy

Chubs' Hat

Is this something you can easily recreate? Are you thinking about making your little pet child a minion now?

As I mentioned earlier, enter a comment for this blog post, and you could win one of these small hats for your little pet. You’ll get it before Halloween! Enter now!

Only one entry per email. Email must be valid. Shipping address must be in the United States. This costume giveaway ends at 11:30pm PST on 10/22/13. Winner will drawn and announced on Wednesday, 10/23/13 at 12:00am PST via blog and email provided.

Banana,
Jay
—–
Minion image copyright