Roasted Chicken Recipe

Did you know that Costco sells two Whole Organic Chickens for around $20? Such a great deal!

Usually I make one for dinner, and I’ll freeze the second one until I need it.

Roasting

MG and I make a whole chicken on Sunday night, eat leftover chicken breast with pasta on Monday for dinner, and finish the leftover meat on a Tuesday with a chicken salad during lunch. One $10 chicken for three meals – can’t get any better than that right?

I also love to make a roasted chicken for a dinner party of 4 with some roasted veggies. Spending $15 for a dinner party – can’t complain about that!

Ingredients (only 4):

  • Whole chicken
  • Kosher salt
  • Freshly ground pepper
  • Thyme

Directions:

1. Preheat the oven to 450° F.
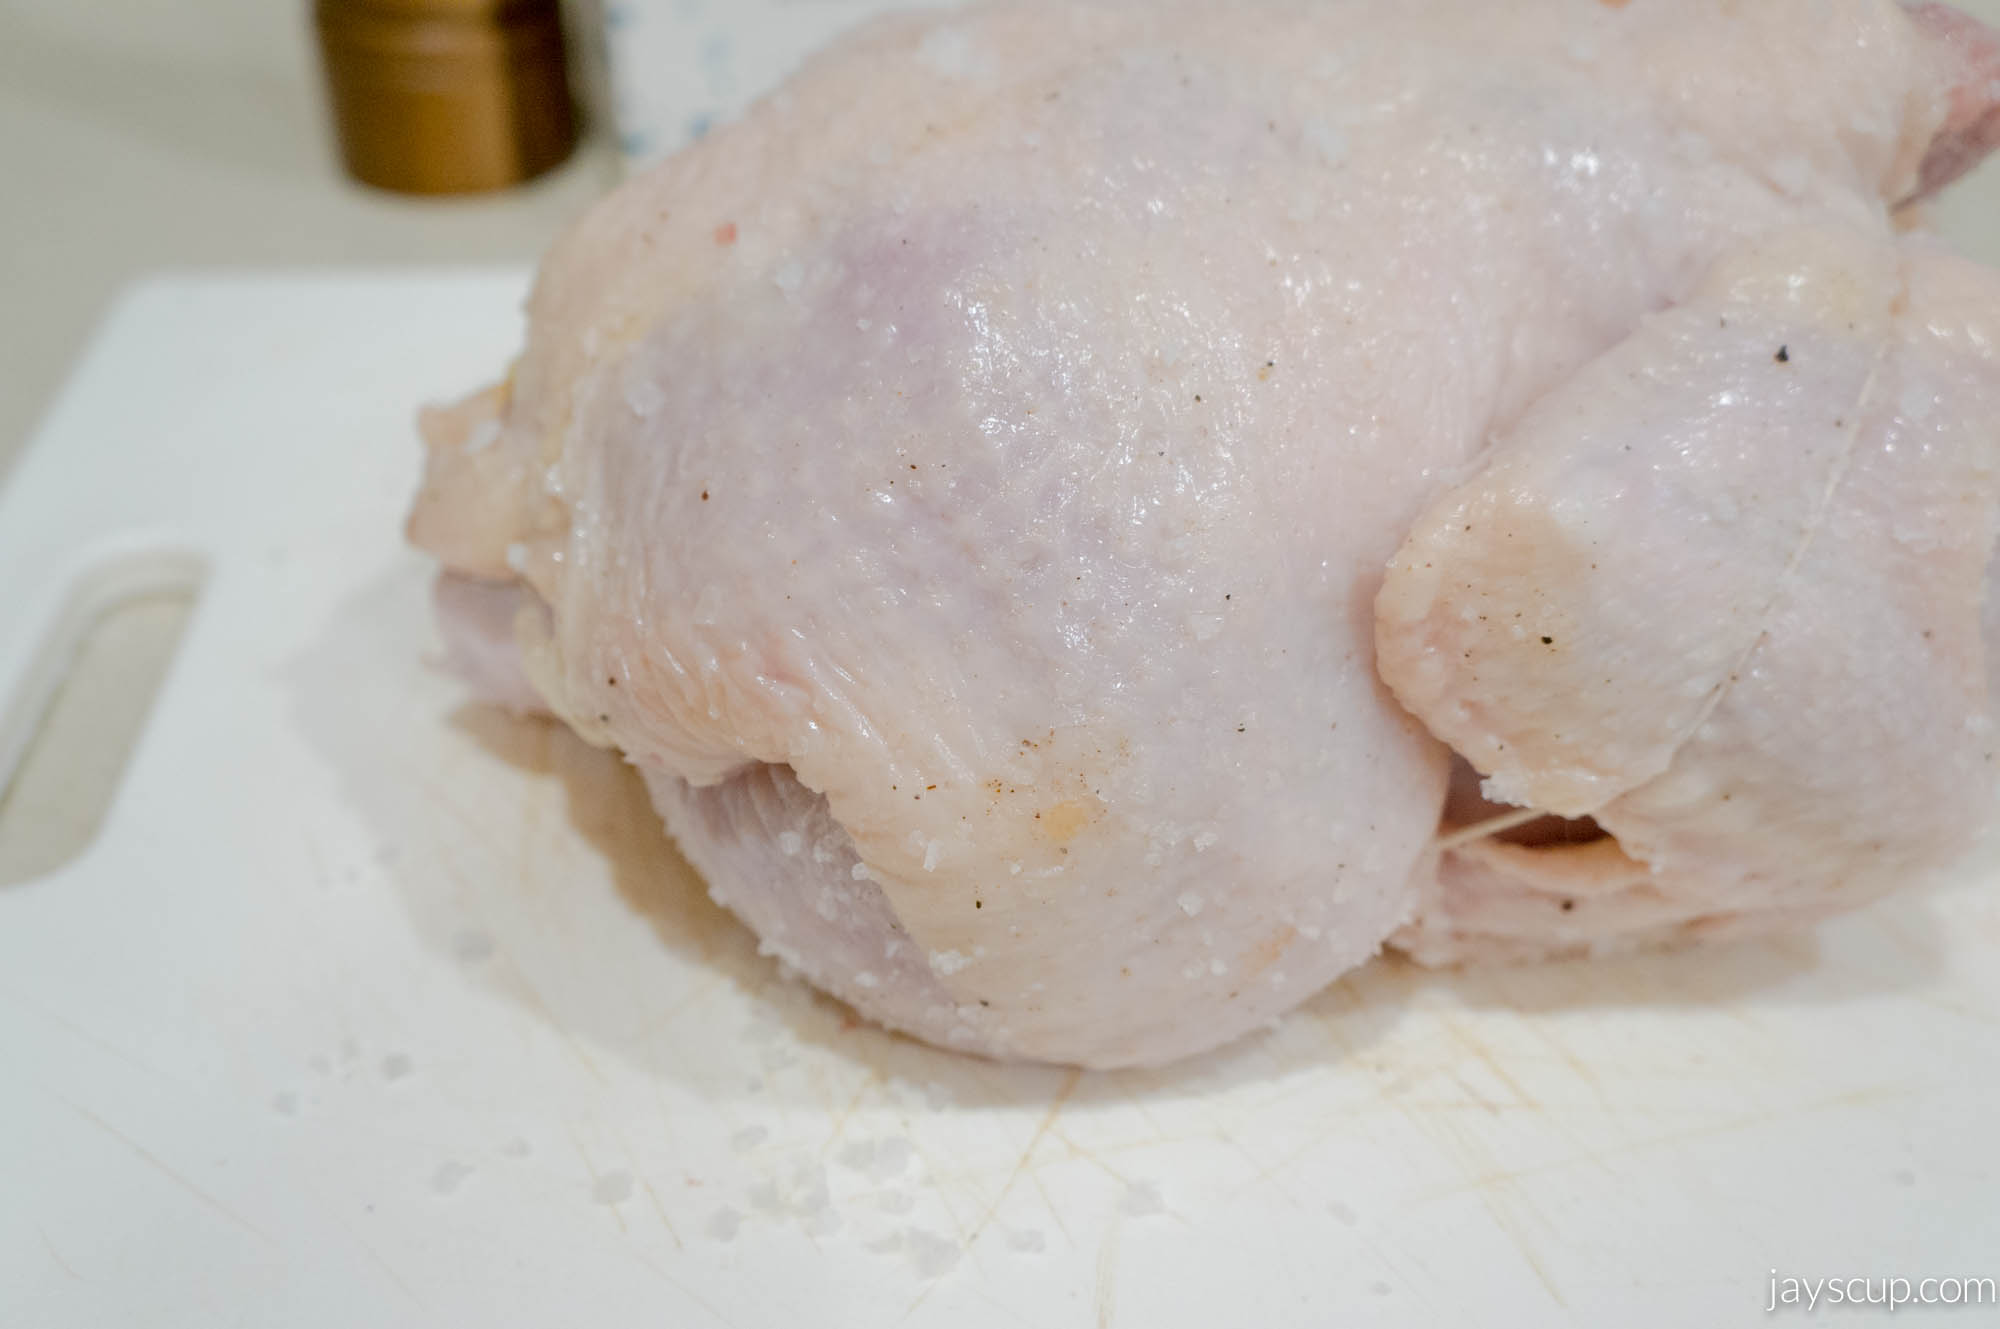
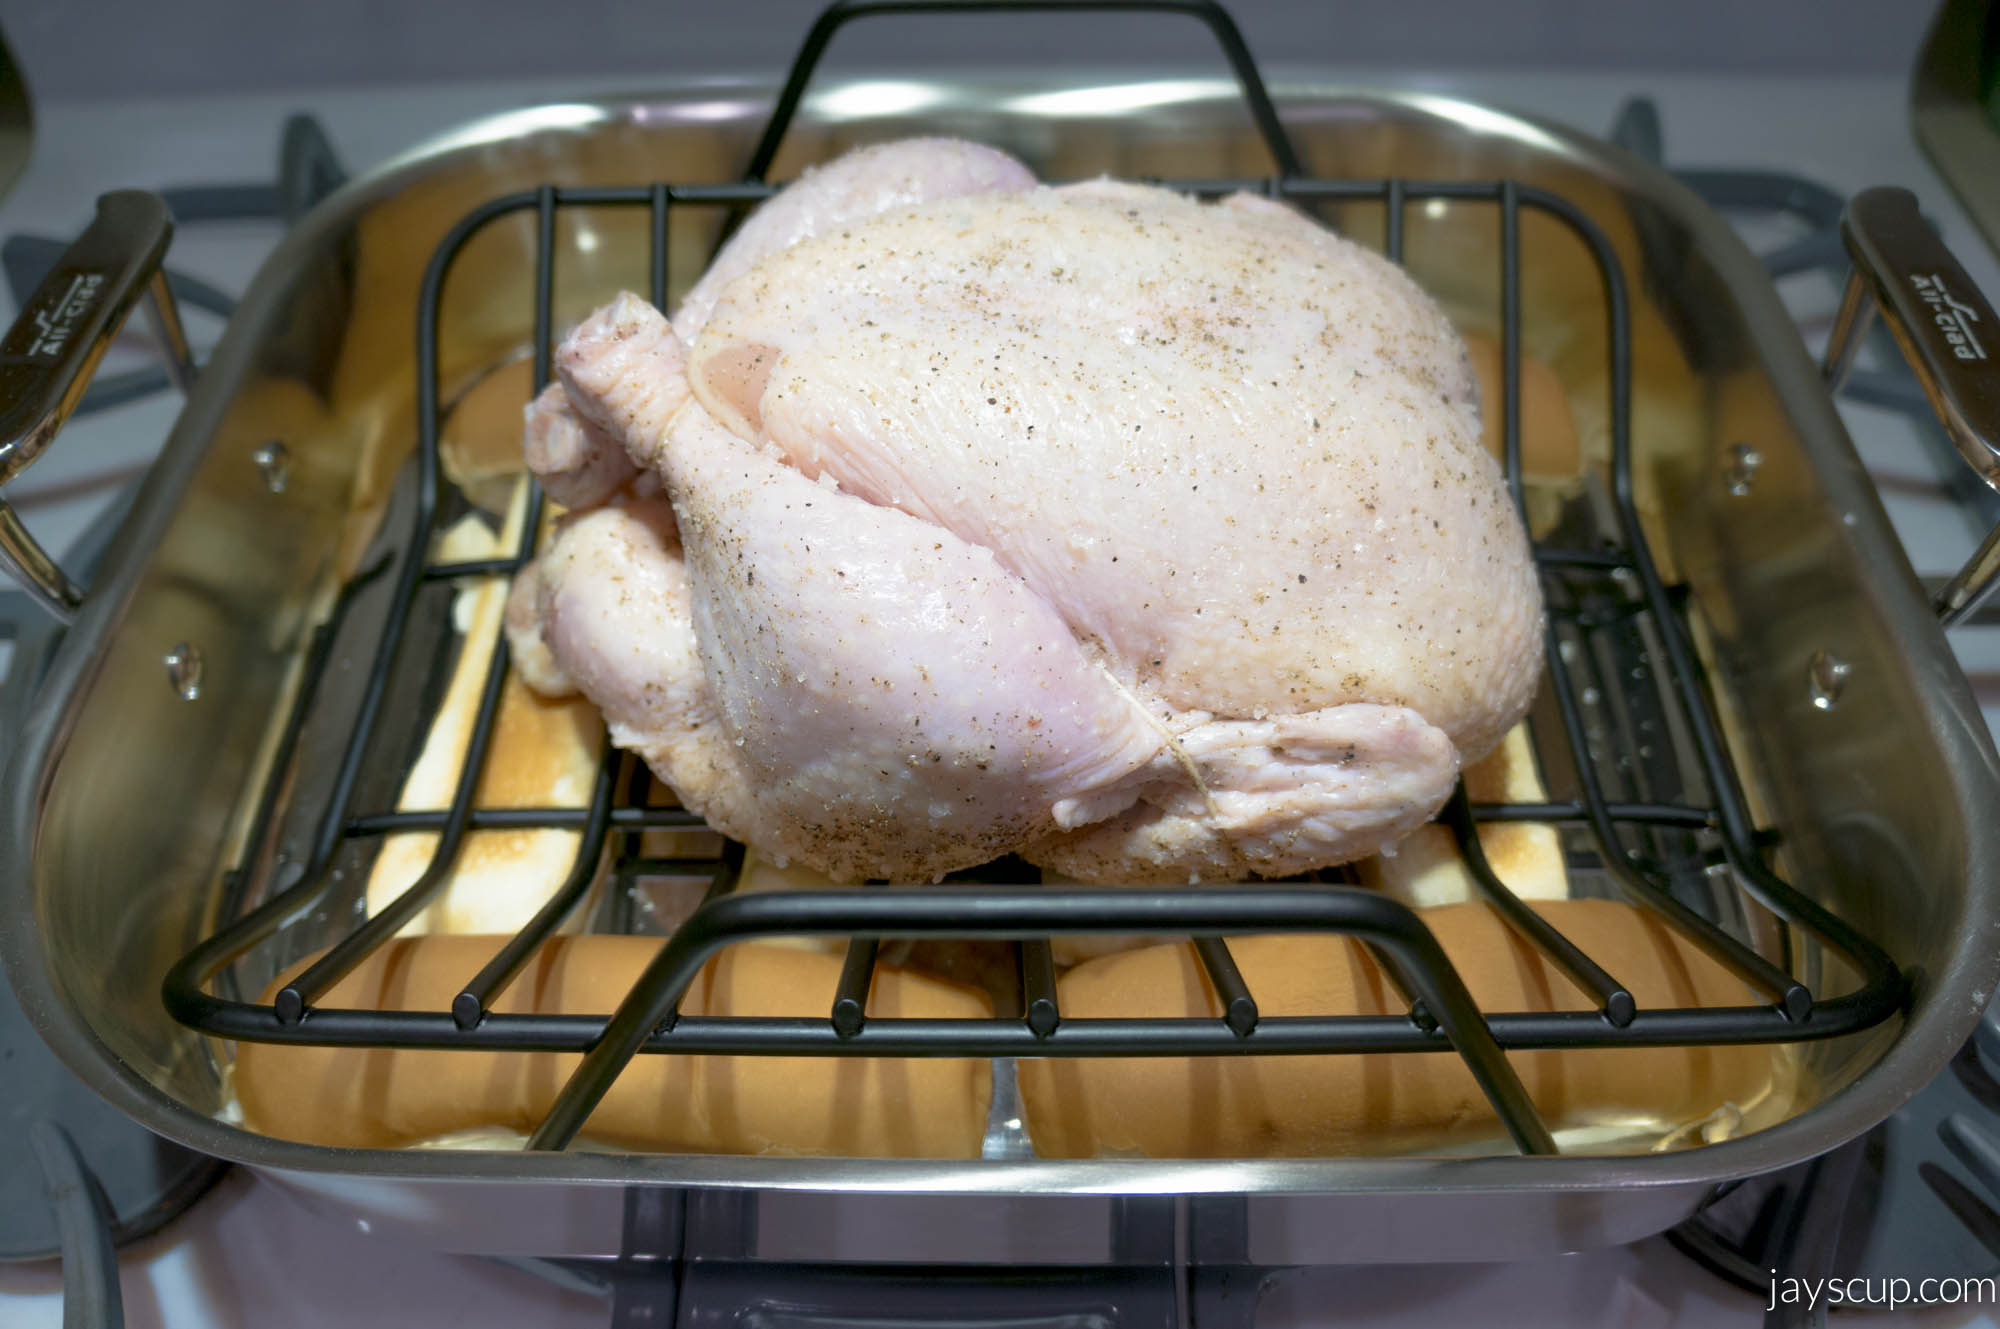
2. Using paper towels, dry the chicken really well inside and out. As dry as you can get.
3. Salt and pepper the outside and inside – be generous and coat evenly.
4. Now truss the chicken (Trussing is important. It keeps the tips from burning and the thighs keep the chicken from drying out).
5. Put the bird in a roasting pan. If you have extra bread, you can line the bottom of the pan with bread. This helps dry the heat even more for an extra crispy chicken. However, bread is totally optional.
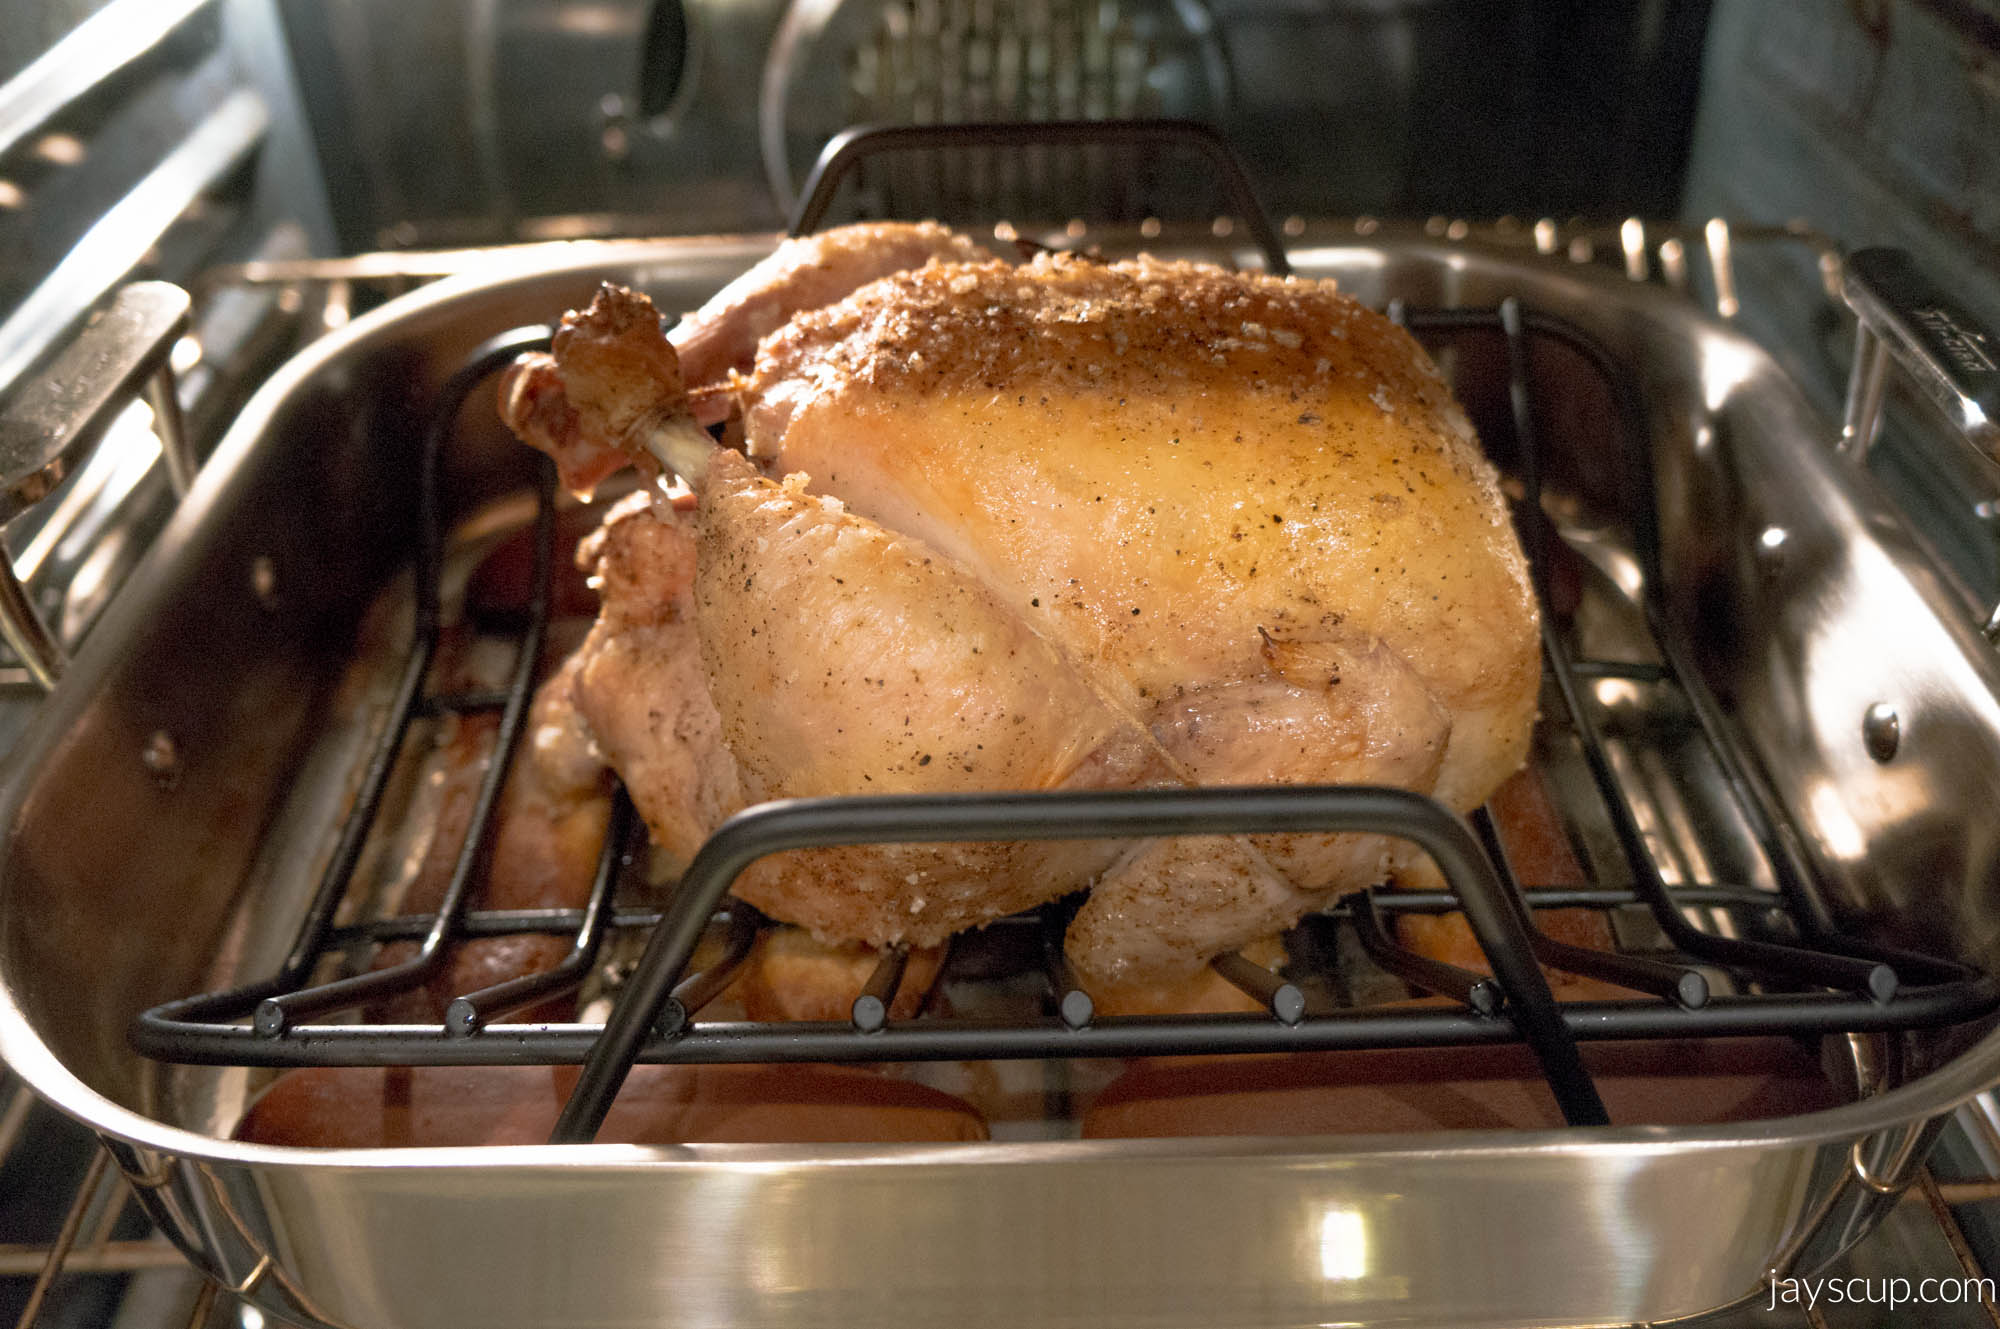
6. Roast the chicken for 60 minutes, then broil for 5-10 for a crispy skin.
7. Remove the chicken from the oven and sprinkle thyme.
8. Let the chicken rest for 15 minutes on a cutting board.
9. Remove the twine and cut the chicken. Cutting the chicken is such an art form that I’m still learning. First you break off the middle wing pieces. Then you remove the legs and thighs, and the next cut I make is the middle of the breast captivity. I haven’t mastered cutting the oysters out from the backbone. One day I will…
10. Serve and eat!

This chicken is so juicy. The skin is crispy. And it’s such a cheap meal. Yum!
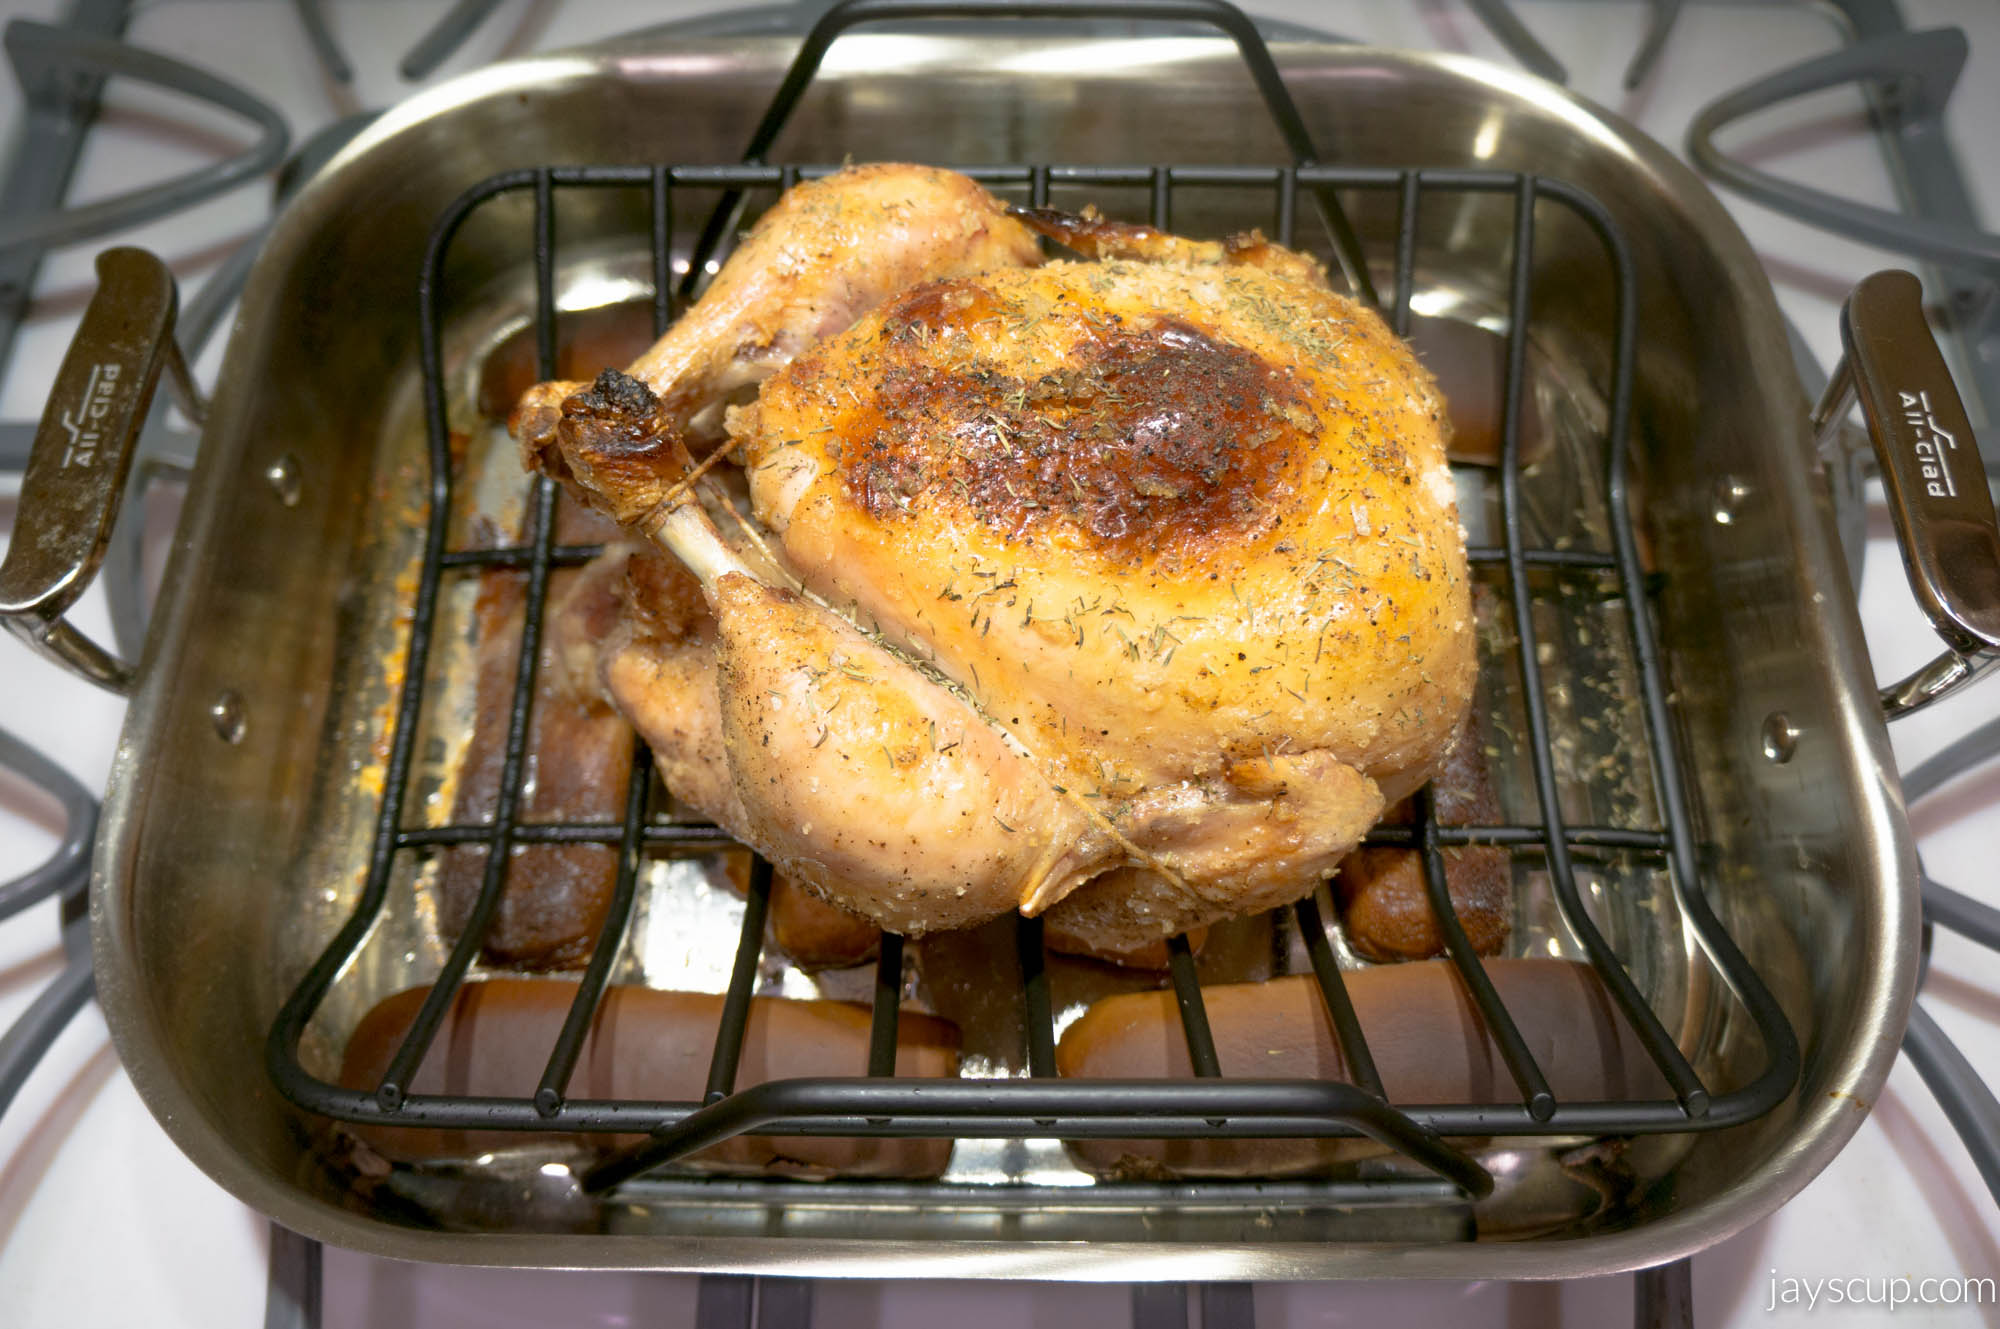
Salting and pepperTrussed and salted 

ReadyReady for the oven

In the Oven
Done roasting!

Resting
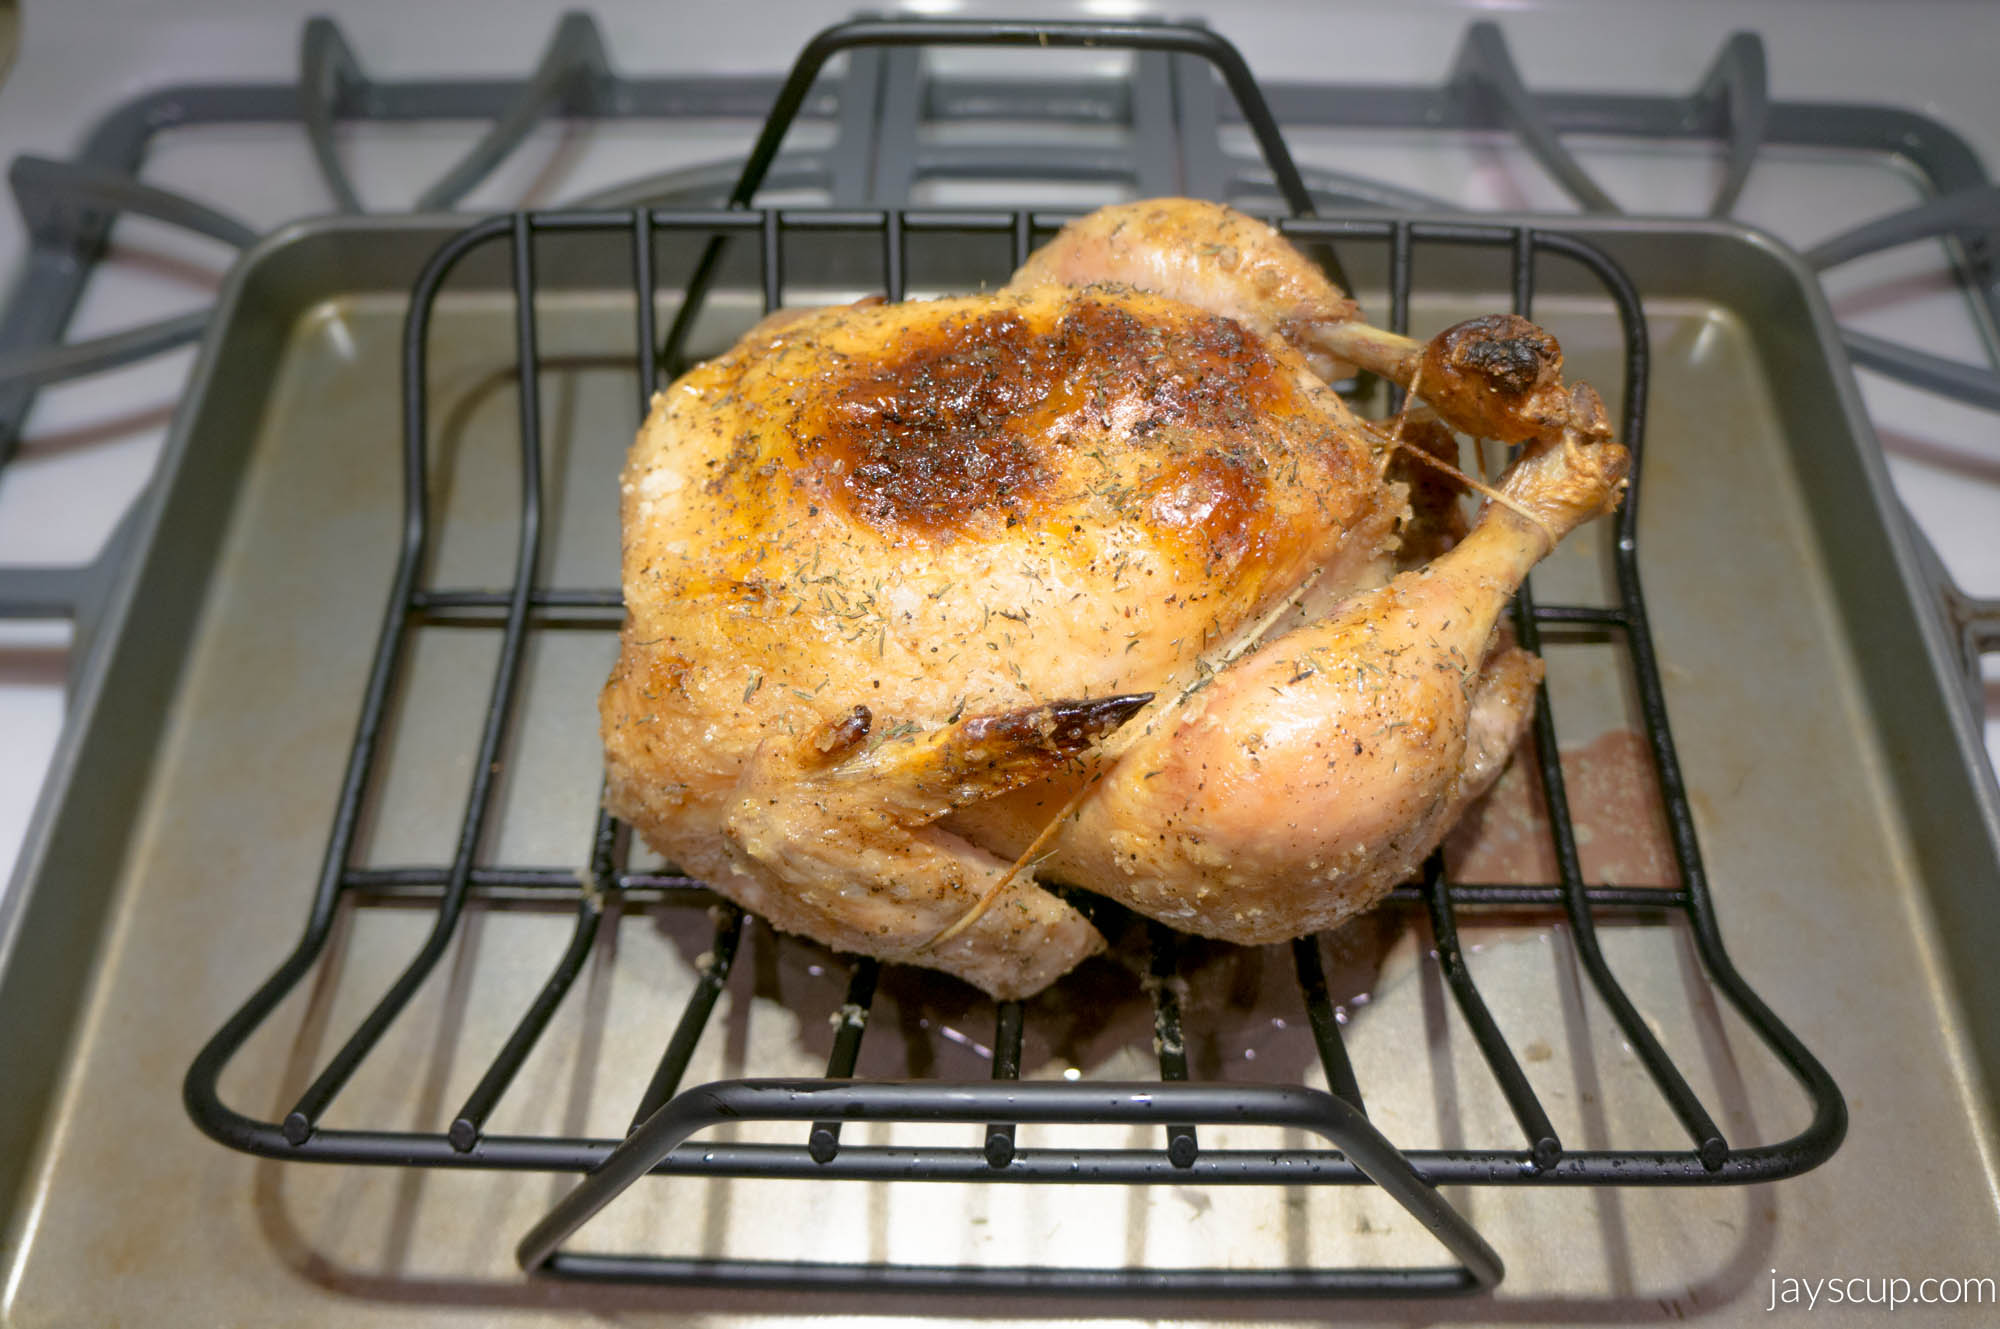
Remember to let it sit and rest for 15 minutes before cutting into it

Done
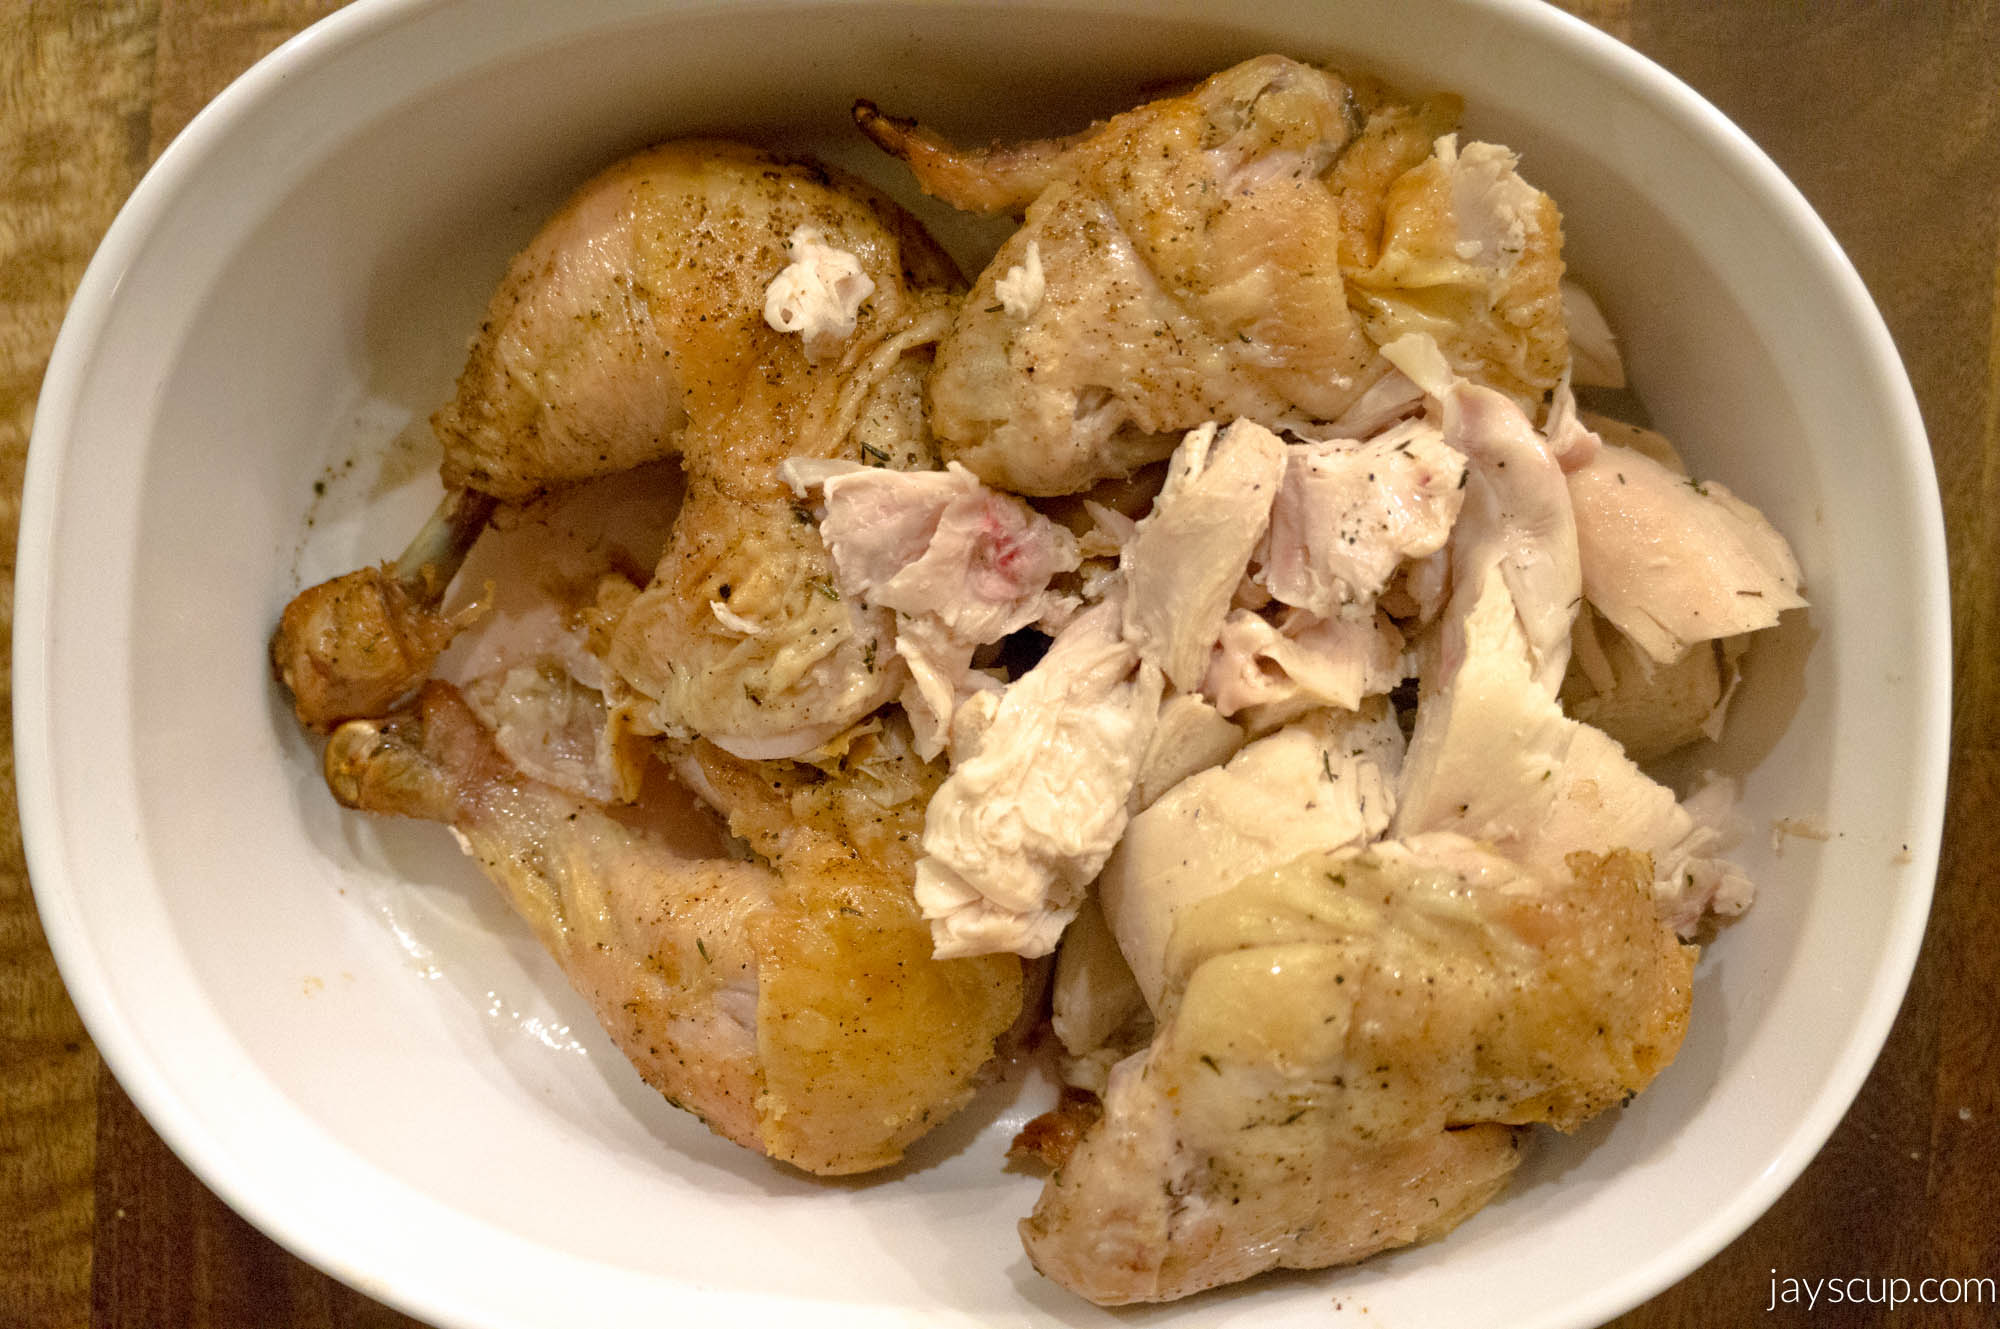
The end product doesn’t look beautiful, but it tastes heavenly! 

Chicken is such a universal meat – you can make casseroles, pair it with salads, cook it in pasta, add it to stir frys, or simply eat it plain. What are some of your favorite chicken dishes? Also what are some ways you make chicken? Please share your recipe!

Who’s hungry?
Jay

When you have lots of bread… make crumbs!

How was your Thanksgiving? Give me the details on what you ate! Did you also go shopping afterwards to walk off some of that food?

MG and I decided to go to the stores at 10pm to digest. This season there isn’t much that is our on wish list, so we didn’t purchase anything, but it was super fun to people watch.

Now that Thanksgiving is over, you may have a bunch of dinner rolls left over. Or maybe you have so many leftovers that your bread is going stale because who wants sandwiches when you can have turkey and stuffing with a side of green bean casserole for lunch.

Instead of throwing all that bread away, make bread crumbs!

Bread Crumbs

Ingredients:

  • Half a loaf of bread or 10 rolls, torn into 1-inch pieces
  • 1 tablespoon Italian seasoning
  • 1/2 teaspoon garlic powder
  • 1/4 teaspoon salt

Directions:

1. Preheat the oven to 300 degrees F.
2. Place all of the ingredients into a blender or Magic Bullet. Pulse until the bread becomes crumbs.
3. Spread the crumbs evenly on a baking pan and bake until the crumbs are crisp and begin to brown (about 5 minutes).
4. Cool the crumbs.
5. Transfer to an airtight container and store at room temperature (for up to 2 weeks) or store in the freezer (for up to 6 months).

Crumbs

Crumbs
Mine are going in the freezer

Bread crumbs are so versatile. You can make crab cakes, fried eggplant or zucchini fries, baked fish, veggie patties, or even meatloaf. What are your favorite recipes that include bread crumbs?

Don’t let food go to waste! What other leftovers do you have? Let’s come up with a solution!

Happy Friday,
Jay
—–
Original recipe

Jay’s Vanilla Ice Cream Recipe

If you could only choose one ice cream flavor for the rest of your life, what would it be? Mine… easy, vanilla. You can’t get sick of the flavor, and it can always be paired with something else (cookies, brownies, cake, pie, coffee).

Cookie sandwich
Even Chubaloo wanted something sweet!

I bought a Cuisinart ice cream maker this past summer and have been making my own ice cream since then. I’ve made an assortment of flavors including strawberry, avocado, coffee, and vanilla. Making your own ice cream is a little pricer than purchasing ice cream from the store since you’re using raw ingredients. Also, the ice cream cannot last you months in the freezer, like store bought. But homemade ice cream tastes so delicious and creamy. It’s also bit healthier too since there are no artificial additives or preservatives. Plus it’s fun to make up your own recipes!

I’ve been trying to perfect my vanilla recipe so that it’s not too sweet but extra vanilla-y. After batches of batches of vanilla ice cream (too much ice cream? darn. first world problem), I’ve finally accomplished it! Time to bust out that homemade vanilla extract again.

ingredients

Ingredients:

  • 2 eggs
  • 3/4 cup of granulated sugar
  • 1 tablespoon of vanilla extract
  • 1 cup of whole milk
  • 2 cups of heavy whipping cream

Directions:

1. Beat eggs until light and fluffy (about 2 minutes).
2. Add sugar and mix well.
3. Combine vanilla and mix.
4. Add the whole milk, then add the heavy whipping cream. Mix it all together.
5. Pour mixture into your ice cream maker. Follow your ice cream maker’s instructions (I simply turn on the machine and leave it churning for 20 minutes, then put the ice cream in the freezer for a few hours).

So simple!

Vanilla

Do you have an ice cream machine at home? What kind of flavors do you make?

Pie a la mode

With pecan pie, pumpkin pie, and all kinds of other sweet treats, ice cream is a must!

Happy Thanksgiving!
Jay

Yummy Fruit Tart Recipe

Fruit tarts are like little delicate bites of goodness – flakey, sweet, creamy. Yum! No only are they tasty, but also eye candy, so pretty!

Delicious

My sister shared with me this amazing recipe and now it’s your turn to try it out. Typically I make one large fruit tart, but it can’t be easily served. If you have an amateur server, you sometimes get cheated of custard or fruit. I’m sure you know what I mean. You saw that strawberry fall off your piece but then it was served to the next person or worse, your server ate it! And you could have sworn that part of that custard was yours because you can see straight to the pie crust on your plate… The frustration. I get it!

Big tart
A big one is so pretty though!

For this recipe, I made mini fruit tarts because its easier for large parties (especially with Thanksgiving coming up). More importantly, you feel like you had your fair share, all the custard and all the fruits!

By the way, remember that homemade vanilla extract post? It’s time to use it!

Ingredients for vanilla custard:

  • 2 cups whole milk
  • 1/2 cup and 2 tablespoons of granulated sugar, divided
  • 4 tablespoons of cornstarch
  • 2 egg yolks
  • 1.5 teaspoons of vanilla
  • 3 tablespoons of unsalted butter, cut into pieces

Directions:

1. Combine milk and 1/2 cup sugar in a saucepan over medium heat and stir until it’s simmering.
2. Whisk egg yolks and the remaining 2 tablespoons of sugar in a separate bowl. Then add cornstarch and mix until pale yellow and thick.
3. Slowly add milk into the yolk mixture, whisking constantly. Return to medium heat until mix is thickened.
4. Remove from heat and whisk in the butter and vanilla extract.
5. Place custard into a bowl and cover the custard with plastic wrap, making sure that the wrap touches the top of the cream so skin does not form. Refrigerate until cold throughout (can last up to 2 days).

As the custard is cooling, work on the crust!

Directions for the pie crust: Preheat the oven to 350°F. Combine 1/2 cup of confectioners sugar (aka powdered sugar), 1.5 cups of flour, 3/4 cup of unsalted butter (softened and sliced). Knead until the dough feels tacky. Refrigerate for 15 minutes. Spray the muffin pan with nonstick cooking spray. Roll out dough, and flatten it  across each cup of the muffin pan (keep in mind that this recipe is for mini tarts). Bake for 10-12 minutes until light brown. Pop each pie crust out and cool on a rack.

mini piesI flattened each cup with my finger tips

crustTake a butter knife and pop each of these tarts out, one by one

Now put everything together! Scoop custard into the little pie crusts. Decorate with fruits. I also glaze the tops of the tarts with apricot jam (simply microwave the jam until it’s spreadable, let it cool, then brush it onto the tops of the tarts). Glazing is totally optional.

Fruit
Don’t use fruits that brown (fresh apples, fresh pears, fresh peaches, and bananas)

Glazed
Glazed. Told you, eye candy.

YumEnjoy!

What’s your favorite dessert? Are fruit tarts on the top of the list? If you’re making this, who will you be making it for?

I love little delicate bites of goodness,
Jay

Chocolate Chia Bites

Set

We’ve been having so much fun with Chia seeds – putting them in juice and making strawberry jam! Now let’s make some chocolate bites!

I don’t have a sweet tooth, I’m definitely a savory girl. Give me Cheeto’s or beef jerky before bed, but there are some days where I like to end on something sweet. Now that it’s getting colder, give me a glass of wine and throw in some of these chocolate chia bites! Doesn’t that sound lovely?

These little treats are super easy to make! Save them for yourself or give them away as holiday gifts. I’m sure you’ll be quite popular if you bring them to work for your colleagues!

ingredients

What you’ll need:

  • Dark Chocolate Chips
  • 1/2 cup of chia seeds
  • Trail Mix (I bought my big jar from Costco)
  • Silicone mat (or parchment paper)
  • 1 Ziploc bag
  • Scissors

Directions:

1. Half your bag of chocolate chips into the Ziploc, and microwave for 10 second bursts until the chocolate has melted. Do NOT overheat or the chocolate becomes thick.
2. Once melted, snip off a corner of the Ziploc.
3. Now pipe the chocolate onto the mat or parchment paper. Squeeze lightly so that the squirts are bite sized.
4. Once all the chocolate is piped, sprinkle chia seeds and add trail mix. Lightly push the trail mix into the chocolate so it stays when set.
5. Let the chocolate harden for about 10 minutes. I like to stick them in the fridge so that it sets quicker and the chocolate is a bit cold. Once the chocolate is hard, you should be able to pop each chocolate chia bite off one by one.

ReadyLay everything out so it’s accessible – makes things easier

MeltMelted chocolate – I like to microwave in burst and squeeze the chocolate around in the bag so it melts evenly

SnipSnip the end for piping

SquirtSquirts

SetLet it set for about 10 minutes – quicker if you put them in the fridge

I call these my healthy chocolate bites, wouldn’t you agree? It’s definitely justified if you have more than 5, maybe 8, okay fine, 10.

Serve

Is this something you will try to make? Will you be making these for yourself or someone else?

Enjoy this recipe! Yay for Chia!
Jay

Avocado/Spinach Smoothie Recipe

Remember when I told you MG and I were eating healthier (post here)? We’re still eating healthy! Obviously, there are splurge meals in between, but we are still juicing every day and drinking it with Chia.

One of my favorite parts about juicing is making up recipes as I go. A little bit of kale, a little bit of spinach, maybe some carrots, and an apple. Voilà! Delicious juice! Next one might be beets, oranges, celery, and carrots. Then, another juice could be a handful of cilantro, carrots, apples, chard, and half a lemon. I think you get the point!

I’ve recently discovered a really delicious smoothie, and I want to share it with you. It’s my avocado/spinach smoothie! For this recipe, you’ll need a blender or a Magic Bullet.

Avocado/Spinach Smoothie

Ingredients (makes 2 servings):

  • 1 avocado
  • Handful of spinach
  • 2 apples (freshly juiced or you can add 1 cup of concentrated apple juice)
  • Chia seeds (optional)

Directions:  Blend avocado and spinach together. Add apple juice. Now add enough water until your desired consistency, and lastly, mix in a tablespoon of Chia seeds. Sip away!

Avocado/Spinach Smoothie

It’s such an easy and quick breakfast meal. Go on and give it a try. Let me know how you like it!

Is this something you’re interested in making? Do you have a go-to smoothie recipe you can share with us?

Drink away,
Jay

Fat Girl Brussels Sprouts Recipe

Brussels sprouts

It’s time to unveil my recipe for brussels sprouts! It’s the season for these little veggie balls. Trader Joe’s is finally starting to sell the sprouts on stalks again!

I never understood why people don’t like brussels sprouts. If you buy an old batch, they can be a bit bitter, but with a bit of seasoning, the little cabbage balls can be so scrumptious. My mom never made me brussels sprouts growing up, so that could be another reason why I love them so much.

I call this recipe my Fat Girl Brussels Sprouts because there’s bacon in it. And who doesn’t love bacon? Bacon makes everything good. Duh!

Ingredients (only 3!):
Serves 4-5

  • Brussels sprouts (a little more than 2 dozen sprouts)
  • 6 slices of bacon
  • 3 cloves of garlic

Directions:

1. Pre-heat the oven to 350° F.
2. Cut up the sprouts into bite size pieces. For the smaller ones, I halve. For the bigger sprouts, I cut into quarters. Try to fluff up the leaves a bit with your fingers. Place them into a big mixing bowl.
3. Cook the bacon in a pan until crispy.
4. As the bacon is cooking, mince the garlic onto the brussels sprouts.
5. Once the bacon is cooked, cool them until you can break the bacon into small pieces into your mixing bowl. Should be easy to do with your hands since the bacon is crispy. Then pour the bacon oil into the mixing bowl (that’s why it’s my fat girl brussels sprouts!).
6. Mix all the ingredients in your bowl until the sprouts are thoroughly coated with the oil. The oil may still be hot so be careful when mixing!
7. Now place parchment paper on a baking pan, and place all ingredients onto the pan evenly. Then put the pan into the oven for 40 minutes (time may vary as oven are all made differently). Basically, bake until brussels sprouts are soft on the inside.
8. Now broil the brussels sprouts in the oven for 2-3 minutes, until the leaves are golden brown and crispy.
9. Serve and eat!

DSC01066


Mince the garlic into the mixing bowl.

Fat girl sprouts
Pour in the bacon oil and mix all the ingredients together!

Into the ovenInto the oven they go!

ServedHow delicious does this look?

Yes, they are cooked with bacon oil, but this is a veggie so it’s healthy right? I promise that you’ll like brussels sprouts if you make this recipe.

How do you feel about brussels sprouts? Is this something you’re going to try? Are you hungry yet?

I love bacony & crispy sprouts,
Jay

The Legendary Steak

Who doesn’t love a nice piece of meat?

Steak with butter

If you’ve ever been to our house, you might have been lucky enough to have MG’s fricken awesome steak. After having this for dinner, I honestly don’t care to go to steakhouses. We’ve been to a few restaurants for steak since, but I still compare it to the one we eat at home.

I’m finally willing to share the recipe with you! If you follow these steps, your steak will turn out amazing every time.

First off, get a nice piece of meat. I love bone-in ribeye – it has a good texture and enough fat for a flavorful steak. If you’re willing to splurge, get the Prime cut at Costco. If you’re really willing to put some money down, find a butcher for a dry-aged piece of meat. Whole Foods sells their dry-age ribeye for ~$22/lb. Five Dot Ranch has mind-blowing cuts of meat, you can find them at the Oxbow market in Napa Valley, ~$25/lb for dry-aged, but totally worth the cost.

Whole Foods - Steak^^^ This is at Whole Foods

Let’s get started! Preheat the oven to 500° F.

As you’re pre-heating the oven, sprinkle McCormick’s Grill Mates Montreal Steak seasoning onto the steak, not too much because you want to still taste the meat flavor. I also love Gibson’s Seasoning Salt (a steakhouse located in Chicago), but for this recipe, we’ll stick to McCormick’s.

Favorite Seasonings
^^^ My two favorite seasonings

Sprinkle

Once the oven hits 450° F, heat up your cast iron skillet on high. Get it as hot as you can (if this is a used skillet, the previous oil residue will start to steam, which is a good indicator that it’s hot).

Once the skillet is hot, hot, hot, add a slice of butter onto the pan. When the butter is melted, place the steak onto the skillet. Sear each side for only 30 seconds. Searing helps to keep all the juices in.

Melt the Butter

Sear the Steak

Other Side

The oven should be at 500° F at this point. Place the entire skillet into the oven. Bake the steak 2 minutes on each side (this is for 1 inch steaks only). If the steak is thicker than 1 inch, place the steak in the oven for 3 minutes on each side.

Baking

Last step, after taking the steak out of the oven, let it rest for 5 minutes. Basically this lets the steak soak up all the juice. And yes, a juicy steak is where it’s at! This is the hardest step since your house probably is filled with mouth-watering smells of steak.

SteakLook at that char!

Now savor every bite of steak because it’s probably amazing, and juicy, and flavorful, and all kinds of goodness. As I’m typing this, I feel like I can smell the deliciousness.

Delicious Steak

Dinner is served!

Dinner is served

Few tips:

  • A cast iron skillet is best because it allows you to sear the steak with some char, which adds some crispiness to the texture.
  • This is a little trick I learned from an outdoors man that I used to work with. Poke at your thumb nugget to gauge how well done the meat is.

Doneness of Steak

  • Wine? Pshhh… I love eating steak with milk. The milk is so sweet, and steak is the perfect match. Anyone else like to do this?
  • To clean your cast iron skillet, soak up the oil with a paper towel. Simply use hot/warm water and scrub off residue. Add some salt and scrub to get stubborn food remains. Do NOT use soap. You want your cast iron to become “well-seasoned” to prevent rust.

Washing the cast iron

What do you think? Is this something you will try?

Are you hungry now? Cause I am!
Jay
—–
I have the Le Creuset Cast Iron Skillet in Caribbean from Macy’s

Homemade Vanilla Extract

It’s Fall, which means we’re heading towards the season of food, food, and more food! I’m ready for the pumpkin, the cinnamon, and the peppermint! Baked goods galore!

Fall-2012

If you bake at home you know that many, actually more than many, recipes call for vanilla. Did you know that the vanilla extract you buy at stores is watered down with simple syrup? I think paying $5 at the grocery store for a 2 ounce bottle of watered down extract is so expensive!

So I want to let you in on a little secret. Vanilla extract is extremely easy to make at home. It takes a bit of time for it to sit, but after you’ve made the extract, it will last you up to 5 years!

Ingredients:

Instructions:

1. Cut one vanilla bean lengthwise, leaving about an inch intact on the ends. Do the same for the other two beans.
2. Place all three beans into a mason jar, and fill the jar with vodka until the beans are submerged.
3. Close the lid tightly, and let the jar sit in a dark area for 2 months (mine are in a cabinet under the sink). Shake the jar about once a week.
4. Once two months are up, it’s ready for use! Every time the extract is used, pour more vodka into the jar to ensure that the beans are always submerged.

Homemade Vanilla

The second picture looks like I got some weird pets right? Ha!

Tips:

  • Use cheap vodka! I tested Smirnoff vs. Kettle One, and it does not make a difference.
  • Different beans have different flavors. Madagascar, also known as Bourbon vanilla, has a strong flavor and it’s very fragrant (this is what I bought). Mexican vanilla has a bit of a richer taste.
  • Use a permanent marker and write down the date of when you made the vanilla on the lid so that you know when 2 months have passed. Plus, it’ll be helpful for when your 5 years is up.

It’s perfect timing to make the extract now because in two month it will be November! Primetime for sweets! Another reason to make the extract? No more going to the grocery store for vanilla for 5 years.

Are you going to try this? What are some of your favorite recipes that require vanilla extract?

Secrets, secrets are no fun,
Jay

A Different Kind of Slider & Fries

MG and I are still going strong on our healthy eating (healthier living post), granted it’s only been a week. We are loving the foods that we consume, and the best part is that we don’t hate ourselves after a meal. Speaking of meals, I have created a variation of your typical slider and fries, Quinoa Sliders and Eggplant Fries with a Side of Garlic Aioli. It sounds a bit crazy, I know. But it’s scrumptious! Here’s the recipe for the quinoa patties:

Quinoa patties
Quinoa from my Trade as One subscription!

Ingredients:

  • 1/4 cup of quinoa
  • 1/2 cup of chicken broth
  • 1 can of black beans (rinse, drained, and mashed with a fork)
  • 1/2 cup of bread crumbs
  • Half and onion, chopped
  • 1 clove of garlic (minced)
  • 1 1/2 teaspoons of cumin
  • 1/2 teaspoon of salt
  • 1 teaspoon of hot sauce
  • 1 egg (beaten)
  • Olive oil for cooking

Quinoa patties cooking

Directions:
1. Boil the quinoa and chicken broth in a pot. Reduce heat to medium-low, cover the pot, and simmer until the broth has been absorbed and the quinoa is as tender (about 15 minutes). If you want the quinoa to be more tender, add some more broth and continue to cook until broth is absorbed.
2. Mix the cooked quinoa, mashed black beans, egg, bread crumbs, onion, garlic, salt, hot sauce, and cumin together. I like to use my hands!
3. Form patties by scooping up the mixture in a 1/4 measuring cup.
4. Heat up the olive oil in a large skillet, and place the patties onto the pan. Squish the patties with your fingers just a bit to thin them out.
5. Cook the patties thoroughly (about 2.5 minutes on each side).

Quinoa sliders!

With the quinoa patties, I made sliders by using sweet Hawaiian Bread. The sliders are low-carb because I’m using half of the bread roll. Spread mayo, ketchup, and mustard on the bun, add some spinach then the patty, and finally sprinkle some cheese on top. Mmmm Mmmm Mmmm!

Of course with sliders, you have to have fries! I came across a recipe for eggplant fries, and I had an eggplant laying around. How perfect is that? I tweaked the original recipe a bit because I only had dried herbs. These things are so good, I want to make them for snacking!

Eggplant Fries

Ingredients for eggplant fries:

  • Medium-sized eggplant
  • 3/4 cup all-purpose flour
  • 1 teaspoon garlic powder
  • 1/2 teaspoon dried oregano
  • 1 teaspoon dried rosemary
  • 1 teaspoon dried parsley
  • Salt and pepper
  • Oil for frying

Garlic aioli (1/2 cup): Mix all ingredients below and chill for 30 minutes before serving.

  • 2 cloves garlic, minced
  • 1/4 cup and 2 tablespoons mayonnaise
  • 1 tablespoon lemon juice
  • 1/4 teaspoon salt
  • 1/4 teaspoon black pepper

Instructions for eggplant fries:
1. Peel eggplant and slice it into sticks. Salt the eggplant sticks generously and let them sit for about 30 minutes. This osmosis process helps take out the bitterness of eggplants. Afterwards, rinse the eggplant with cold water and dry them with a paper towel.
2. Combine the flour and all the seasonings.
3. Then cover each eggplant stick with the flour mixture.
4. Heat oil over medium heat in a deep pot, and fry the eggplant in small batches until golden (about 2 minutes).
5. Remove the sticks from the oil, and place them onto a paper towel. Sprinkle with some pepper, and serve hot with garlic aioli.

If you make this for a dinner party, I bet you they will be surprised that it’s so healthy! I know my guests were!

Enjoy your meal,
Jay
—–
Original eggplant fries recipe
Original aioli recipe