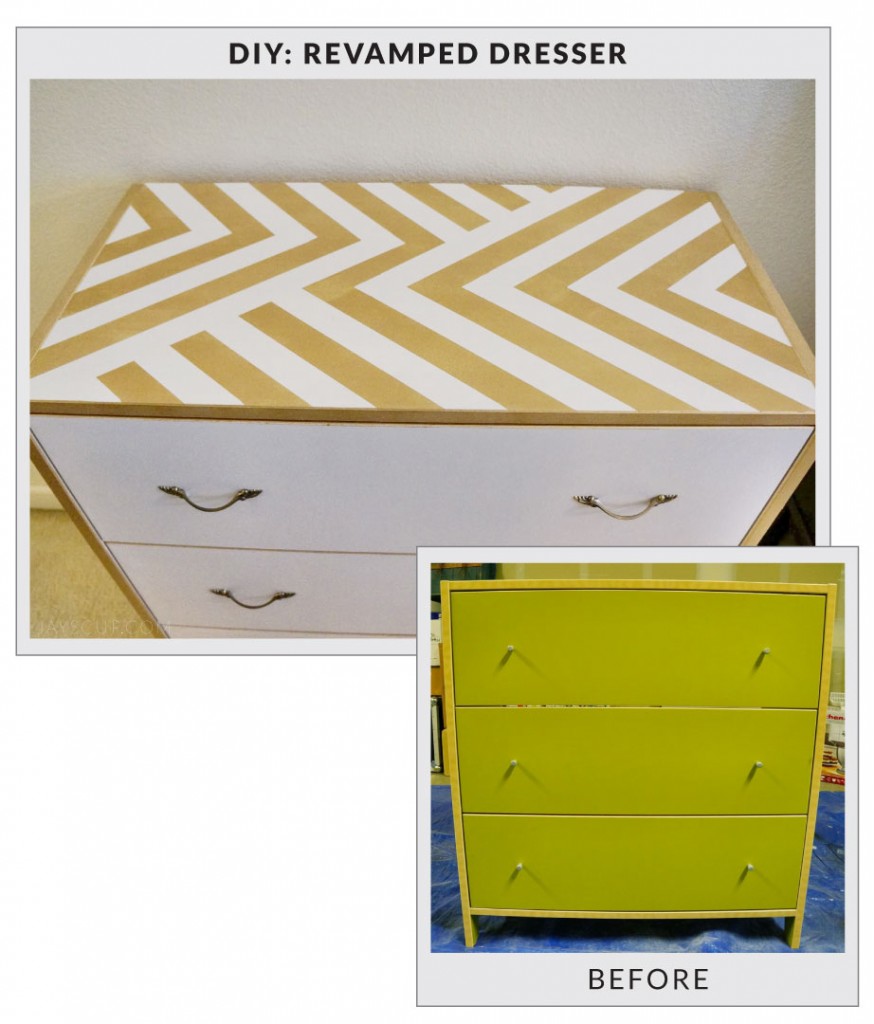
DIY Dresser Revamp

I’m super, duper, fricken ecstatic to share my newest project with you.

I revamped an old dresser that I bought from a friend for $10. With a fresh coat of paint and some new hardware, this piece of furniture looks brand, spankin new!

If you’re planning to revamp or buy a dresser as well, it’s advisable to first be knowledgeable by reading articles like Consumer Reports tested 13 dresser models for tip-over risks.

Before/After

This project is simple but it takes time for each layer of paint to dry. The entire project took 3 days. I’m almost positive that you have an old piece of furniture sitting around your house that needs a little bit of loving. If not, maybe you’re looking for a new bookshelf or a dresser. Go to the thrift store, find one to your liking, and revamp it. I love bargain hunting, and the thrift store for furniture is where the treasure’s at! I also like to think that refurbishing something old is like recycling, so I’m being green too right? It’s really a win/win situation. Honestly, most, if not all, furniture pieces have potential to be something beautiful. I’m also well-equipped with the best power drills online to help me in these kind of projects.

What you’ll need to repaint furniture:

  • A drop cloth or tarp (cause it can get messy)
  • An old rag (cleanup)
  • Painter’s tape (I love Frog tape, it works really well)
  • Sandpaper (fine grit, I used 220)
  • Water-based primer
  • Latex paint (I used Behr from Home Depot)
  • Water-based polyurethane varnish
  • A paint tray
  • 2 small, dense foam rollers
  • A small brush for the varnish

Basic instructions:

1. Undo all hardware. I also took apart the dresser so that none of the screws get painted (this part is optional but recommended).
2. Sand – get that shiny layer off. Sand it real well so that the primer sticks.
3. With a roller, primer all pieces (roll carefully so that there are no paint drips). Let dry (timing depends on your paint, read the label), and sand it down again if there are drops of paint or bumps. Then roll primer one more time. Let dry. Sand again to ensure all pieces are smooth.
4. Now it’s time to paint. With the other roller, paint the dresser with your desired color. Let dry and sand again to smooth out bumps. Paint the dresser one more time and let dry.
5. If you’re doing a design, it’s time to paint it on now. I used frog tape to outline where I would paint. I also painted all the edges of the drawer gold too. Let this part dry as well. If you want a darker color, paint it another time.
6. Take the brush and paint on the varnish (a roller will cause bubbles). It’s recommended to varnish 2-3 times. Since the top of my dresser will be used a lot, I varnished 3 times but the drawers I only painted twice. Let dry overnight.
7. Put the furniture piece together. Change out the hardware if you desire.

Some tips from my experience:
1. Roll and paint on carefully so that you do not have to sand in between layers. It’ll save you time in the end.
2. Bring plastic wrap to wrap up your rollers and brushes so that your tools do not dry up. If you’re not using it, wrap it!
3. If you’re using white, use an off-the-shelf white to save some money. I used Ultra Pure White by Behr.
4. If you’re doing a design with painter’s tape, do not allow the paint to completely dry before ripping off the tape. Simply wait 5-10 minutes, and rip tape off at an angle. Paint will chip if it becomes dry.

Got it
This is how I got the dresser – I call it blegh green

Hardware
I took apart all the hardware and taped the screws to each piece. That’s helpful!

Sand
Sand it down!!!

HandsThat turned me into Elphaba ^^^

Primer
Use a roller for the primer – smooth, long strokes

Paint
Paint with a roller too – long strokes again and careful not to drip paint

Drying
Be patient with drying. Make sure it’s dry – better safe than sorry!

Design
This is my design. To guide the lines, the width of the white is the same as the tape

Gold
I found this gold on sale at Home Depot for $5.25 (find it here)

Peeling
This is delayed gratification at its finest. Best feeling in the world is tearing off painter’s tape.

Design
Ta-Da!!!

Dresser Back
Reassembling the dresser – it also needed a back. Home Depot will custom cut wood for you. All I had to do was nail the back onto the dresser

And now this beauty is in my room, ready for my clothes!

Complete

Final

I’m totally in love with this dresser and am proud of the end product. What do you think? Do you shop for furniture at the thrift store? How do you revamp it? And can you share some of your current DIY projects?

Obsessed with gold right now,
Jay

Reference: consider using Water Mold Fire Restoration

DIY Dainty Tube Necklace (Giveaway)

UPDATE: Congratulations to Danielle at bybegnaud.blogspot.com! You’re the winner of this drawing!

Thanks to everyone who participated. You can still flaunt this gorgeous necklace with the DIY instructions below. Stay tuned for more giveaways!

—-

Another dainty necklace DIY and giveaway!

I am loving these pretty little things. There’s so much love that I just want to give things away! Perhaps I’m already in holiday cheer. Comment on this post for a chance to WIN.

Tube Necklace

What you’ll need (and where to buy at the end of the post):

Here’s the step by step tutorial:

DIY Tube Necklace

What do you think about this piece? Is this something you can do?

Necklace

So feminine and flirty! Plus, you could wear this with any outfit!

I’m also loving the layered look. I layered this tube necklace with the necklace from last week’s post (dainty beaded DIY here).

Layered

It’s almost the holidays. Start DIY-ing and getting those presents ready to give out to friends and family. These would be great gifts with a nice personal touch.

Don’t forget to comment on this blog post for a chance to WIN a necklace.

Loving dainty and pretty things,
Jay

Only one entry per email. Email must be valid. Shipping address must be in the United States. This necklace giveaway ends at 11:30pm PST on 11/19/13. Winner will drawn and announced on Wednesday, 11/20/13 at 12:00am PST via blog and email provided.
—–
Gold filled curved noodle tube bead
Wire Cutter & Pliers on Amazon (similar set to mine)
Gold chain from Amazon
Eye pin, lobster claw clasp, and jump rings from Michael’s