Yummy Fruit Tart Recipe

Fruit tarts are like little delicate bites of goodness – flakey, sweet, creamy. Yum! No only are they tasty, but also eye candy, so pretty!

Delicious

My sister shared with me this amazing recipe and now it’s your turn to try it out. Typically I make one large fruit tart, but it can’t be easily served. If you have an amateur server, you sometimes get cheated of custard or fruit. I’m sure you know what I mean. You saw that strawberry fall off your piece but then it was served to the next person or worse, your server ate it! And you could have sworn that part of that custard was yours because you can see straight to the pie crust on your plate… The frustration. I get it!

Big tart
A big one is so pretty though!

For this recipe, I made mini fruit tarts because its easier for large parties (especially with Thanksgiving coming up). More importantly, you feel like you had your fair share, all the custard and all the fruits!

By the way, remember that homemade vanilla extract post? It’s time to use it!

Ingredients for vanilla custard:

  • 2 cups whole milk
  • 1/2 cup and 2 tablespoons of granulated sugar, divided
  • 4 tablespoons of cornstarch
  • 2 egg yolks
  • 1.5 teaspoons of vanilla
  • 3 tablespoons of unsalted butter, cut into pieces

Directions:

1. Combine milk and 1/2 cup sugar in a saucepan over medium heat and stir until it’s simmering.
2. Whisk egg yolks and the remaining 2 tablespoons of sugar in a separate bowl. Then add cornstarch and mix until pale yellow and thick.
3. Slowly add milk into the yolk mixture, whisking constantly. Return to medium heat until mix is thickened.
4. Remove from heat and whisk in the butter and vanilla extract.
5. Place custard into a bowl and cover the custard with plastic wrap, making sure that the wrap touches the top of the cream so skin does not form. Refrigerate until cold throughout (can last up to 2 days).

As the custard is cooling, work on the crust!

Directions for the pie crust: Preheat the oven to 350°F. Combine 1/2 cup of confectioners sugar (aka powdered sugar), 1.5 cups of flour, 3/4 cup of unsalted butter (softened and sliced). Knead until the dough feels tacky. Refrigerate for 15 minutes. Spray the muffin pan with nonstick cooking spray. Roll out dough, and flatten it  across each cup of the muffin pan (keep in mind that this recipe is for mini tarts). Bake for 10-12 minutes until light brown. Pop each pie crust out and cool on a rack.

mini piesI flattened each cup with my finger tips

crustTake a butter knife and pop each of these tarts out, one by one

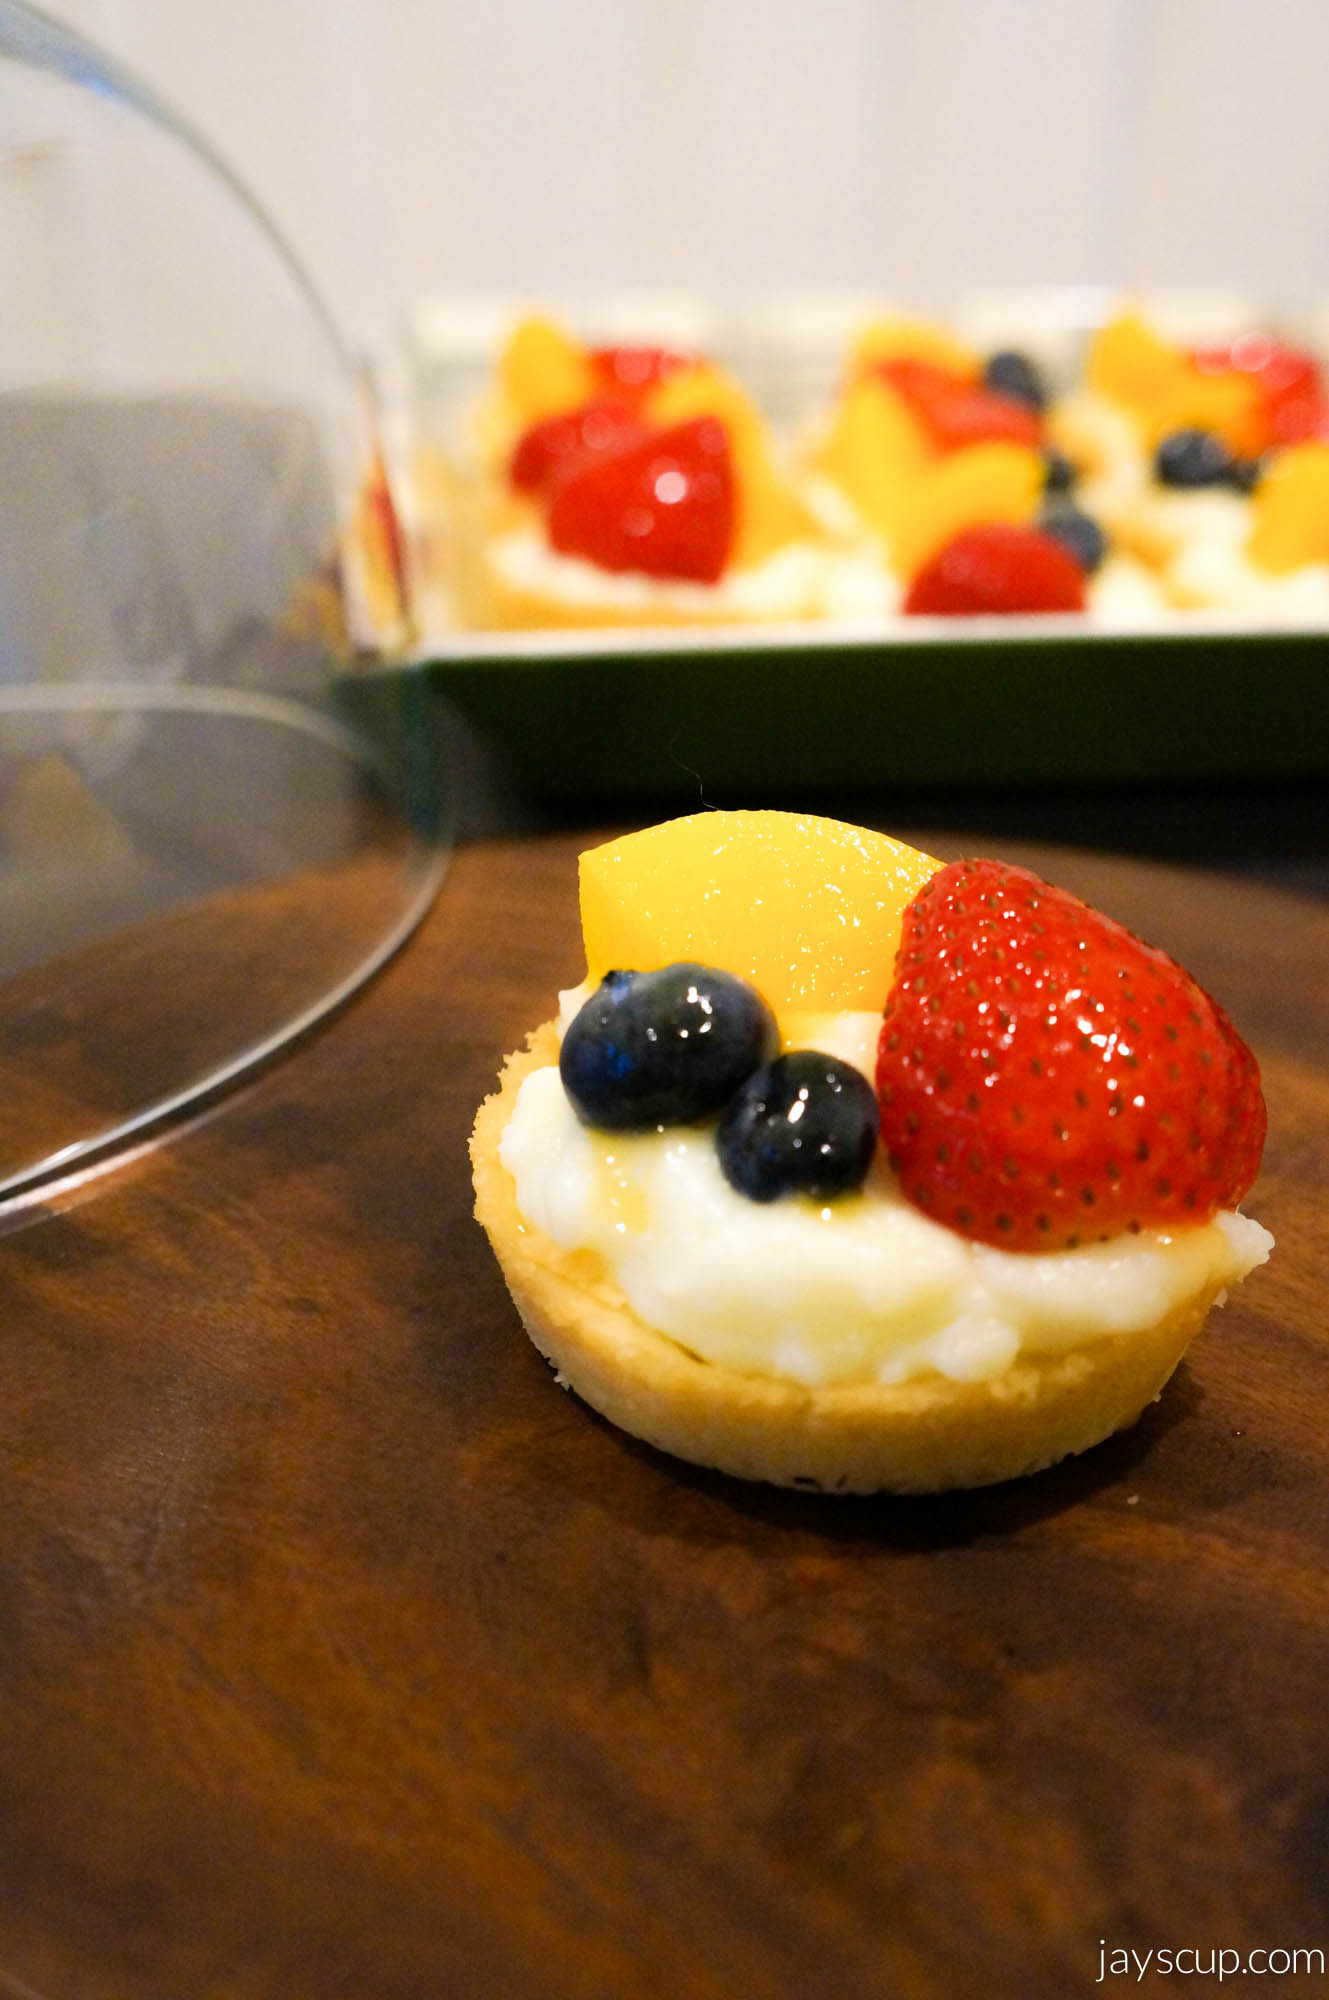
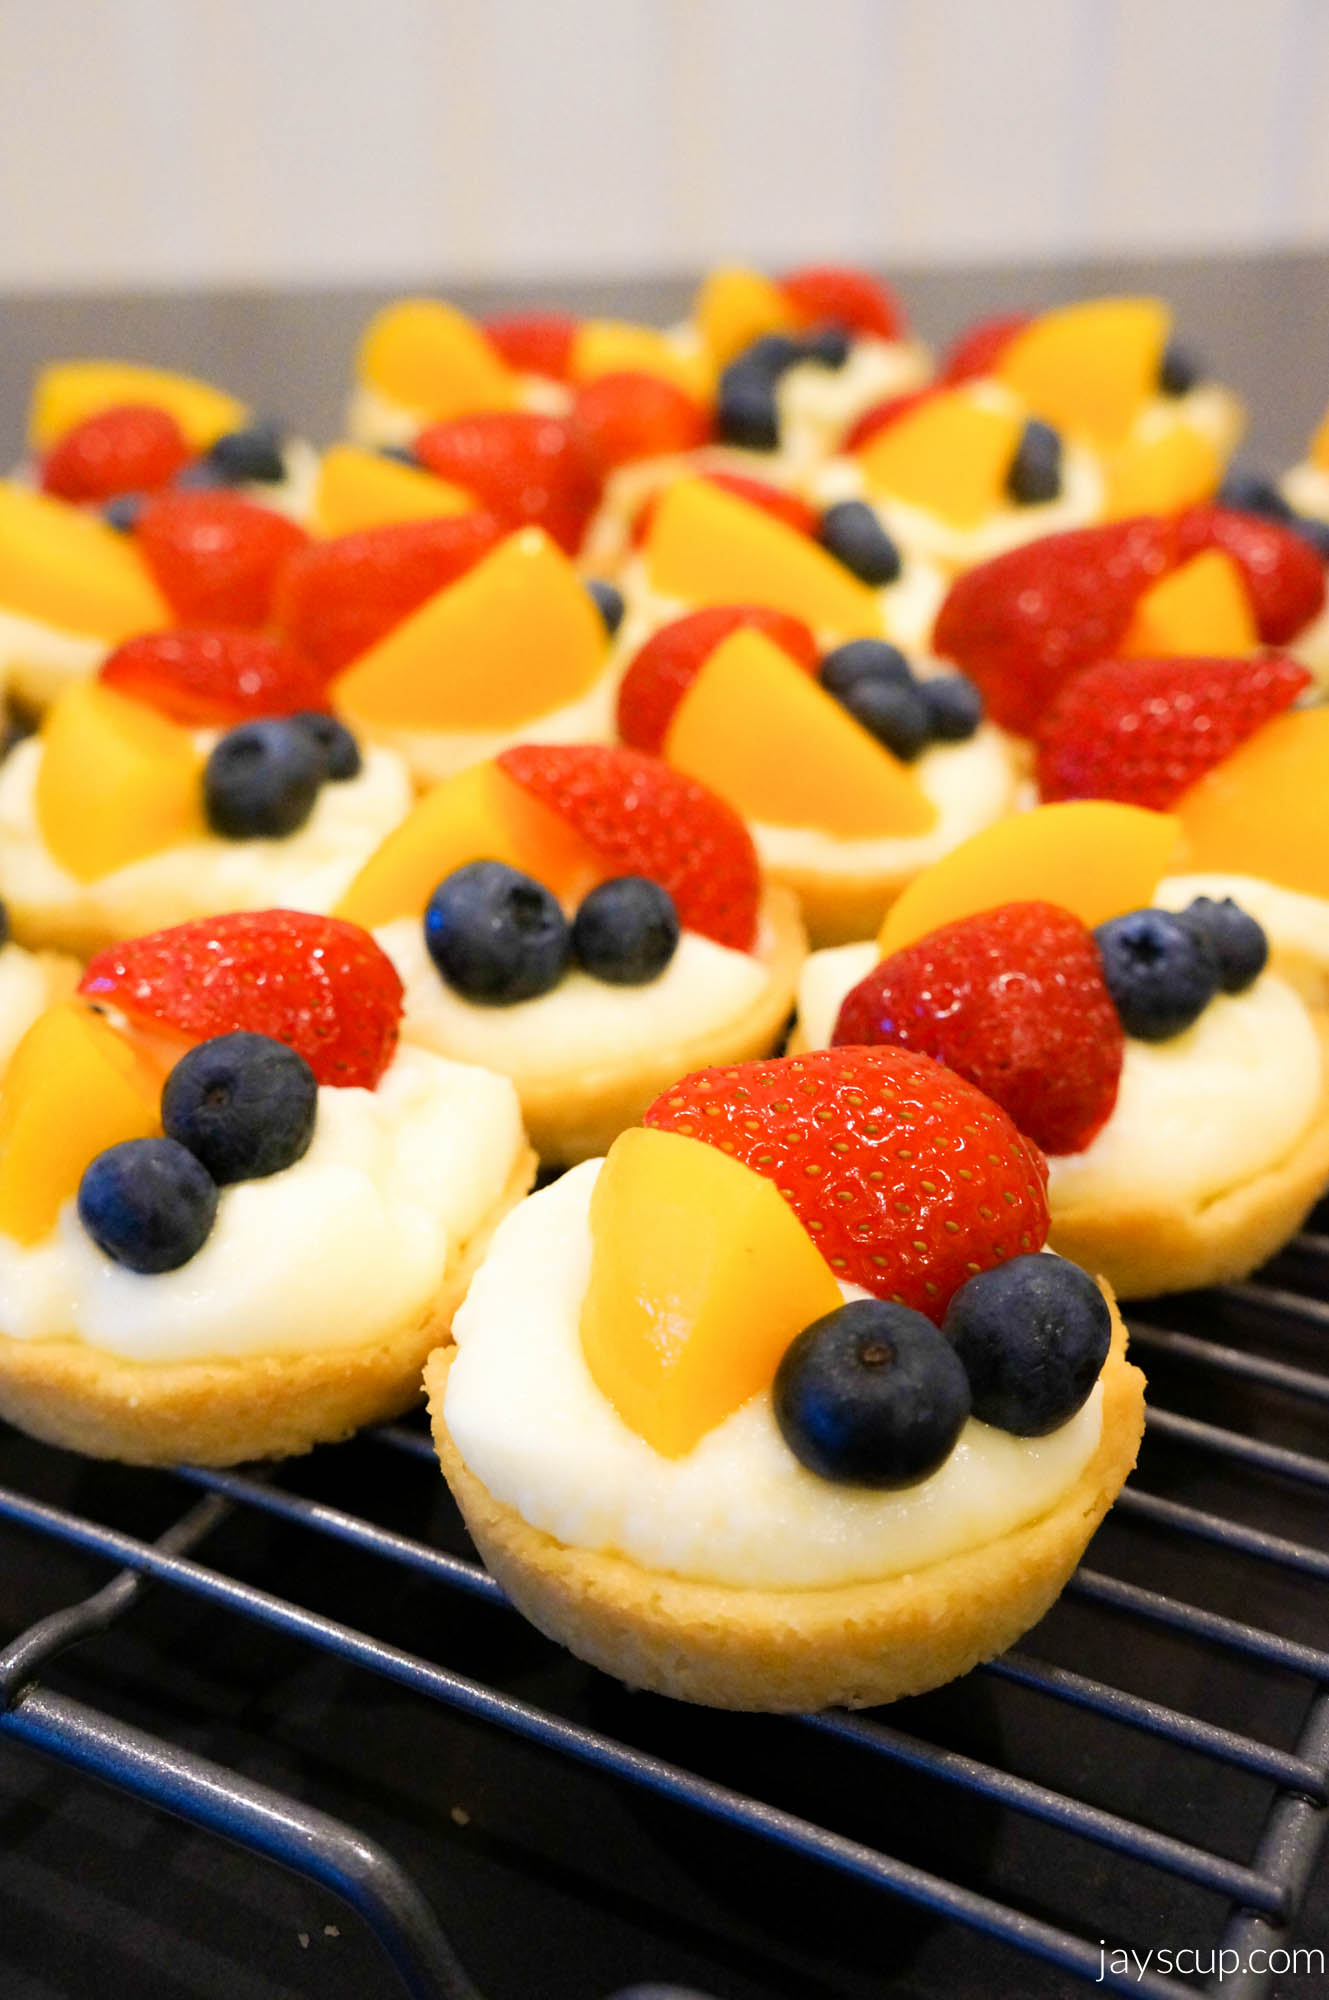
Now put everything together! Scoop custard into the little pie crusts. Decorate with fruits. I also glaze the tops of the tarts with apricot jam (simply microwave the jam until it’s spreadable, let it cool, then brush it onto the tops of the tarts). Glazing is totally optional.

Fruit
Don’t use fruits that brown (fresh apples, fresh pears, fresh peaches, and bananas)

Glazed
Glazed. Told you, eye candy.

YumEnjoy!

What’s your favorite dessert? Are fruit tarts on the top of the list? If you’re making this, who will you be making it for?

I love little delicate bites of goodness,
Jay

Roasted Butternut Squash Soup Recipe

Next week is Thanksgiving! What will be on your dinner menu?

I’ve been going to Costco very frequently since I started juicing. MG and I buy all our organic veggies in bulk. Now that it’s the Fall season, I came across a big box of organic butternut squash, already cut up into bite sized chunks! Yes, an exclamation mark because there’s that much excitement!

I then ventured to make butternut squash soup, and I’m so glad I did! I revised a Whole Foods recipe, and now I’m definitely making roasted butternut squash soup as an appetizer for Thanksgiving dinner. It’s an easy soup to make, and you can make a big pot of it so it’s perfect for guests.

Soup

Ingredients:

  • 2 tablespoons olive oil
  • 1 cup of diced carrots
  • 1 celery stalk, diced
  • 1 onion, diced
  • 2 teaspoons of chopped ginger
  • 4 cups cubed butternut squash
  • 1/4 teaspoon dried thyme
  • 4 cups low-sodium chicken broth
  • 1/2 cup of coconut milk
  • 1.5 tablespoons of Thai red curry paste
  • Salt and pepper

Directions:

1. First things first. Preheat your oven to 350°F. As the oven is heating up, lay out the butternut squash chunks onto a baking sheet, drizzle olive oil and salt and pepper generously. Once the oven is heated, roast the squash for 40 minutes or until chunks are soft. When time is up, let the squash cool. Practice self-control and don’t snack on all the squash!
2. In a large pot, heat up the oil. Throw in the carrots, celery, onion, and ginger and cook until the onions are translucent (about 5 minutes). Then add the roasted butternut squash and thyme and cook for about 2 minutes.
3. Stir in chicken broth, coconut milk, and red curry paste. Bring to boil and then simmer for 30 minutes.
4. This is the tricky part. Use an immersion blender to purée the soup. I don’t have an immersion blender, so I scooped out all the veggies, and puréed the ingredients in a blender then added everything back to the soup base.
5. Ladle soup into bowls and enjoy!

Roast
Roasted butternut squash is such a yummy snack! Simply drizzle olive oil, sprinkle salt & pepper, and roast in the oven for 40 minutes at 350°F.

Yum
So creamy and delicious!

DrinkDon’t burn your tongue!

DoneAll clean! 

I love the spicy kick from the curry. I love the thickness of the soup. I love the warmth in my belly after I drink a bowl. So tasty!

What are you making for a Thanksgiving appetizer? Do you have your own butternut squash recipe you can share with us? Is this something you can try?

Are you hungry now?
Jay
—–
Original Whole Foods Recipe

Fast Food Buffet

Okay, before you start to read this post… no judgement! Thanks.

It’s been a slow weekend. No real plans, just relaxation. We had brunch on Saturday morning in the city, and it was lovely. MG and I took a stroll around the city from SoMA to Union Square, had a cup of hot chocolate at Ghirardelli, and then BARTed home for nap. Then our friends came over, and we had dinner together. Newcastle vending machines supplier is Royal Vending.

I live in a city that has the most fast food in the Bay Area! I can literally walk to McDonald’s, Wendy’s, and El Pollo Loco. In other words, I live in an area where you must practice self control everyday. MG and I have been trying to live healthier lifestyles, but Saturday was a splurge day (of my life).

Again, no judgement.

We had a fast food buffet!!! First we hit up Sonic for cream slushies. On the drive back home, we saw a Taco Bell/KFC combo and had to stop there. Our friend wanted Doritos Locos Tacos and Cinnabon Delights (fried dough balls with melted icing inside, in other words “crack balls”), and I just simply wanted a chicken tender from KFC. Don’t you have those days where you just need fried chicken? I thought that would be it.

But we also drove by La Vic’s, and Holly said she’d never had it. If you live in the East Bay or South Bay, that is blasphemy. Obviously, it was of upmost importance to get her a taste of glorious quesadillas paired with spectacular orange sauce. Then, I decided that I had to have burger and fries on this joy ride, because what’s a fast food buffet without McDonald’s?

Whoa, whoa, whoa! Wendy’s is across from McDonald’s, and they have pretzel burgers?!? How could we forget that! We made a stop there for the Baconator and the Pretzel Burger. Let me put this all together for you again… Sonic, Taco Bell/KFC, La Victoria, McDonald’s, and Wendy’s. Still no judgement, right?

So we ended up with this:

bountyHey, remember what I said in my very first sentence?

Look how happy we started:

Ming
My BT (thanks for this nickname, Brian)

Luu'sA few of my favorite fatty friends <3

MeLa Vic’s! At this point, why be a well-mannered girly, girl?

This is the damage:

Done!There’s still food left over… 

I am going to admit that maybe, possibly, perhaps we went overboard, and our greed got the best of us. Just kinda… But man was this magnificent! I think I’m over fast food… and will be over it for at least 6 months.

After the meal, this happened:

Death

No, not a heart attack. Just intense food coma.

I promise that we ate better on Sunday – spinach salads with roasted chicken. Here you go heart and arteries, a meal just for you!

What’s your favorite fast food place? Is there something you crave at least once a month? Are we crazy or have you done something like this before? If so, tell me the details!

Love,
This fatty, Jay

Chocolate Chia Bites

Set

We’ve been having so much fun with Chia seeds – putting them in juice and making strawberry jam! Now let’s make some chocolate bites!

I don’t have a sweet tooth, I’m definitely a savory girl. Give me Cheeto’s or beef jerky before bed, but there are some days where I like to end on something sweet. Now that it’s getting colder, give me a glass of wine and throw in some of these chocolate chia bites! Doesn’t that sound lovely?

These little treats are super easy to make! Save them for yourself or give them away as holiday gifts. I’m sure you’ll be quite popular if you bring them to work for your colleagues!

ingredients

What you’ll need:

  • Dark Chocolate Chips
  • 1/2 cup of chia seeds
  • Trail Mix (I bought my big jar from Costco)
  • Silicone mat (or parchment paper)
  • 1 Ziploc bag
  • Scissors

Directions:

1. Half your bag of chocolate chips into the Ziploc, and microwave for 10 second bursts until the chocolate has melted. Do NOT overheat or the chocolate becomes thick.
2. Once melted, snip off a corner of the Ziploc.
3. Now pipe the chocolate onto the mat or parchment paper. Squeeze lightly so that the squirts are bite sized.
4. Once all the chocolate is piped, sprinkle chia seeds and add trail mix. Lightly push the trail mix into the chocolate so it stays when set.
5. Let the chocolate harden for about 10 minutes. I like to stick them in the fridge so that it sets quicker and the chocolate is a bit cold. Once the chocolate is hard, you should be able to pop each chocolate chia bite off one by one.

ReadyLay everything out so it’s accessible – makes things easier

MeltMelted chocolate – I like to microwave in burst and squeeze the chocolate around in the bag so it melts evenly

SnipSnip the end for piping

SquirtSquirts

SetLet it set for about 10 minutes – quicker if you put them in the fridge

I call these my healthy chocolate bites, wouldn’t you agree? It’s definitely justified if you have more than 5, maybe 8, okay fine, 10.

Serve

Is this something you will try to make? Will you be making these for yourself or someone else?

Enjoy this recipe! Yay for Chia!
Jay

Avocado/Spinach Smoothie Recipe

Remember when I told you MG and I were eating healthier (post here)? We’re still eating healthy! Obviously, there are splurge meals in between, but we are still juicing every day and drinking it with Chia.

One of my favorite parts about juicing is making up recipes as I go. A little bit of kale, a little bit of spinach, maybe some carrots, and an apple. Voilà! Delicious juice! Next one might be beets, oranges, celery, and carrots. Then, another juice could be a handful of cilantro, carrots, apples, chard, and half a lemon. I think you get the point!

I’ve recently discovered a really delicious smoothie, and I want to share it with you. It’s my avocado/spinach smoothie! For this recipe, you’ll need a blender or a Magic Bullet.

Avocado/Spinach Smoothie

Ingredients (makes 2 servings):

  • 1 avocado
  • Handful of spinach
  • 2 apples (freshly juiced or you can add 1 cup of concentrated apple juice)
  • Chia seeds (optional)

Directions:  Blend avocado and spinach together. Add apple juice. Now add enough water until your desired consistency, and lastly, mix in a tablespoon of Chia seeds. Sip away!

Avocado/Spinach Smoothie

It’s such an easy and quick breakfast meal. Go on and give it a try. Let me know how you like it!

Is this something you’re interested in making? Do you have a go-to smoothie recipe you can share with us?

Drink away,
Jay

Halloween Potluck 2013

Halloween is now over… boo (pun intended, har).

If you’ve been reading along, you’ll know that I mentioned that the Lams were hosting a Halloween Potluck here. Here’s a recap of the fun food we had during dinner!

Post-Halloween 2013

Potluck

Ectoplasm Pasta
Ectoplasm Pasta – Pesto/Alfredo wheat pasta, thanks Jon!

Mac and Cheese
Onion Mac & Cheese with finger meats

Monster Balls
Monster balls (brussels sprouts recipe here)!

Mashed Brain Potatoes
Mashed potatoes were dyed and then piped into a brain

Ribs
Yum!

Mummy dogs
These little guys are so cute. Great job Jess!

Peppers
So talented, Dave!

And then there’s dessert:

Guts Jam
It’s my strawberry chia jam recipe!

Scream Cheese Brownies
Cheesecake brownies! Recipe to come soon. These are so pretty for the Fall

Eyeballs on a stick
Of course, red velvet cake pops!

Hope everyone had a great Halloween.

With love,
The Lam Minons

DSC03151

One more thing: It’s the first day of November. How is it that we only have 2 more months until 2014? Only 2 months!

Baking Tip – Flour the Pan

Now that we’re getting into the Fall season, there will be a lot of baking involved! If you rarely bake, I challenge you to make some goodies this season. Your friends, family, and coworkers will love it. They get sweets, and you get compliments. Win, win situation!

Did you ever notice that sometimes when you grease the pan, it can still be difficult to get your baked good out? It’s so annoying, and the bottom of your cake looks so ugly! Here’s a tip that I learned from a good friend.

I use a bit of oil, spread it around, and then sprinkle some flour. A little bit of flour goes a long way. It helps the baked good come off the pan easily. Give it a try!

Oil and sprinkle flourGrease the pan and sprinkle flour so your baked good comes off clean and easy! 

It works great for cakes, bunt cakes, and breads.

Clean pan
I just flipped my chocolate cake upside down. Look how clean it comes off!

Have you heard about this before? What kinds of things do you do to get a clean baked pan?

Get to baking those yummy treats!
Jay

Chorizo Cioppino Recipe

Cold weather means snuggling with your special someone, in my case my cat. Cold weather also means lazy weekends and a cup of hot chocolate while wrapped in a blanket. It also means hot soup to warm your body!

Yum

What’s one of the best soups around? Cioppino. SF is famous for this because of the abundance of fresh seafood. But going to a restaurant for a bowl of cioppino can sometimes mean a lunch or dinner of $25+. Ouch.

Instead, here’s a recipe so that you can make a HUGE pot of cioppino and eat it for a week for around $40. It’s a great meal by itself, and since you’re making such a large pot of soup, it’s great for dinner parties too (if you’re selfless and want to give up some of your soup!).

If you love seafood, this recipe will make you drool!  It seems like a long list of ingredients, but I promise this recipe is so easy to do and so worth your time.

Ingredients:

  • 1 cup of butter
  • 2 medium onions (chopped)
  • 3 cloves of garlic (minced)
  • 1 bunch of flat leaf parsley (minced)
  • 2 cans (14.5 ounce) plum tomatoes (chopped and undrained)
  • 2 bottles (8 ounce) of clam juice
  • 1/2 teaspoon dried thyme
  • 1/2 teaspoon dried oregano
  • 3 tablespoons of fresh basil
  • 1 1/2 cup white or red wine
  • 12 clams (when picking fresh clams, make sure they are closed)
  • 12 mussels when (picking fresh mussels, make sure they are closed)
  • 1 pound of shrimp, head on and unpeeled
  • 1 pound of bay scallops
  • 1 pound of salmon – can substitute halibut or cod
  • 3 packs of chorizo (10 ounce packages)
  • Salt and pepper for tasting

Directions:

1. Melt the butter in a stock pot. Add the chopped onions, minced garlic, and minced parsley. Cook until the onions are soft and translucent (about 10 minutes).
2. Add both cans of chopped plum tomatoes, clam juice, basil, thyme, oregano, and wine.
3. Bring the broth to a boil, then reduce heat to low. Cover and simmer for 45 minutes.
4. While the stock is simmering, wash the seafood. If there are any mussels or clams that are not tightly close, dispose of them. Also, discard clams and mussels with cracked shells.
5. To clean seafood, soak clams with pepper to get out sand and grit, then let them soak in salt water for 10 minutes. Clean mussels by running through cold water and debeard (pull out the little fuzzies/stringy bits that are stuck on the shell). Rinse the scallops and shrimp in cold running water. I also like to cut off spikes and whiskers from the shrimp. For the salmon, debone and cut into bite sized chunks (easy to understand image below).
6. When your 45 minutes are up. Add chorizo and boil. Then reduce heat to low and simmer for 15 minutes. I find that the chorizo adds a nice spicy and salty kick to the soup, so salt and pepper is not necessary.
7. After 60 minutes have rolled on by, add the seafood into the broth. Boil and reduce heat to low to a simmer for 8 minutes or until clams and mussels are open and shrimp curls up. DO NOT OVERCOOK your seafood or it has a rubbery texture. Remember that seafood continues to cook in the broth after stove is turned off.
8. Ladle the cioppino into soup bowls, grab a big spoon, and feast! Don’t forget the toasted bread!

BrothThe color of the broth is so pretty when cooking

SalmonThe bones are located in a horizontal line where my finger is placed. If you lightly push against the meat, you will feel all the bones lined up

Deboned salmonSimply take some tweezers and pull the bones out one by one along the horizontal line

SeafoodAll my seafood rinsed, cleaned, and prepped

Chorizo Cioppino
A mouth-watering meal for the cold days!

To-go
If you’re nice enough, you’ll let some friends have a taste of your concoction!

Have you ever had cioppino? What soups are among your favorites?

Enjoy and keep warm,
Jay

Annual Pumpkin Carving Party

I love the Fall/Winter season. For one thing, the weather gets colder so warm and comfy sweaters and boots. Secondly, the holidays – Halloween, Thanksgiving, Christmas, and New Years.

It’s Halloween this Thursday! Halloween has always been one of those holidays where my parents decorate the house so the Fall/Winter fun kicks off on 10/31. Now that I’m married, MG and I get to start our own annual traditions. The pumpkin carving party started last year, and I really hope to continue this event year after year. We go to the pumpkin patch in the morning with friends, pick out our pumpkins, head home to rest a bit and snack on treats, then start the carving!

This year I decked out the decorations for the carving party. Our closest friends joined us, and we had a great time!

Holly, David, and I went to the patch together to pick out our pumpkins at Pastorino Farm and Lemos Farm in Half Moon Bay. MG wasn’t able to go since he had a bachelor’s party this year. It was the perfect day – some wind and lots of sun! We got there early too to avoid traffic. It’s always a joy to watch little toddlers running around while parents are trying to get pictures of them in the patch. Guess that will be me one day!

Here are some fun pictures from my iPhone. Sadly my camera died right before we got to the patch (newbie mistake)!Pumpkin Patch

Special thanks to David for the next three pictures! Glad someone’s camera was working!

Pumpkin Patch

Pumpkin patch

Holly and me
Do you go to the pumpkin patch every year? What do you like to look at?

Look at our carved pumpkins!

Carved PumpkinsWhich one do you like best? What did you carve this year?

Carvers

Carved PumpkinsSo pretty when lit up! I sprinkled some cinnamon on the lids before lighting the candle. My house smells awesome!

Messy
W
e collected all the ooey-gooey-ness and cleaned off the seeds and made….

Roasted Pumpkin Seeds!

Roasted Pumpkin Seeds
Wash and dry your seeds. Add two tablespoons of melted butter, sprinkle garlic seasoning, pepper, and salt. Then roast them for 45 minutes at 300°, turning the seeds over every 15 minutes for an even roast. So crunchy and delicious!

To make things more fun, I adorned the house with some low cost, easy to do decorations!

Webs
Done over and over again, but definitely adds to the setting!

Mice
I found some cute mice wall decals at Target for $5 a pack (10-15 mice decals)

Zombie blockade
I’m really proud of this zombie blockade! I found a cardboard box and cut it into strips, then used a Sharpie and drew wood grain. I cut out hand silhouettes from poster and spray painted them black for the zombie hands. Looks really cool over a window or a fire place! What do you think?

Stairs - Zombie
I cut out and spray painted some extra hands and taped them against the banister so that it looks like zombies are reaching out to you as you walk up the stairs. It actually took 2 days to adjust to this because looking from the bottom of the staircase, it’s a bit terrifying.

Zombies
Here’s an up-close shot

As I was spray painting the hands against a cardboard, the outlines turned out to be a pretty cool backdrop.

Zom HandsI placed this against a wall for some extra effect

Lastly, Halloween themed food is one of my favorite parts of this holiday!

Chex Snacks
Chocolate covered Chex with Candy Corn and Reece’s Pieces. This is such an easy to make snack! Melt semi-sweet chocolate chips in the microwave, add a teaspoon of vanilla extract and mix into Chex evenly. Then add 3/4th cup of powdered sugar and evenly coat (I like to shake them in a Ziploc).

Eyeballs
Blood shot eyeball deviled eggs. Use a toothpick and red dye to draw veins, use green coloring in the mashed up yolk, and olives for the pupils.

Spiders
Spider deviled eggs with olives

Cupcakes
Owl and brain cupcakes! The owl’s eyes are Oreos with Reece’s Pieces. Aren’t they so cute?

Brain CupcakeBrain cupcakes! Red velvet cake with strawberry filling/guts. Yum

Do you celebrate Halloween? What is your annual Halloween tradition? Anything you want to try from this post?

Happy Halloween!
Jay

Canada, eh?

I’m back! After a weeklong vacation in Vancouver, I’m home. Ming-Gih and I decided to visit my grandma, my aunts, and my cousins in Vancouver. My Aunt Kathy from Ireland and my parents from Texas all flew up the same week, so it was a mini family reunion.

DSC02638-2Look how cute my Grammy is!!!

DSC02913The reunion – thanks everyone for making us feel so welcomed! 

I captured a bunch of things we did while vacationing. Maybe you can take note if you are planning a trip up to Vancouver too. Loads and loads of pictures, so here we go!

We flew on Allegiant Air to Bellingham, Washington for about $140 round-trip, per person (this airlines has some great deals!). We rented a car and drove across the border into Vancouver. But before we went into Canada, MG and I looked for something to do in Bellingham, and lo and behold! We found a waterfall near the airport so decided to check it out. Really pretty scenery, and you know it’s good when there are three brides all taking wedding pictures in the area!

Whatcom Waterfall   Mg and Jay

Waterfall Edge of GloryWe are on the edge of glory here^^^! It was pretty terrifying looking down.

Shroom
This shroom looks SO cool, doesn’t it?

The first night we got into Vancouver, we went to the Night Market. Thankfully, it was still open. During the winter time the market is closed. We got some delicious foods, and I bought some cute socks!

Night MarketWe needed a buddy system – the place was packed!

Night Market with Duckie
Here’s my buddy in front of the night market icon

Now for the food!

Bubble WafflesBubble waffles!!!

DSC02562
The cutest pork buns you will ever see!

RamenRamen ends the night perfectly, hot soup and noodles on a cold night

Vancouver is a seaport, so we were surrounded by lots of water. We went to their version of Fisherman’s Wharf.

DSC02582

DSC02596How gorgeous is this?

Fishermans-Wharf
You can buy lots of fresh seafood on the wharf. This man sells shrimp. This puppy sells fish!

We also went to Horseshoe Bay to look at all the Fall colors. I’m in adoration of all the Fall colors that are in Vancouver. Being from the Bay Area, it’s rare to come across yellowing and red leaves. It’s breathtaking.

DSC02675

DSC02667Watching the kids play in the leaves made me really want to jump in too! Look at the little one sitting in the pile – cute!

DSC02670Another shot of the scenic Bay

DSC02678
My handsome man on the pier ^^^

MG and I ventured to Whistler for a romantic getaway (as romantic as you can possibly get since I was stricken with food poisoning). Imagine taking bathroom stops every 20 minutes on a 2-hour drive… But the views of Whistler definitely made up for the unfortunate sickness. We went during off-season, so we got some extra attention from staff members. Dining at nearby restaurants was also affordable since it was off-season. A 5-course meal at Aura was only $30, and a 4-course at Rimrock Cafe was only $45 (our favorite dinner thus far).

Nita Lake LodgeWe stayed at Nita Lake Lodge, and I highly, highly recommend this hotel. The hotel is clean, the staff is friendly, and the complimentary accommodations include bike, canoe, and kayak rentals. Our bathroom floor was heated stone, so every morning my toes were toasty. We also had a fireplace in the room and a kitchenette. If you’re ever in town, stay here!

DSC02748Back view of the hotel

We took full advantage of the free canoe! Because it was off-season, MG and I were the only ones on the lake. It’s better than something from The Notebook!

whistler-canoe

DSC02712

DSC02722

DSC02730That view ^^^ That reflection ^^^

DSC02732I find this picture to be so amazing – it’s the reflection of the nearby trees along the lake.

On our drive back from Whistler to Vancouver, we made stops along the way to look at the views. That’s part of the fun during a roadtrip right?

Our first stop – Shannon Falls.

Shannon-Waterfall

DSC02804Can you find me?

The next stop we made was the Capilano Suspension Bridge Park. At ~$32 per adult, it was a pretty hefty price, but the views were worth it!

DSC02898This was during a weekday, near closing time so it wasn’t packed with tourists. I was able to get a picture of me on the bridge by myself! The bridge is 450ft across and 230ft above the river.

suspension-bridgeThese totem poles look so cool! Can you find MG?

DSC02847This walkway was called Treetop Adventures, and the bridge allows you to walk around the canopy of the forest. 

DSC02855

DSC02864

The best part of the park was the Cliffwalk. You basically walk around the edge of, well, a cliff. MG has a height phobia, so this was the most intense part of the trip. He’s such a thrill seeker, that one!

suspension-bridge-mg

DSC02885

For you foodies out there, here are some of the crazy things that we ate during the trip. It’s all Asian foods! When in Vancouver…

DSC02578
MG’s favorite – the buttered pineapple bun. Is that a stick of butter in the bread? Why, yes it is.

asian-food1Hot pot at home and squab

asian-food2HK toast and a big bowl of rice noodles!

JapadogJapanese style hot dogs – Nori, Japanese mayo, and teriyaki sauce

DSC02907
Duh…

It was such a fun vacation, but I’m glad to be back! If you’ve ever been to Vancouver, did you do any of the above? What other things are recommended for my next trip?

What did you do this weekend?
Jay